BobART
tab, right-click
BobART
tab, right-click  Emboss Model, and click Sculpting.
 Sculpting modifies an embossed model in three different ways. You can deposit or remove material which can then be smoothed. These operations are performed using a brush with adjustable parameters.
To create a Sculpting feature:
BobART
tab, right-click
Emboss Model, and click Sculpting.
The Sculpting parameters display in the
 Data Entry tab.
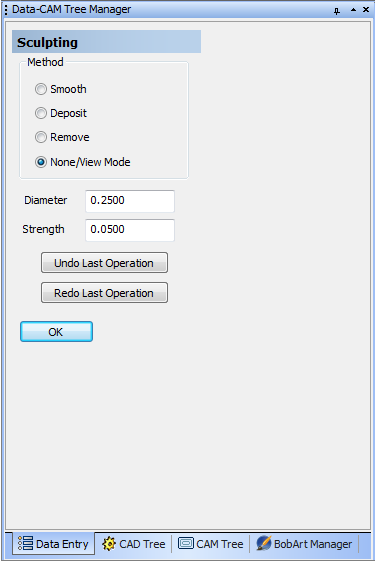
View the Sculpting Data Entry tab
Method
Smooth - blends different areas of a model to create a smoother appearance using the brush.
Deposit - adds material to a model using the Strength and Diameter settings of the brush.
Remove - subtracts material from a model using the Strength and Diameter settings of the brush.
None/View Mode - disables the sculpting brush to return to the normal view mode, allowing other actions to be performed in the graphics area.
NOTE: There are two ways to perform sculpting. This first way is a single click: the brush deposits or removes the amount of material specified in the Strength box, by the area specified in the Diameter box with each click. The second way is the drag method in which you click and hold the left mouse button while moving the mouse over the area being sculpted.
Brush Options
Diameter - controls the size of the brush.
Strength - controls the strength of the brush for the Method used.
You can also control the brush options using shortcut keys as follows:
Hold down Shift and scroll the middle mouse button up, to increase the Diameter, and down to decrease the Diameter. You can also use the Left- and Right-Arrow keys to increase or decrease the Diameter.
Hold down Ctrl and scroll the middle mouse button up, to increase the Strength, and down to decrease the Strength. You can also use the Up- and Down-Arrow keys to increase or decrease the Strength.
Editing Options
Undo Last Operation - removes the last sculpting operation performed.
Redo Last Operation - reapplies or brings back the last sculpting operation performed.
OK - accepts any changes and closes the dialog box. (The first time you click OK, the feature is created and added to the BobART tree.)
Cancel - cancels the creation of the feature (the first time that the dialog box displays). When editing the feature, this cancels any changes and closes the dialog box.
After defining the parameters, you use the Emboss Features in the BobART Tree to finish creating, or edit, the feature.
When you finish defining the feature parameters and click OK, the feature is added to the BobART tree. You right-click each feature item to access a shortcut menu.
The Feature Shortcut Menus
 Sculpting
Right-click this item to access the following commands.
Edit - opens the Data Entry tab for you to modify the feature parameters.
Delete - removes the feature from the tree. Regenerate to view the change in the model.
Suppress/Unsuppress - is used to remove the feature from the model or to restore a suppressed feature. To update the model, Regenerate.
After all necessary selections are made, you must regenerate to create the model.
To Regenerate the Model:
Emboss Model, and click Regenerate.TIP: Every time a change is made to an Emboss feature, you must Regenerate to update the model.