In the  BobART
tab, right-click
BobART
tab, right-click  Emboss Model, and click Emboss From Image.
This feature is used to import an image and create an emboss feature based on the grayscale values of the imported image and the Z-depth or maximum user specified height. Although any image can be used, results may vary. This means that an image is usually prepared to be used for the Emboss from Image feature. The proper type of image to use depends on the desired result. For example, height-map images, in which black represents the minimum height and white represents the maximum height, create reliable results. This is shown in the How to Create an Emboss from Image tutorial.
To create an Emboss from Image feature:
In the BobART
tab, right-click
Emboss Model, and click Emboss From Image.
In the Open dialog box, select a file type, then select an image file, and click Open.
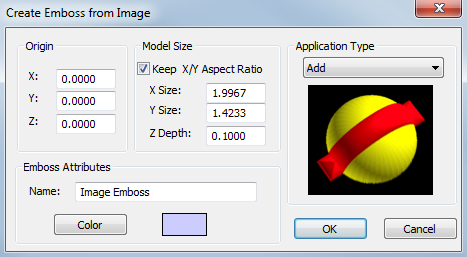
The Create Emboss From Image dialog box displays.
View the Create Emboss From Image dialog box
Origin
The Origin group sets the image location using the XYZ coordinate values. The origin is at the lower-left corner of the image.
Model Size
 Select the check box to lock the aspect
ratio of the imported file. Making a change in the X Size automatically
calculates the Y Size.
Select the check box to lock the aspect
ratio of the imported file. Making a change in the X Size automatically
calculates the Y Size.
 Clear the check box to adjust the size of the imported file
using the X- and Y-Size boxes independently.
Clear the check box to adjust the size of the imported file
using the X- and Y-Size boxes independently.
Emboss Attributes
Name - indicates the feature name that displays in the BobART tree. By default, it is automatically named by the feature type and number. Note that you cannot use the hyphen (-) character with spaces around it, as this is reserved for the automatic naming and will be removed. You can however use it without spaces, for example, Emboss-Body).
Color - opens the Color dialog box. Select the desired color for the feature, and click OK. (The default color is set using the Solids color of the Settings Part/Settings Default dialog box.)
Application Type
Application Type - indicates what kind of embossing is performed: Add, Subtract, Merge High, or Merge Low. For more information, view the Application Types help topic.
OK - accepts any changes and closes the dialog box. (The first time you click OK, the feature is created and added to the BobART tree.)
Cancel - cancels the creation of the feature (the first time that the dialog box displays). When editing the feature, this cancels any changes and closes the dialog box.
After defining the parameters, you use the Emboss Features in the BobART Tree to finish creating, or edit, the feature.
When you finish defining the feature parameters and click OK, the feature is added to the BobART tree. You right-click each feature item in the tree to access a shortcut menu.
The Feature Shortcut Menus
 Image Emboss
Right-click this item to access the following commands.
Edit - opens the Feature dialog box for you to modify the feature parameters.
Delete - removes the feature from the tree. Regenerate to view the change in the model.
Suppress/Unsuppress - is used to remove the feature from the model or to restore a suppressed feature. To update the model, Regenerate.
 Image
Image
Right-click this item to access the following commands.
Re/Load Image - displays the Open dialog box for you to select a file type, select an image file, and click Open. The image is used to create the feature. Regenerate to view the change in the model.
Edit Image Using Paint - select this option to open the image for editing in the Paint program. When you are done editing, save the changes and exit the program. Regenerate to view the change in the model.
After all necessary selections are made, you must regenerate to create the model.
To Regenerate the Model:
Emboss Model, and click Regenerate.TIP: Every time a change is made to an Emboss feature, you must Regenerate to update the model.