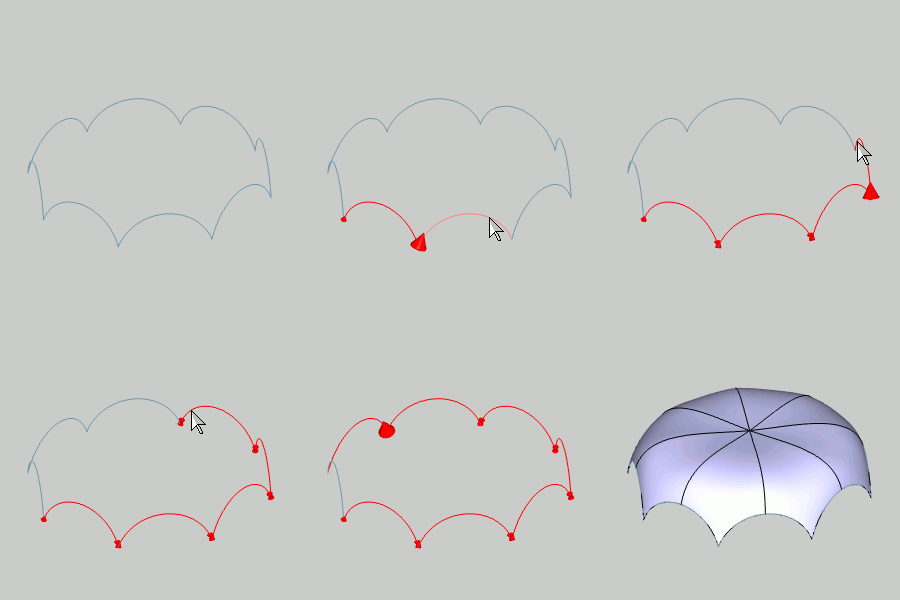
 Multisided Patch
 Multisided Patch
The Multisided Patch function is used to create a 3-dimensional surface from a closed chain that consists of 3 or more edge curves. To perform the function, you chain select each geometry curve one at a time in a consecutive order. After the chain direction of all edge curves is defined, you confirm the selection to create the surface.

To open Multisided Patch, do one of the following:
 icon.
icon.
The parameters display in the ![]() Data Entry tab of the Data-CAM Tree Manager.
Data Entry tab of the Data-CAM Tree Manager.
 Preview - Select the check box
to enable the CAD preview, which displays the result that will be
created when you click OK. The Preview is generated automatically
once enough chains are added to the Selected Geometry list to create
a surface.
  Preview - Clear the check box
to turn off the CAD preview. The geometry is created when you confirm
the selections.
The Selected Geometry list, shows all entities
chosen for the creation of a Multisided Patch.
![]() (Move
Up) - moves the selected entity up one level.
(Move
Up) - moves the selected entity up one level.
![]() (Move
Down) - moves the selected entity down one level.
(Move
Down) - moves the selected entity down one level.
![]() (Delete)
- removes the selected entity from the Selected Geometry list.
(Delete)
- removes the selected entity from the Selected Geometry list.
![]() (Reverse
Direction)- reverses the direction of the highlighted item
in the Selected Geometry List.
(Reverse
Direction)- reverses the direction of the highlighted item
in the Selected Geometry List.
![]() (Delete
All)- removes all entities from the Selected Geometry list.
(Delete
All)- removes all entities from the Selected Geometry list.
When creating a Multisided Patch, you complete one chain selection for each side of the surface. Each chain can be one or more entities. The selection order determines the results, and the chains should all share the same general direction, such as clockwise.
1 Open the function.
2 Click near the end of the first chain entity to set the start of the chain.
Hold Shift and click near the end of the last entity to set the end of the chain.
3 Chain select, as explained in step 2, the second chain using the same direction as the first chain.
4 Repeat
this process until all sides of the surface are selected and using the
same direction.
5 To
create the surface, in the Data Entry Manager, click OK.
The feature is added to the CAD Tree.
You can repeat this process for any other surfaces.
6 To close the function, click Cancel.