 Note
Note
Introduction
This topic will explain the Note function, and the options found in it. This topic will also give brief description of the Snap Increment function, will describe where to find the Note function, provide an explanation on snap increment function, quick steps and an example on how to use Note, and provide links to related topics.
The Note Function
Notes are used to create text that is placed in the graphics area along with a leader, or multiple leaders, ending in a terminator for the purpose of drawing attention to something in the drawing. To perform the function, you define the parameters, click to place the terminator(s), and then adjust the position of the leaders/text in the graphics area.
Snap Increment
This function support the use of the snap increment when selecting the location of the entities. The snap increment allows you to get precise results when using mouse selection and helps to reduce data entry modifications.
To learn more, view Snap Increment.
Navigation
To open Note:
-
In the Annotation group, of the Evaluate tab, click
 Note.
Note.
The parameters display in the Data Entry Manager.
The Data Entry Parameters
Font
- Font - Select a font type: Windows Font or BobCAD Font.
- Font List - Click the arrow to select the font from the list.
- Text box - Type the text that is placed in the graphics area.
Selection
The Selection group determines the amount of leaders for the note. If the Single Leader is used, selecting a snap point in the graphics area will set the terminator location. Once the terminator location is set you will automatically be able to drag the note into place. If Multiple Leaders are used, the first snap point selection will place the leader and the text in an arbitrary location. Once all terminator location points have been selected, click the text to then drag it into the desired position. Additional termination points can be added prior to finalizing the note.
![]() Single Leader - allows you to
select a single position for a leader terminator.
Single Leader - allows you to
select a single position for a leader terminator.
Selected Geometry
|
|
|
| The list box will list the entity currently selected for the function. | |
![]() Multiple Leaders - allows you
to select multiple positions for leader terminators.
Multiple Leaders - allows you
to select multiple positions for leader terminators.
Selected Geometry
|
|
|
| The list box will list the entities currently selected for the function. | |
 (Delete All)
- removes all entities from the list.
(Delete All)
- removes all entities from the list.
 Parameters
- Height - sets the maximum height of the text.
- Ratio - for BobCAD fonts only, this sets the X:Y size ratio of the text.
Arrow
- None - When selected, no arrows will be used on the leaders.
- Width - sets how far the arrows travel up the leader.
- Height - sets how
far the arrows extend from the leader.
- OK - finalizes previews when one is shown.
- Cancel - Closes the function without finalizing the preview if one is currently shown.
Quick Steps - Note
- Enter the text.
- In the Selection group, select between Single, or Multiple Leaders.
- Select the point(s) to notate in the graphics area.
The text preview appears. - If the text, text size, font, or arrows need to be adjusted, move your mouse into the Data Entry Manager and adjust the parameters.
- Move your mouse back into the graphics area and click to place the note.
The note is created. - Repeat as necessary.
- Click Cancel to exit the function.
Example: Single Leader
Notes are used to create text that is placed in the graphics area along with a leader, or multiple leaders, ending in a terminator for the purpose of pointing something out in the drawing.
-
To start the function, in the Annotation group, of the Evaluate tab, click Note.
The Parameters load in the Data Entry Manager. - Move your mouse over the point we would like our note to point to.
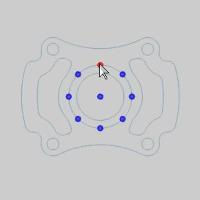
The snap points appear. - Click the snap point.
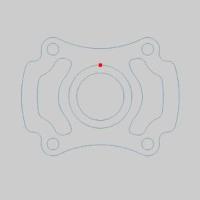
- Move to the Data Entry Manager, and click in Text box at the top of the dialog.
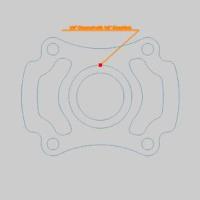
- Type: 1/4" Channel with 1/8" Chamfers.
You may notice a leader is generated, and text being created on the leader as you type.
Now to place the text. - Without clicking in the graphics area, move your mouse back to the part and test various positions to see where we intend to place the note.
In this case we notice the text is not as visible as we would like it to be. -
Move back to the Data Entry Manager, and adjust the Height in the Parameters group to 0.5000, and press Enter.
-
Move back into the graphics area, and click to place the Note.
The Note is created.
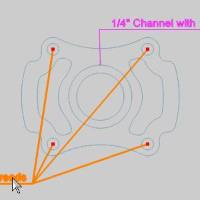
Example: Multiple Leaders
-
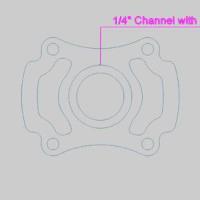
In the Data Entry Manager, click in the text box, and type: 1/4"-20 Threads.
-
In the Selection group of the Data Entry Manager, select Multiple Leaders.
-
In the graphics area, hover over the intended entity to see the available snap points, and click the desired point.

In this example, we use the center point of the corner arcs.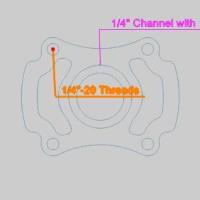
When the first point is selected, the text is placed in an arbitrary location in the graphics area. You can adjust its location and then add more leaders, or add more leaders and then alter its location. We will do the latter. - Add the rest of the points that are to have leaders attached.
At any point in selecting the desired points, if a point is selected by mistake, simply highlight it in the Select Geometry list and click or press Delete on your keyboard.
With all the points selected, we move the text and leaders into position. - Hover over the text so that it highlights.

- Click the text to select it.
-
Move the text into position.
- Click again to place the text.
With the text in place, clicking other points in the graphics area will add leaders, altering text, or values in the Note dialog will update the preview. - In the Arrow group of the Note dialog, update the Width, and Height values 0.5000.
The preview updates.
- Click OK to finalize the Note.

That concludes this tutorial.