The Milling Tool Holder Library
Introduction
This topic will explain the Milling Tool Holder Library, explain where to access it, explain the options found in it, and provide the links to related topics.
The Milling Tool Holder Library
The Milling Tool Holder Library is used to create and modify tool holders and arbors. Each category on the left specifies a tool holder type, and each arbor that belongs in that category is shown on the right. The holders/arbors can be associated with a tool for simulation purposes.
Important: When using the Milling Tool Holder Library dialog box, any changes that are made affect the currently selected item. Be sure that you have the desired item selected before changing any values.
|
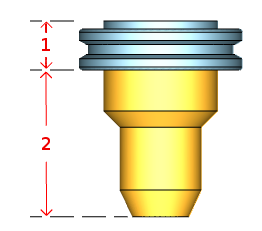
The Tool Holder Parts |
|
|
Tool Holder (1)
Tool Arbor (2) |
|
Navigation
To access the Milling Tool Holder Library, do one of the following:
- In the CAM
Tree, right-click
 CAM Defaults,
and click Milling ToolHolders.
CAM Defaults,
and click Milling ToolHolders.
This method is used only to create/modify holders and arbors. - Right-click on the
 icon in the CAM Tree and select Mill
Tool Holders.
icon in the CAM Tree and select Mill
Tool Holders.
This method is the same as launching through the CAM Defaults and is used only to create/modify holders and arbors. - You can click Assign ToolHolder in any Milling Wizard
Tool Page.
This method is used to assign a tool holder/arbor to the tool for the current operation. - When adding or modifying a tool from the Tool Library, in the Create/Modify
Tool dialog box, click Assign
Tool Holder.
This method is used to associate a tool holder/arbor to the selected tool, as the default holder for the tool.
The Dialog Box Parameters
On the left side of the dialog box is the Tool Holder Category list. Each category listed has default tool holders/arbors that have already been created for you. Select a category to show the available tool arbors, for that category, in the Arbor list on the right side of the dialog box. The Arbor list displays the arbor Description. Depending on the current selection, you can modify a Tool Holder or Arbor in one of the following ways:
Arbors
- Add
Arbor - opens the Tool
Holder Definition dialog box to create an arbor in
the selected Tool Holder category.
- Delete
Arbor - removes the selected arbor.
- Edit
Arbor - opens the Tool Holder Definition dialog box to
edit the selected arbor.
Holders
- Add
Holder - opens the Tool Holder Definition dialog box to
create a Tool Holder.
- Delete
Holder - removes the entire Tool Holder category.
Warning: When
deleting a tool holder from the Tool Holder category list, the entire
category and all arbors within
that category are deleted.
- Edit
Holder - opens the Tool Holder Definition dialog box to
edit the selected tool holder. Make the desired changes, and click
OK to finish.
Related Topics
The Tool Holder Definition Dialog Box
How to Create Milling Tool Holders