How to Create Turning Stock
Introduction
There are two stock types to use when defining stock in the Lathe Stock Wizard. When defining a standard cylindrical stock geometry, you use the Cylindrical type. In order to define a custom stock shape, you use the Revolved type.
Method 1) How to Create Cylindrical Stock
-
In the CAM tree, right-click
 Stock and click Stock
Wizard. (When creating a new CAM Job, you can click Stock Wizard
in the Machining Job dialog box.)
Stock and click Stock
Wizard. (When creating a new CAM Job, you can click Stock Wizard
in the Machining Job dialog box.)
The Stock Wizard displays in the Data Entry Manager.
The first time the Stock Wizard is opened in any job, the Workpiece dialog box displays. You can assign workpiece geometry for simulation, or for this example, just click .
. -
In the Stock Definition page, Cylindrical stock is selected by default in the Stock Type section.
In the Size section, enter:
Stock Diameter - 3.50
Internal Diameter - 0.75
Length - 6.00
Stock Origin (Z) - 0.00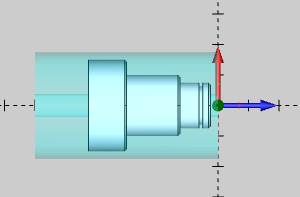
Note: In the example shown, the stock face is at Z0 and does not need to be modified. The Stock Origin (Z) will allow you to alter the location of the stock in relation to the machine setup.
-
After setting the stock size and origin, click
. -
In the Machine Setup page, set the Clearance values for rapid movements in the job.
-
Click OK to close the dialog box and start creating machining features.
Method 2) How to Create Custom Stock Geometry
In the event that a custom stock is needed, you can draw 2D geometry that is revolved around the X-axis of the WCS to create the stock. The Lathe machining Z-axis is automatically aligned to the X-axis of the WCS used to draw the geometry.
-
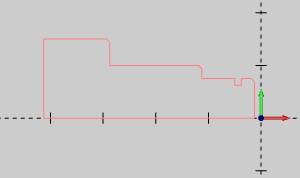
To create custom stock from the part shown in method one, the geometry is drawn as shown next.
-
In the CAM tree, right-click
Stock and click Stock
Wizard. (When creating a new CAM Job, you can click Stock Wizard
in the Machining Job dialog box.)
The Stock Wizard displays in the Data Entry Manager.
The first time the Stock Wizard is opened in any job, the Workpiece dialog box displays. You can assign workpiece geometry for simulation, or for this example, just click. -
In the Stock Definition page, select Revolve stock.
The Selected Geometry list appears in the Size section. -
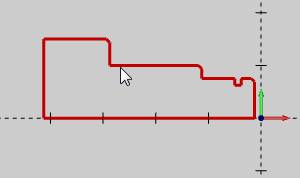
Press and hold Shift, and click the custom profile to select the entire chain.
-
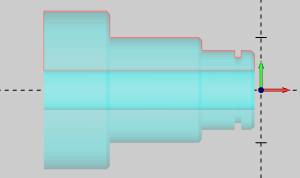
To confirm the selection, click Calculate Stock.
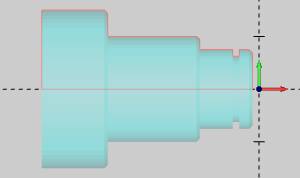
The custom stock geometry is created. The software automatically sets the stock parameters based on the revolved geometry.
Tip: In order
to define the same custom stock with an internal diameter, draw the geometry
as shown next, and apply the same process as explained previously.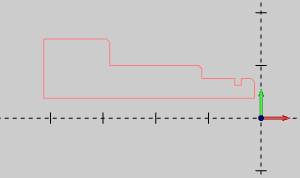
-
If needed, after selecting geometry, you can type values in the Stock Definition dialog box to modify the parameters of the selected stock.
Click. -
In the Machine Setup page, set the Clearance values for rapid movements in the job.
Click OK to close the dialog box and start creating machining features.