


 Point On Entity
Introduction
This topic will explain the Point On Entities function, and the optionsfound in it.This topic will also describe where to find the function,provide quick steps and an example on how to use it, and provide links to related topics.
The Point On Entities Function
The Point On Entities function is used to create points on other wireframeentities in the graphics area using either a percentage of the entity,a distance on the entity, or an angle position on an arc.
Navigation
To open Point on Entity:
-
In the Entity groupof the Create 2D ribbon, click the down arrow under
 Point, and select
  Point on Entity.
The parameters display in the Data Entry Manager.
Note: Whether you click the main icon, or the down arrow to get to the other options, you will have access to the same options in the Data Entry Manager.
The Data Entry Parameters
For the following three options, click thename of the method that you want to use, and then type the value usedfor the selected method.When using the Percentage and Distance options,the result will vary based on the side of the entity you select.
- Percentage - typeapercentageof the distance along the selected entity at which the point is placed.
-
Distance- sets the distance from the start of an entity to where the pointis placed.
-
Angle- for use with arcs only; sets the angle from the zero degree location(3 o'clock position) of the selected arc at which the point is placed.The point is placed along the radius of the arc, meaning it may notactually be on the arc.For example, if you create an arc with a StartAngle of 90.00 and an End Angle of 180.00, and then use On Entitywith an Angle of 45.00 degrees, the point is not placed on the arc.
-
OK - has no use with this function.
- Cancel - Closesthe function.
Quick Steps - Point On Entity
- To perform the function, select either:
- Percentage
- Distance
- Angle (arcs only)
- Set the value.
- Move to the appropriate geometry in the graphicsarea and over the end of the geometry to view the preview.
The entered value is based on the side the entity is selected from. - When the preview is correct, click the entityto create the final point.
- Continue this process to create the neededpoints.
- To close the function, click Cancel.
Examples
Percentage Example
For use with this example, open a new file and sketch a linein the graphics area.
- In the Entity groupof the Create 2D ribbon, click the down arrow underPoint, and select Point on Entity.
The Point On Entity parameters display in theData Entry Manager. - The Percentageoption is selected by default.
- Next to Percentage, double-click in the boxto select the text, and type 75.00.
Important: The Percentageoption creates a point as a percentage of the length of an entity.Whatis most important here is that the start of the entity is determined bythe side of the entity that you click and not the direction in which theentity was drawn.This can be seen in the CAD preview as shown next.(Forcircles, but not arcs, the start is always the same regardless of whereyou click it.)
- In the graphics area, point to the left side of the line sothat it displays in the Highlight color.

Notice that the CAD preview displays the point on the right side ofthe line. - While pointing at the line, slowly move the pointer to the right.
Notice that once you cross the middle of the line, the CAD previewof the point switches to the opposite side of the entity.
- To create the point, click the line.

Tip: The PointOn Entity function can also be used to create points on an entity as anextension of that entity.An example of this is shown next to clarify.
- Change the Percentagevalue to 150.00, and clickthe left side of the line.


You can repeat this process for as many points as needed using lines,arcs, or splines. - To end the function, click Cancel.
Distance Example
The Distance option uses the same procedure as the Percentage option.You can apply the same steps as the Percentage Example to use the Distancemethod.The only difference is that you select Distance and type a valueas the distance from the start of the entity.
Angle Example
The Angle option is designed for use with arcs only.For use with thisexample, open a new file and sketch one arc (that is a full circle) andanother with a Start Angle of 90.00 degrees and an End Angle of 180.00degrees.
- In the Entity groupof the Create 2D ribbon, click the down arrow underPoint, and select Point on Entity.
The Point On Entity parameters display in theData Entry Manager. - In the Data Entry Manager, click Angle.
Use the default value of 45.00degrees.
Note: The Anglevalue can be either positive or negative.
- In the graphics area, point to the circle so that it displaysin the Highlight color.
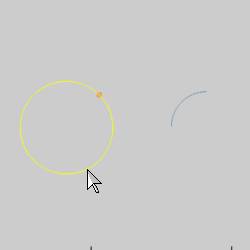
Notice that the CAD preview displays the point where it will be createdwhen you click the circle. - To create the point as shown in the CAD preview, click the circle.

Important: The Anglevalue is always in reference to the zero degree location (3 o'clock position)of any arc regardless of its start and end values.This is shown next.
- Click the arc, and notice the location of the point.
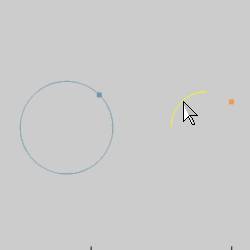

- In the Data Entry Manager, change the Anglevalue to 270.00.
- Click both entities to create two more points.

You can repeat this process for as many point as needed. - To end the function, click Cancel.
This concludes the example.