Creating Knowledge Base Templates
Introduction
This topic will explain the Knowledge Base, describe how to access it, and provide an example of how to create Knowledge Base Templates.
Knowledge Base Templates
The Knowledge Base allows you to determine, in advance of a job, how to handle the 4 types of supported hole features Bob
- Hole
- Counterbore Hole
- Tapped Hole
- Counterbore Tapped Hole
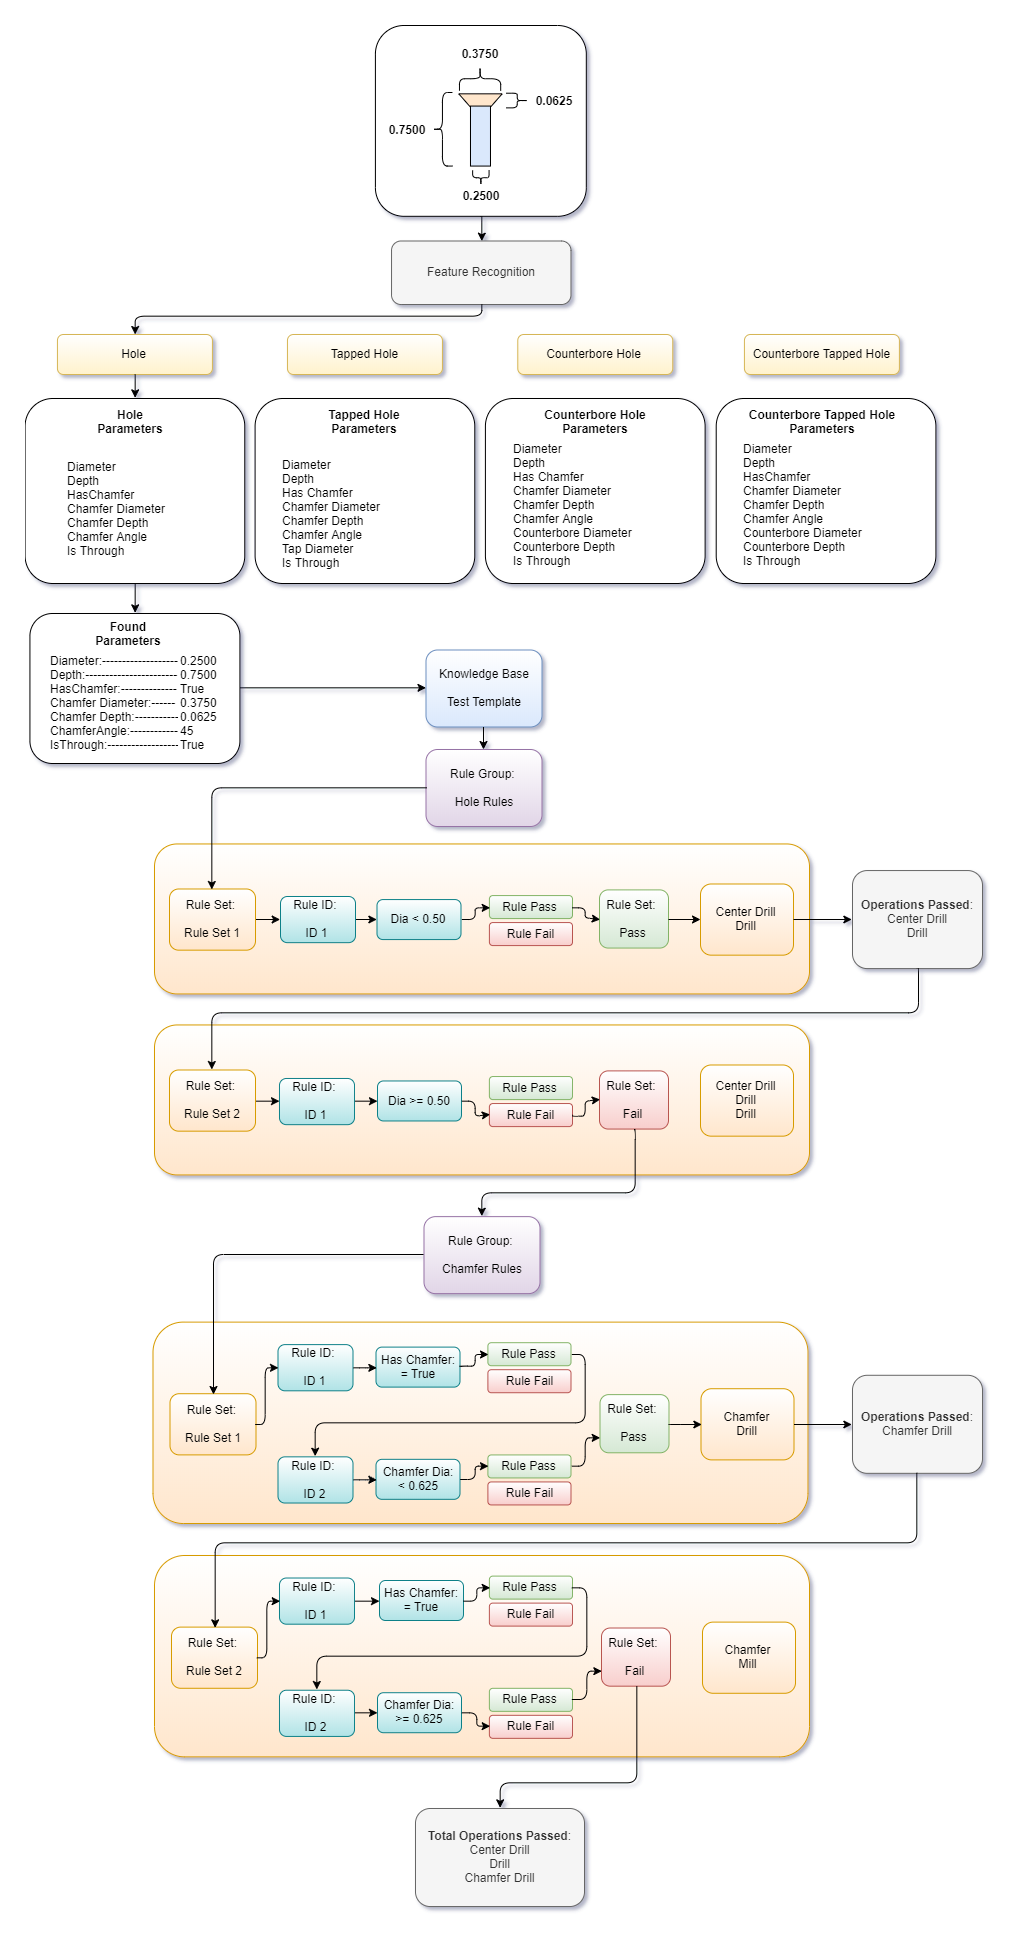
The Knowledge Base contains templates comprised of various rules that you will define to determine which operations and parameters to apply to any geometry identified as one of these feature types. When a particular hole type is identified, the rules are then referenced in order to build the features and operations based on your specifications.
Navigation
To access the Knowledge Base:
- In the
 Knowledge Base.
- Right-click CAM Defaults in the CAM Tree and select Knowledge Base.
Creating a Template
Part 1) Create a new template
- In the Quick Access Menu of the Rule Templates section, click
 (Create new template) to create a new template.
A new template is added to the list. - Right-click the new template and select Rename.
The name becomes editable. - Enter Test Template for the name of the new template.
Press Enter, or click elsewhere, to set the name.
Part 2) Create Rule Groups for the Hole Feature Type
Note: With our holes we need an additional drill operation when the diameter is 0.5 inches or over, and when a chamfer is present we will use a chamfer drill unless the diameter is larger than 0.625. Because of this, we will end up with two rule groups. One for the diameter rules, and another for the chamfer rules.
- In the new template, select the Hole Feature Type and click
 (Create new rule group) twice to create two new rule groups for it.
Two new rule groups, Rule Group 1 and Rule Group 2, are added to the list. - Right-click the Rule Group 1 and select Rename.
The name becomes editable. - Type Diameter Rules for the first rule group.
Press Enter, or clicking elsewhere, to set the name. - Right-click the Rule Group 2 and select Rename.
The name becomes editable. - Type Chamfer Rules for the second rule group.
Press Enter, or clicking elsewhere, to set the name.
Part 3) Create additional Rule Sets
Note: By default, creating a rule group also creates a rule set. Each rule set determines how the rule is met, and what happens if it is. Since the diameters and chamfer sizes will be cut in one of two ways, each of these rule groups will need two rule sets.
- In the Diameter Rules rules group, click
 (Create new rule set) to create a new rule set.
Another rule set, Rule Set 2, is added to the rule group. - In the Chamfer Rules rules group, click (Create new rule set) to create a new rule set.
Another rule set, Rule Set 2, is added to the rule group.
Part 4) Create the Rules
With our rule groups, and rule sets, created for the Diameter and Chamfer, we must now determine the rules (if this occurs), and define what results if the rules pass (then do this).
Diameter Rules: Defining Rules for Rule Set 1
Step 1) Determine the "if"
- In Rule Set 1, of the Diameter Rules rules group, click
 (Create a new rule) to create a rule.
a new rule, ID 1, is created. - By default, the Parameter is set to Diameter. In this case, that is the desired result.
- Set the Condition to <.
- Set Value1 to 0.5.
Note: This determines that, "if the value of the diameter is less than 0.5 inches ......". Now we must determine the second portion.
Step 2) Determine the "then"
- Select the Operation Lists check box, and select Hole.
- Hover over the Hole drop down list.
A tool tip appears showing the current operations: Center Drill, Drill.
Note: This will add the operations from the Hole machining strategy to the overall machining strategy if the rule is met.
Diameter Rules: Defining Rules for Rule Set 2
Step 1) Determine the "if"
- In Rule Set 2, of the Diameter Rules rules group, click (Create a new rule) to create a rule.
A new rule, ID 1, is created. - By default, the Parameter is set to Diameter.
In this case, that is the desired result. - Set the Condition to >=.
- Set Value1 to 0.5.
Note: This determines that, "if the value of the diameter is greater than, or equal to 0.5 inches ......". Now we must determine the second portion.
Step 2) Determine the "then"
- Select the Operation Lists check box, and click the ellipses button next to the drop down list.
The Strategy Manager dialog appears. Notice the Operations in Strategy group in the middle contains a single Center Drill operation. - Highlight Drill in the Available Operations group and click the left arrow to add the Drill operation to the Operations in Strategy list.
A Drill operation is added to the Operations in Strategy list. - Click the left arrow again to add another Drill operation to the Operations in Strategy list.
A Drill operation is added to the Operations in Strategy list.
Note: This will add the operations from the Hole machining strategy to the overall machining strategy if the rule is met.
Chamfer Rules: Defining Rules for Rule Set 1
Step 1) Determine the "if"
- In Rule Set 1, of the Chamfer Rules rules group, click (Create a new rule) twice to create two rules.
Two new rules, ID 1 and 2, are created. - For rule ID 1:
- Set the Parameter is set to Has Chamfer.
- Set the Condition to =.
- Set Value1 to True.
- Set the Parameter is set to Has Chamfer.
Note: This determines that, "if there is a chamfer......", but we need to determine the other rule.
- For rule ID 2:
- Set the Parameter is set to Chamfer Diameter.
- Set the Condition to <.
- Set Value1 to 0.625.
- Set the Parameter is set to Chamfer Diameter.
Note: This determines that, "if the chamfer is less than 0.625 inches......". Now we must determine the second portion.
Step 2) Determine the "then"
- Select the Operation Lists check box, and select Chamfer Drill.
- Hover over the Chamfer Drill drop down list.
A tool tip appears showing the current operations: Chamfer Drill.
Chamfer Rules: Defining Rules for Rule Set 2
Step 1) Determine the "if"
- In Rule Set 2, of the Chamfer Rules rules group, click (Create a new rule) twice to create two rules.
Two new rules, ID 1 and 2, are created. - For rule ID 1:
- Set the Parameter is set to Has Chamfer.
- Set the Condition to =.
- Set Value1 to True.
- Set the Parameter is set to Has Chamfer.
Note: This determines that, "if there is a chamfer......", but we need to determine the other rule.
- For rule ID 2:
- Set the Parameter is set to Chamfer Diameter.
- Set the Condition to >=.
- Set Value1 to 0.625.
- Set the Parameter is set to Chamfer Diameter.
Note: This determines that, "if the chamfer is greater than, or equal to, 0.625 inches......". Now we must determine the second portion.
Step 2) Determine the "then"
- Select the Operation Lists check box, and select Chamfer Mill.
- Hover over the Chamfer Mill drop down list.
A tool tip appears showing the current operations: Chamfer Mill.
Since we have created the Diameter Rules first, one of its two rule sets will pass and add the operations from one of the rule sets to the Machining Strategy:
- Rule Set 1:
- Center Drill
- Drill
- Rule Set 2:
- Center Drill
- Drill
- Drill
If a chamfer is detected, the one of the Chamfer Rules rules sets will pass and add its operation to the Machining Strategy:
- Rule Set 1:
- Chamfer Drill
- Chamfer Drill
- Rule Set 2:
- Chamfer Mill