


The Layers
Introduction
This topic will explain what layers are, what the layer manager is, where to find it, and explain the functionality of layers and the Layer Manager.
Layers
The Layers are what CAD geometry is created on. The default CAD layer is always visible in the Layers Manager. While the original CAD layer, cannot be deleted, it can be renamed. Any geometry, or dimensions, that are created, are automatically placed on the Active layer.
The Layer Manager
The purpose of the Layers Manager is to provide a way to keep your CAD drawings organized. Layers can be hidden to only show certain aspects of a drawing, or you can place different versions of the same part on separate layers. The Layers Manager can be used to specify a particular color and line style to use for each layer, and you can also select all the geometry on a given layer for use with other CAD functions or CAM features.
Navigation
The default location of the Layers Manager is the right-hand side of the user interface. When the pane is docked with other Managers, as is the case by default, clicking the Layers tab will access the Layer Manager.
The Layers Manager Quick access menu
-
 New
Layer - adds a new layer to the list with the description available
to be renamed. Type the name of the layer and press Enter.
New
Layer - adds a new layer to the list with the description available
to be renamed. Type the name of the layer and press Enter. -
 New
Group - adds a new group to the list with the description available
to be renamed. Type the name of the group and press Enter.
New
Group - adds a new group to the list with the description available
to be renamed. Type the name of the group and press Enter. -
 Modify to Current Layer - places the currently selected entities
on the active layer.
Modify to Current Layer - places the currently selected entities
on the active layer. -
 Move Out - moves the selected layer out of the group.
 -
 Move Up - moves the selected layer up the list.
 -
 Move Down - moves the selected layer down the list.
 -
 Delete Layer
- removes the selected layer from the layers list. The layer must
be empty, or it can't be deleted.
Delete Layer
- removes the selected layer from the layers list. The layer must
be empty, or it can't be deleted. -
 Use Layer Attributes - toggles whether or not the document colors and line styles are used, or whether the color and line styles assigned to the layer are used.
 -
 Move to New Group - creates a new group and immediately moves the currently selected layer to it.
 -
 Move to an Existing Group - opens the Group Selection dialog. This dialog lists all current groups, allowing you to select one to move the currently selected layer to. Select the group, and click OK.
The Layers Manager Shortcut Menu
To create or modify layers, click the Layer
New button at the top of the Layer Manager, or you can right-click anywhere in the Layers Manager window, and select Add New Layer. To access the context menu, right-click a layer of group in the Layer Manager.
- Add New
Layer - adds a new layer to the list with the description available
to be renamed. Type the name of the layer and press Enter.
- Insert Group - adds a new group to the list with the description available
to be renamed. Type the name of the group and press Enter.
- Insert Child Group - adds a new group in the selected group with the description available
to be renamed. Type the name of the group and press Enter.
 Active Layer
- sets the selected layer as the active layer (or active drawing layer).
Active Layer
- sets the selected layer as the active layer (or active drawing layer). Show Group - makes the selected
group visible.
Show Group - makes the selected
group visible. Hide Group - makes the selected group hidden.
- Move Up - moves the selected layer up the list.
- Move Down - moves the selected layer down the list.
- Move Out - moves the selected layer out of the group.
 Move to New Group - creates a new group and places the item in it.
 Move to an Existing Group - opens the Group Selection dialog to allow you to select which group to move the item to.
 Show All Layers - makes all layers
visible.
Show All Layers - makes all layers
visible. Hide All Layers - makes all layers
hidden.
Hide All Layers - makes all layers
hidden.- Show Layer - makes the selected
layer visible.
- Show Only This Layer - makes the selected
layer visible.
- Hide Layer - makes the selected
layer hidden.
-
 Modify to Current Layer - moves selected geometry to currently selected layer.
 - Select Layer Geometry - selects all geometry on currently selected layer.
- Collapse Group - collapses the items in the group.
- Expand Group - expands the items in the group.
- Delete Layer
- removes the selected layer from the layers list. The layer must
be empty, or it can't be deleted.
 Rename Layer - enables
the layer description for you to type a new name.
Rename Layer - enables
the layer description for you to type a new name.
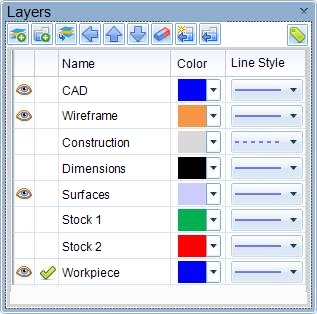
Visibility, Active Layer, Name, Color, and Line Style
Each one of the columns in the Layer Manager control a different aspect of the layers . In each row, the columns contain visual aids that are used to show the current state of the each layer.
- Visibility - The contents
of each layer, can be visible, or not. This column will set whether
the particular layer is hidden.
This icon means
that the layer is visible. You can click this icon to hide the layer.
This icon means
that the layer is hidden. You can click this icon to show the layer.
-
Active Layer - Only one layer can be drawn in at a given time. This column sets which is the active layer being drawn in.
This is the active
layer icon. There is always only one active layer. Any geometry that is
created is drawn on this layer. Any layer without this icon is considered
a non-active layer. Clicking on a layers row, in this column, will make
that the active layer, and move the icon to that position.
-
Name - Each layer is given a name upon creation. The original layer is always CAD, with additional layers numbered as Layer-1, Layer-2, etc. To change the name of a layer, double click on the name and enter the name as you wish for it to appear. This column will list the name of each layer.
-
Color - assigns a particular color to the layer. This is only utilized when the Overwrite option is active.
Tip: When each layer is created, the current entity color is assigned to it, which can be updated at any time directly from the layer. To utilize each layers specific color, select the Use Layers Attributes option. With the Use Layers Attributes option active, switching to an active layer whose assigned color differs from the current active color, will automatically update the active color.
-
Line Style - Assigns a particular line style to the layer. This is only utilized when the Overwrite option is active.
Tip: When each layer is created, the current entity line style is assigned to it, which can be updated at any time directly from the layer. To utilize each layers specific line style, select the Use Layers Attributes option. With the Use Layers Attributes option active, switching to an active layer whose assigned line style differs from the current active line style, will automatically update the active line style.