 Solid Fillet &
  Solid Chamfer
Introduction
This topic will explain the Solid Fillet / Chamfer function, will explain where to find the function, and explain the options found in it. This topic will also explain creation with quick steps, and provide links to related topics.
The Solid Fillet / Chamfer Function
The Solid Fillet / Chamfer function creates fillets and chamfers for surfaces and solids based on the settings that you define in the Data Entry Manager and the geometry that you select in the graphics area.
Fillet Edges |
Fillet Whole Solid |

|

|
Navigation
To open Solid Fillet/Chamfer, do one of the following:
- In the Corners group, of the Create 3D tab, click
 Solid Fillet.
- In the Corners group, of the Create 3D tab, click
 Solid Chamfer.
The parameters display in the Data Entry Manager.
Note: No matter which option you selected, you will have access to both options in the Data Entry Manager, along with Variable Fillet.
The Data Entry Parameters
The first part of setting up a solid fillet is to select the fillet type (click the down arrow and select the type in the Data Entry window). The available parameters change depending on the selected fillet type as explained next.
 Type
Type
-

 ConstantFillet - creates a standard fillet.
Radius - sets the radius value of the fillet.
-

 Chamfer- creates a chamfered edge.
-
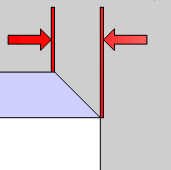
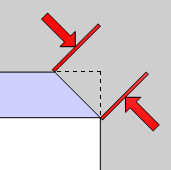
 Chamfer Width - allows you to define the chamfer by entering the width.
-
 Chamfer Length - allows you to define the chamfer by entering the hypotenuse of the triangle.
-
-

 Variable Fillet - creates fillets with a changing radius value.
-
Radius - sets the starting radius value.
-
End Radius - sets the ending radius value.
-
 Parameters
The following options are available for all types.
-
Whole Solid
 - is used to select the entirety of a solid using a single click. Multiple Solids can be selected at a time.
 - is used to select edges, surfaces, or the faces of solids while excluding other portions of the solid.
 -
Tangent Propagation
 - the fillet continues past the selected edge to any tangent edges.
 - only applies a fillet to the selected edge or surface.
Apply Parameters to
- Current Geometry - applies the currently listed value to the geometry highlighted in the Selected Geometry list.
- All Geometry - applies the currently listed value to all geometry in the Selected Geometry list.
Selected Geometry
|
|
|
| The list will display all entities currently selected for the function. | |
- Show Preview
- OK- can be used to perform the function after geometry selection (as an alternative to the other confirmation methods).
- Cancel- cancels the function when finished.
Quick Steps - Solid Fillet
-
Open the function and define all Data Entry parameters.
-
Select geometry in the Workspace.
This can be whole solids, solid faces, surfaces, or surface edges.
Be aware that each selection you make uses the currently displayed Data Entry parameters for that edge or face. -
Click
 (OK) to confirm the selection and create the fillet.
 -
Update the Data Entry parameters, and repeat this process as needed to create more fillets.
-
Click Cancel to close the function.
A feature is added to the CAD Tree (one for each time that you click OK to create a fillet).
Important: The Solid Fillet Data Entry Manager is designed to allow you to create multiple fillets with different parameters using a single OK click, which creates only one feature. This is accomplished by applying the current Data Entry parameters to the edges or faces when you click them. You may want to click OK for each different fillet that you create. This way a separate Fillet feature is added to the CAD Tree for each fillet (or OK click). Either way you can always modify the fillets later.
Editing a Fillet Feature in the CAD Tree
When you edit a Solid Fillet feature, the Data Entry Manager displays with the normal parameters, but also provides a list box of all of the edges and/or faces that you selected for the feature. You can then select an item in the geometry list, and update the parameters for that selection only. This provides you with total control of all the edges or faces that you selected for the original feature as well as allows for geometry modifications.
When making edits, you can right-click in the geometry list to Delete the currently selected item or Delete All items.
When modifying geometry for a Fillet feature, follow these steps:
-
After clicking Edit or Re/Select from the Fillet feature in the CAD Tree, modify your selections as needed.
-
Click the item for the new selection in the Data Entry Manager list to display its parameters.
-
Update the parameters for the newly selected geometry.
-
Repeat this process for all newly selected geometry.
You can also update the parameters of previously selected geometry. -
Click OK to update the Fillet feature.
-
Click Cancel to close the Data Entry Manager.


 (Delete All)
- removes all entities from the Selected Geometry list.