


What's New in BobCAM for SOLIDWORKS V10 SP1
Introduction
This latest release has several brand-new features, enhancements to existing features, and several corrections in several areas.
New Features
CAM
General
Operation Tree
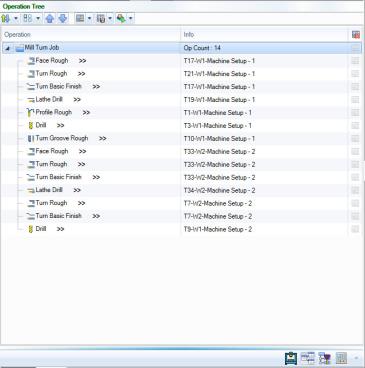
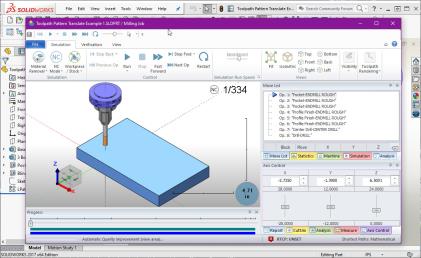
Number of Operations
In this latest update additional information has been added to Jobs row to display the number of operations in the job. In the initial release, while the operations of the job list displayed information in the Info column, the jobs themselves did not. Since the release we've had a few customers request a way to know exactly how many operations are used in a job, so now this data is displayed for all your jobs!

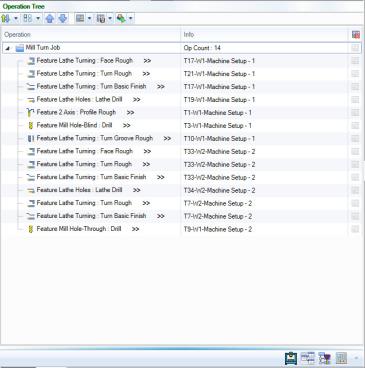
Display Feature Name
By default, the operation tree only lists the operation names, but we have found that many users don’t typically rename their operations, and organize their CAM data by naming their features only. So, if this sounds like you, we have the option in settings to also display the feature name.
|
|
|
|
|
Tool Tree
New Actions
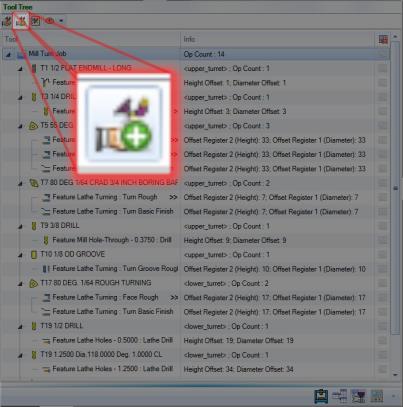
Add Tool to the Tool Crib
-
 Add Tool to the Tool Crib
With all your jobs available, simply highlight part of that job and click the Add Tool to the Tool Crib button in the quick access menu to open the Tool Library dialog and choose a tool to automatically add to the current Tool Crib.
Editing Tools from the Tool Tree
-
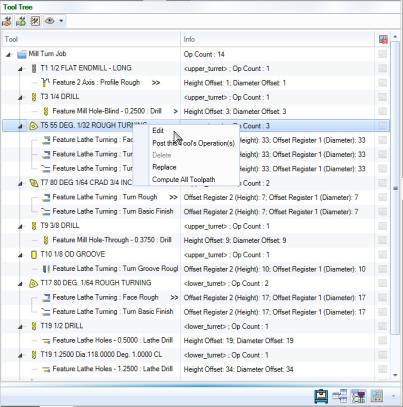
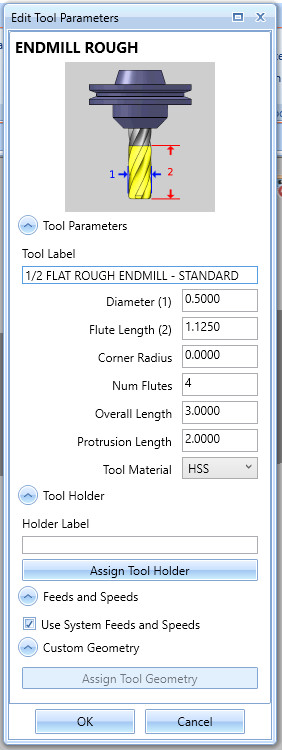
Editing tools - The Edit Tool Parameters dialog
Did something change and now you need to edit aspects of the tool being used in several operations? No problem! Simply right-click the tool and select Edit. The Edit Tool Parameters dialog opens allowing you to edit the necessary aspects of the tool being used. Depending on the values being changed computing the toolpath again may be required. Simply right-click the tool and select Compute All Toolpath. This same dialog can also be edited through the Tool Crib!
Tool Crib
The Edit Tool Parameters dialog
Updating tool values in your Tool Crib has never been easier with the new Edit Tool Parameters dialog! In the past, any edits to your tools were either done directly in the library, or in the tool page of your operations. When setting up tools in your tool crib, there was not a way to directly update their parameters. Now, with the Edit Tool Parameters dialog, just highlight the desired tool in your Tool Crib, and click Modify. The Edit Tool Parameters dialog opens, allowing you to update any of its associated values. Then, just click OK to confirm!
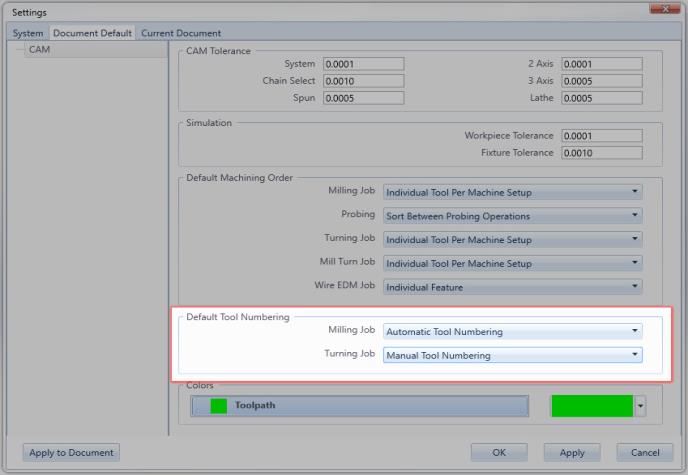
Default Tool Numbering
A new setting has been created which allows you to set the default tool numbering behavior for new Mill and Lathe jobs. In the Document Default and Current Document tabs, you'll now find the Default Tool Numbering group on the CAM page. This group gives you two setting to choose from for both milling and turning jobs: Automatic Tool Numbering, or Manual Tool Numbering. The setting simply determines whether the Use automatic tool numbering option in the Tool Crib and the Assigned Tools dialog is selected. In the past, both locations had Use automatic tool numbering selected by default. Based on customer feature requests, we've now put the power in your hands to decide whether that should be the case for your future jobs. Choose Automatic Tool Numbering, and the option will be selected by default resulting in tools added to the Tool Crib being number sequentially. Select Manual Tool Numbering, and tool numbers will be read from the tool library as they are added to your Tool Crib. Whichever way your work, these settings have you covered!
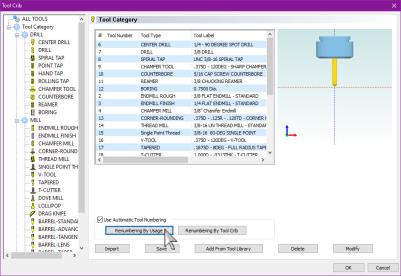
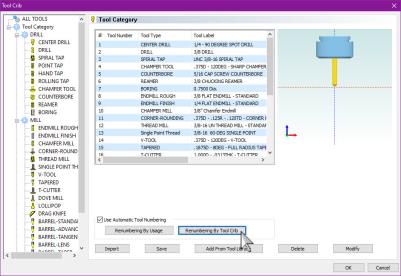
Use Automatic Tool Numbering : Renumbering
Two new actions have been added to the Use Automatic Tool Numbering group for your Mill and Lathe jobs to allow you to renumber your tools based on their use, or the order they were added to the Tool Crib. One of our main focuses for this release has been to make sure selecting, numbering, assigning, and editing your tools is as quick and intuitive as possible. We found even when using automatic tool numbering things can get a little confusing when removing and adding more tools to your crib. To solve this, we've created the renumbering actions so the numbers can be updated easily, and accurately. Whether you want them numbered as they were added to the Tool Crib, or as they are used in operations, simply click the associated button and your tool numbers are updated!
Tool Assignment
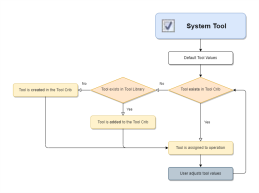
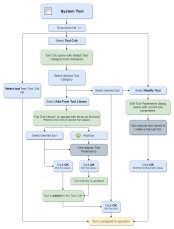
In this release, we've made some updates to the Tool page of your operations to make assigning and modifying tools simpler and more intuitive. Finding a good balance between giving users manual control with no assistance and an automatic system with no user input can be difficult, but we think we've found that balance with this updated tool page! The recommend workflow has been, and continues to be, to add the tools for the job to your Tool Crib prior to feature creation, but the updated Tool page makes grabbing those tools, modifying them, and even adding tools, easy to do and understand. Choose the flow that works for you. Below, you'll see the steps when the System Tool option is selected, and when it is not. Click the flow chart next to each to open it as its own topic. Use the link at the bottom to jump back, or close the new tab.
|
|
|
|
CAM Tree Blank and Post Yes/No Icon State Update
A third state for parent items in your Extended CAM Tree has been added to give you even more information at a glance! When we first introduced the Extended option for your CAM Tree in the Settings dialog, it was an immediate hit. Not only did it add some visual organization to the visual/posting states of your CAM Tree items, but it also allowed you to update those states without having to access a context menu to do so. This version has improved upon that by adding a third state to parent items that shows whether all child items are selected or cleared. In the past, child items could be selected and cleared independently of the parent item. This could be a little confusing with a collapsed tree. Now, whether all child items are cleared, or selected, the parent item is automatically updated. When child items are in mixed states, the parent will show a third state:
-
Third State - This state exists only for parent items and shows the child items are a mix between selected and cleared states.
-
Selected - For child items, this shows the item is selected. For parent items, this shows all child items are selected.
-
Cleared - For child items, this shows the item is not selected. For parent items, this shows no child items are selected.
| Blank/Unblank | Post Yes/No | |||||
|

|

|
Toolpath Pattern Suppression
Previously toolpath patterns were “suppressed” by using the Post Yes/No options because either all instances of the pattern were going to be posted or none, but with the introduction of the operation tree and being able to manage individual instances of the patterns, we needed to clarify the meaning in the CAM Tree. So now from the CAM Tree you do not change the posting status of a toolpath pattern, you either suppress it or not to make the toolpath pattern operations available in the operation tree.
|
|
Suppressed toolpath patterns are shown with the Suppressed icon in the CAM Tree. |
Mill
Mill Express
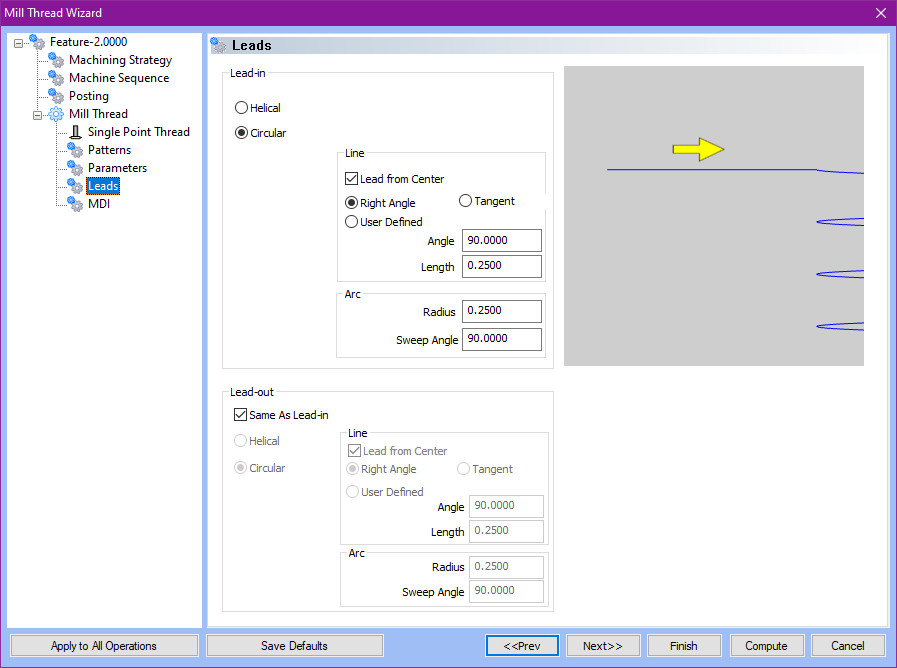
Thread Leads
Additional lead options are now available in the Mill Thread operation! When using the inside thread type in previous versions, the Helical and Circular lead options allowed you to adjust the radius, but began and ended in the center. Although this is normally exactly what you would want, an obstacle in the center would create an issue. Now, whether you're using the Helical or Circular lead types, you can utilize the same Right Angle, Tangent, and User Defined options you're familiar with from other 2 Axis operations! Each one of these can be used with or without the Lead from Center option so you can get the specific leads you need regardless of the situation.
Drag and Drop Toolpath Patterns
Updating what a Toolpath Pattern is applied to just got a lot easier with our new drag and drop functionality! Toolpath Patterns can be a huge time saver, but occasionally you may find you could have placed it a little more efficiently. In some cases, perhaps you have it applied to a single feature when it should be applied to the entire group, index system, or machine setup. Perhaps it's the other way around. Either way, in the past this meant you'd need to delete the original and recreate it in the new location. Now, with drag and drop functionality, there is no need to delete and recreate. Simply drag and drop the Toolpath Pattern to the desired location and you're done!
Work Offset Pattern - Alternating Order
A new option has been added to the Machining Order group of the Work Offset Pattern dialog, which allows you to move from offset to offset in reverse after changing tools. Normally, when a tool is changed, it moves back to the very first work offset to begin the same cutting order as the last tool. To cut down on unnecessary moves, we've introduced the Alternating Order option. Now, when the tool is changed at the last work offset pattern, the next tool begins at that same pattern and works back which helps to save time.
|
|
|

|
|
Simulation
Launch Simulation in a Separate Window
An option in the System > CAM page of the Settings dialog now gives you the ability to launch the simulation as a separate, independent window, and displays the file and job name! When working on a computer, screen space is always at a premium and sizing the various windows in the application to allow easy access to all their content is standard. In the past, once you opened the simulation in the graphics area, you could find yourself resizing many of those windows to give the simulation and its windows as much room as possible. Now, with the Simulation Window options, simply select Separate Window and the simulation will launch as its very own window giving you tons of elbow room to use the simulation to its full potential without having to adjust the size of the graphics area.

Posting
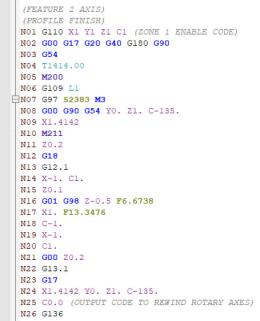
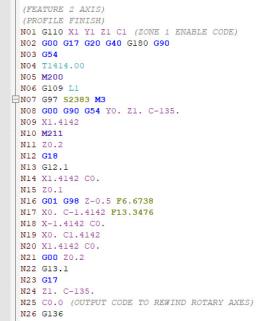
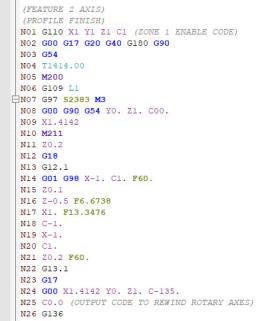
Polar Interpolation : Output forcing the start angle at C0
A new posting question has been added to work with controllers which require the C axis to be at 0 prior to polar interpolation being called. Originally we offered a way to output relative to the start angle with post question 3528. Polar coordinates relative to start angle?. This post question would handle the standard cases along with needing the output relative to the start angle. That post question has now been deprecated in favor of a question which handles each of those cases, along with the case of a controller needing C0 positioning prior to the polar interpolation call!
3529. Polar coordinates mode (0: Default mode, 1: Relative to start angle, 2: Start at C=0)?
-
Outputs are as is for polar coordinates.
This is like setting the now deprecated post question 3528. Polar coordinates relative to start angle? to no -
Outputs are calculated relative to the start angle.
This is like setting the above mentioned post question to yes. -
Outputs are forced to start at C=0 and first point is calculated after starting at C0.
This new option also comes with an associated post question for controlling the feedrate of the new calculated position: 3597. Feedrate value for feed move (for Option 2 in 3529.)? 60.0
|
Cutting this two inch square centered in the stock will give us the following output depending on the setting. |
||
|
||
| 0 | 1 | 2 |
|
|
|
Arc break rule based on posting mode
A new post question has been added to allow arcs to be output for specified posting modes while being broken for others. Outputting arcs in your code can be helpful, but in certain posting modes, controllers won’t accept arc output. While we’ve offered ways to break arcs in the output, it could be frustrating having a small portion of the code dictate whether arcs should be output for the whole of the program. This issue has been solved with the addition of the new post question:
556. Arc break rule based on posting mode?
If post question 550. Break arc segments into lines? Is set to ‘n’, this newest post question allows you to specify for which of the posting scenarios seen below, if any, arcs should be broken for. The valid answers to the posting questions are :
|
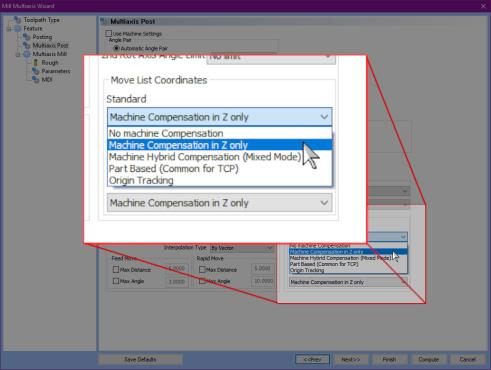
|
Combinations of rules can be used by adding the values of several options together. For instance, using a value of 3 will be the same as using values 1 and 2 so arcs are not output while using TCP or Machine Comp in Z only. With this new post question, you should be able to utilize arcs wherever possible, while avoiding them where necessary.
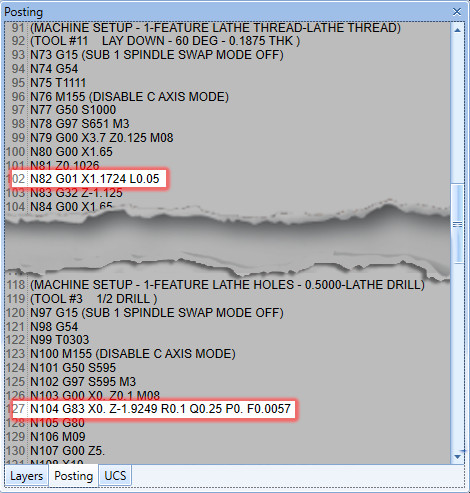
Prefix Specific to thread_g33_feedrate
A new prefix block has been added to the Lathe and Mill Turn posts allowing a prefix to be specified for the lathe threading variable thread_g33_feedrate which does not affect that of other feedrates. In the past, prefix block 1707. Symbol for IPM feedrate? was used to control the prefix, but after encountering controllers which require lathe threading feedrate to be specified with a unique prefix. As a result prefix block 1708. Symbol for UPR feedrate (thread_g33_feedrate)? has been created, enabling lathe thread feeds to be called with a unique prefix as needed! Notice in the image below, the lathe thread operation was updated to us a prefix of "L" for its feedrate without affecting the other feedrates.
Character Output
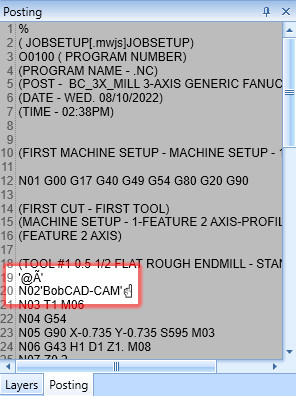
A new posting variable allow you to output any characters in the posted code by specifying its ascii/Unicode value. Occasionally, we get a request for a particular character to be output in the posted code. To cover all possible cases moving forward we've created the posting variable charout_xx.
The values following charout_ support 2 variations:
Decimal value – charout_64
Hexidecimal – charout_0x261D
It is important to understand this variable does interact with post question 228. Support Unicode Output? y/n so if your post processor is set to only support ASCII characters, you cannot output characters from the higher Unicode set of characters.
As an example, by adding the line below to the post under the file header section:
charout_39, charout_64, charout_195, charout_0x27
n,charout_39, charout_66, charout_111, charout_98, charout_67, charout_65, charout_68, charout_0x2D, charout_67, charout_65, charout_77 , charout_39, charout_0x261D
We get the following result depending on the setting of question 228.
| 228. Support Unicode Output? y | 228. Support Unicode Output? n |
|
|
To learn more about unicode characters, click the following link to open the wikipedia article: List_of_Unicode_characters
Enhancements
CAM
Mill
Mill Express
Toolpath Pattern Status Warning
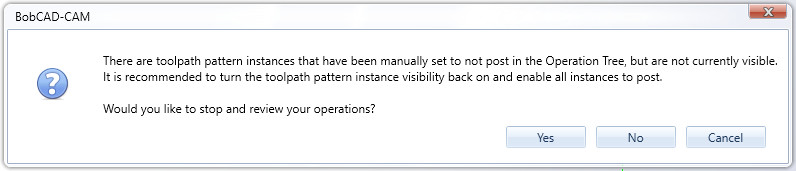
A new warning has been created to inform you when instances of toolpath patterns have been set to not post, but have then been hidden in the Operation Tree. Since you have the ability to adjust the posting settings of individual pattern instances, and then hide them from showing up in the Operation Tree, we wanted to give you a final life line in case of an oversight. In these cases, we pop a quick message informing you of the mixed posting state between the original operation and its patterned instances. If all is well, simply click No to post as is, otherwise, clicking Yes automatically updates the Operation Tree to show all hidden toolpath pattern instances.
Mill Turn
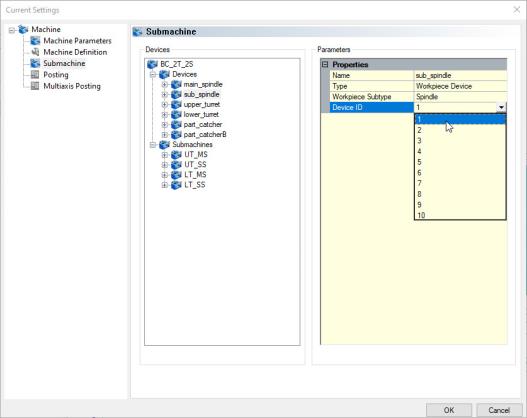
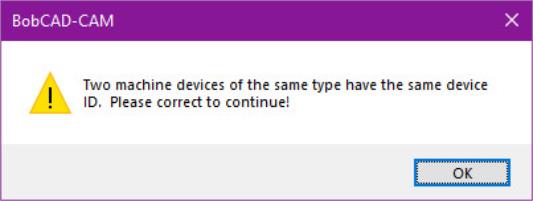
Machine Building : Updated Error Message
When building a machine, the Device ID's specified on the Submachine page seen below need to be unique. Attempting to use the same ID for two different devices results in error informing you of the conflict. This error message has been updated to be a little more clear in explaining this conflict.
The wording in the error now appears as:
Corrections
General
-
Corrected an issue which caused a crash when creating a setup sheet in some non-English operating systems due to unicode characters in the time/date.
-
Corrected an issue which prevented the Tool Library button in the quick access menu of the Tool Tree from launching the Tool Library when no job was in the CAM Tree.
BobART
-
Corrected an issue which prevented Paint from opening when using the Edit Image Using Paint.. option for images in Windows11.
CAM
General
-
Corrected an issue which caused toolpath pattern instances to remain in a Post No state in the Operation Tree when its parent feature was set to Post No and then back in the CAM Tree.
-
Corrected an issue which caused the drag indicator to appear, and remain, in the Operation Tree if an item outside the application, like a file, was dragged across the interface.
-
Corrected an issue which prevented all the tools from the MachiningCloud job from being added to the tool crib.
-
Corrected an issue which caused tools from a new feature to be added to the Tool Tree even if the feature was canceled before being finalized.
Mill
Mill Express
-
Corrected an issue which caused operation chain start points to revert when using Update All Geometries.
-
Corrected an issue which prevented some values from highlighting when using Tab to skip through the text fields in the leads page.
-
Corrected an issue which caused a crash when using the Apply to All Operations button in the Leads page of the Mill 2 Axis Wizard.
-
Corrected an issue which caused an instance of a Pocket operation failing to appear in the Operation Tree, Simulation, or posted code.
Wire EDM
-
Corrected an issue in the 2 Axis Rough Cut operation which allowed Compensation options to remain available when the Coreless option was selected for Wire 2 Axis Inside features.
Simulation
Simulation Standard
-
Corrected an issue which caused the number of toolpath pattern instances to be multiplied in simulation.
Posting
.BCPst
-
Updated the BC_Single_Line and BC_Two_Line installed posts to include the following missing post questions:
-
715. Feed Unit Per Minute Code? "G98"
-
729. Feed Unit Per Revolution Code? "G99"
-
-
Issue addressed where Dogleg Rapid handling was effecting output for certain post processors in 4 axis toolpaths. If the feed or rapid move blocks were modified to break the motion into more than one line of g code, this was effecting the modality checking, so adjustments have been made in the posting engine to support when an expected post block of a single line is modified to output as separate lines of code.
-
Updated the following variables to pay attention to the scale factor defined in post question 6005 for the sub-machine:
-
transform_plane_origin_1
-
transform_plane_pnt_2_1
-
transform_plane_pnt_3_1
-