


Emboss Swept Example 2
Introduction
The coffee cup that you created in How to Create an Emboss Regular is used in this tutorial. In this tutorial, you learn how to add more detail to the model using only the Emboss Swept feature.
Example File
If you are connected to the Internet, the part file for this example can be downloaded automatically by clicking the following link: Emboss SweptExample 1.sldprt
Once you download and saved the zip file, extract the files on your system in an easy place to remember.You can then open the file to use with this tutorial. All files for the tutorials in this help system available for download can be found by clicking on the following link: http://www.bobcad.com/helpfiles.
The embossed model used in this tutorial is shown next. The second image shows the result that is created in this tutorial.


Part 1) Open the Example File
-
Click File > Open.
The Open dialog is displayed. -
In the Opendialog, select the folder in which you saved the example files.
-
Select Emboss Swept Example 1.
(If you have completed the How to Create a Regular Emboss example, you can open the My Coffee Mug.
The file is opened and the embossed model is displayed in the graphics area.
Part 2) Add an Emboss Swept Feature and Set Attributes
The first swept emboss is added to rim at the top of the coffee mug. This helps to improve the 3-dimensional appearance of the model.
-
In the
 BobARTtree, right-click
  Emboss Model, and click Emboss Swept.
 -
In the Embossdialog, click in the Namefield, and type Top at the beginning of the description so it displays Top Emboss Swept 6.
-
Click Color.
In the Color dialog, click the desired color for the feature, and click OK. -
Set the Application Type to Add.
Part 3 Select Geometry for the feature
-
In the Feature Manager design tree, select the Top Ellipse feature.

Part 4) Define the Cross-Section
-
In the Cross-Section section, confirm that Convex Arc is selected.
-
Update the Radiusvalue to 0.0625.
-
Confirm the Start Angle is set to 0.00.
-
Confirm the End Angle is set to 90.00.
-
Click OK to regenerate the model and add the feature to the BobArt Tree.

When the view of the model is rotated, you can see that the Emboss Swept feature added the 0.0625 arc sweep to the model. The entire sweep is added on top of the previous features. In the next part, you edit the feature so that less of the sweep is added to the model.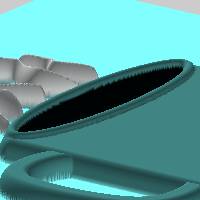
Part 5) Edit the Attributes
-
Update the Application Type to Merge High.
-
Click OK.
Notice that the Emboss Swept feature is no longer visible in the model.
This is because the -
In the Fast Edit section at the bottom of the dialog, set the Base Height value to 0.200.
-
Click OK.

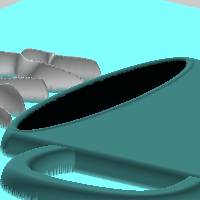
The swept feature is now at the desired height. -
Click Cancel to exit the dialog.
Note: The first Emboss Swept feature is now complete. The feature adds a subtle improvement to the appearance of the model. This adds more detail to the model which can be seen when the model is machined.
Part 6) Add the Emboss Swept Feature 2
The next swept feature is used to add detail to the model in a similar way to the previous swept feature. The same geometry selections from the How to Create an Emboss Regular tutorial are used for the mug body, bottom, handle, and the steam. The result is that an outline of each of these sections is added to the mug. Three of these geometry items receive the exact same emboss, and for this reason, multiple geometry selections are combined into a single feature.
-
In the
BobARTtree, right-click Emboss Model, and click Emboss Swept. -
In the Embossdialog, click in the Namefield, and type Top at the beginning of the description so it displays Mug Emboss Swept 7.
-
Leave the Color set to Black.
-
Leave the Application Type to Merge High.
Part 7) Select Geometry for the Feature
-
In the Feature Manager design tree, select the following CAD features: Body,Bottom, and Handle.

Part 8) Define the Cross-Section
-
In the Embossgroup, under Cross Section,confirm that Convex Arc is selected.
-
In the Radiusfield, set the value to 0.125.
-
Confirm that the Start Angleis set to 0.00.
-
Confirm that the End Angle is set to 90.00.
-
Click OK.

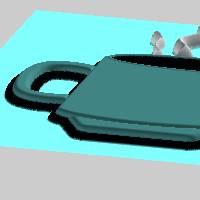
Note: Even though the geometry for the Emboss Swept feature defines the center of the emboss/feature, only the outer portion of the cross-section is what appears on this model. This is a result of using the Merge High Application Type. The inside portion of the sweep is lower than the rest of the embossed model, and only the highest part of the model is kept.
Part 9) Add the Emboss Swept Feature 3
-
In the
BobARTtree, right-click Emboss Model, and click Emboss Swept. -
In the Embossdialog, click in the Namefield, and type Steam at the beginning of the description so it displays Mug Emboss Swept 8.
-
Leave the Color set to Black.
-
Leave the Application Type to Merge High.
Part 10) Select Geometry for the Feature
-
Select the Steamfeature from the design tree.

Part 11) Define the Cross-Section
-
Confirm that the CrossSection is set to Convex Arc.
-
In the Radiusfield, set the value to 0.0313.
-
Confirm that the Start Angleis set to 0.00.
-
Confirm that the End Angle is set to 90.00.
-
Click OK.

-
Click Cancel to exit the dialog.
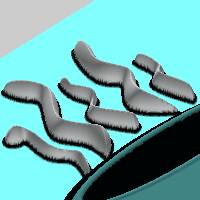
The result of the last feature is another subtle change that is added to improve the appearance and detail of the model.
This concludes the tutorial.