Knowledge Base
Introduction
This topic will explain the Knowledge Base, describe how to access it, explain the options found in it, will provide quick steps explaining how it is used, and provide links to related topics.
The Knowledge Base

The Knowledge Base allows you to determine, in advance of a job, how to handle the 4 types of supported hole features BobCAM automatically recognizes:
- Hole
- Counterbore Hole
- Tapped Hole
- Counterbore Tapped Hole
The Knowledge Base contains templates comprised of various rules that you will define to determine which operations and parameters to apply to any geometry identified as one of these feature types. When a particular hole type is identified, the rules are then referenced in order to build the features and operations based on your specifications.
Navigation
To access the Knowledge Base:
- In the
 Knowledge Base.
- Right-click CAM Defaults in the CAM Tree and select Knowledge Base.
The Knowledge Base Manager
Rule Templates
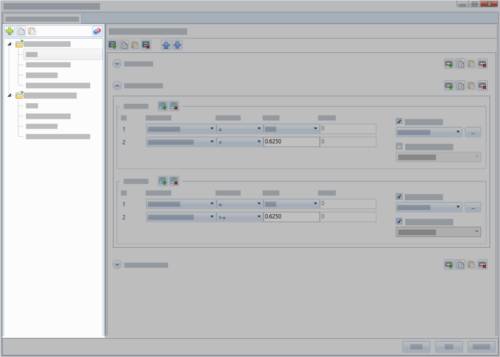
Each template is essentially a folder containing all the rules for determining which operations, and which parameters, are applied to each hole found under each particular hole type.
Tip: You can modify the existing default templates, or create your own. Perhaps you handle your holes differently depending on the machine you are working on, or the material you are working in. You can create a different template for each of these situations. Each template, will then allow you to handle each of the four hole feature types differently.
Quick access menu
By right-clicking in the template column, you can access a context menu that gives you the ability to create new templates, as well as copy, paste, and delete templates. The quick access menu gives you these same options:
-
 Create New Template - automatically creates a blank Template and adds it to the list.
 -
 Copy Template - adds the highlighted template to the clipboard so you can utilize the Paste Template option.
 -
 Paste Template - allows you to add another of the copied template to the list. The new template will utilize the same name with "-Copy" attached to the name.
 -
 Delete Template - opens a dialog verifying you intend to remove the selected template. Click Yes to remove, and No to keep it in the list.
Note: Clicking on a hole type in a template gives you access to its Rule Groups.
Rule Template Features
Each template is broken down into four parts, one for each of the possible hole types:
- Hole
- Counterbore Hole
- Tapped Hole
- Counterbore Tapped Hole
With one of these features highlighted in a particular template, the rule groups to the right will be assigned to that particular feature, and template.
The Rule Group Section
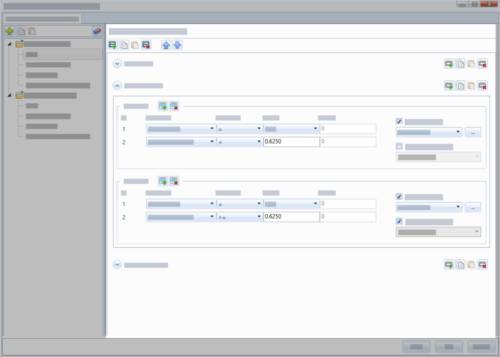
This section is where all rules are made. The top level item in this section is the Rule Group which contains Rule Sets. It is the Rule Sets that contain the Rules themselves.
Context menu
Right-clicking along the top of a Rule Group section gives you access to the following items in a context menu:
- Create new group - automatically creates a blank rule and adds it to the list.
- Copy group - adds the highlighted rule to the clipboard so you can utilize the Paste Template option.
- Paste rule group - allows you to add another of the copied rule to the list. The new rule will utilize the same name with "-Copy" attached to the name.
- Delete rule group - opens a dialog verifying you intend to remove the selected rule. Click Yes to remove, and No to keep it in the list.
- Move up rule group - moves the highlighted rule up the list.
- Move down rule group - moves the highlighted rule down the list.
Quick access menu
The quick access menu gives you access to the following items:
-
 Create new rule group - automatically creates a blank rule and adds it to the list.
 -
Copy rule group - adds the highlighted rule to the clipboard so you can utilize the Paste Template option.
-
Paste rule group - allows you to add another of the copied rule to the list. The new rule will utilize the same name with "-Copy" attached to the name.
-
 Delete rule group - opens a dialog verifying you intend to remove the selected rule. Click Yes to remove, and No to keep it in the list.
 -
 Move up rule group - moves the highlighted rule up the list.
 -
 Move down rule group - moves the highlighted rule down the list.
Rule Groups

Rule Groups contain Rule Sets, which are comprised of individual rules. The Rule Group contains as many Rule Sets as necessary to define what operations will be utilized when the rules are met.
Tip: The best way to think about the Rule Groups is equate them to particular considerations of how to cut a hole. When you approach a machining job with a hole, you probably consider how large it is, how deep it is, and whether it has a chamfer or not. Each one of these considerations can be expressed as a Rule Group.
Context menu
Right-clicking along the top of a Rule Group gives you access to the following items in a context menu:
- Copy - copies the entire Rule Group, and can then be pasted by using the Paste rule group option as seen in the section above.
- Delete - opens a dialog verifying you intend to remove the selected rule group. Click Yes to remove, and No to keep it in the list.
- Rename - allows you to rename the rule group.
- Move Up - will move the selected rule group up one position in the list of rule groups.
- Move Down - will move the selected rule group down one position in the list of rule groups.
- Create New Rule Set - will add a new rule set to the rule group.
- Copy Rule Set - will copy the currently selected rule set to the clipboard. If a rule set is not highlighted a dialog will appear instructing you to select one.
- Paste Rule Set - once a rule set has been copied to the clipboard, this option will paste a copy of the rule set to the rule group.
- Delete Rule Set - opens a dialog verifying you intend to remove the selected rule set. Click Yes to remove, and No to keep it in the list. If a rule set is not highlighted a dialog will appear instructing you to select one.
Quick access menu
The quick access menu gives you access to the following options:
-
 - will add a new rule set to the rule group.
 -
- will copy the currently selected rule set to the clipboard. If a rule set is not highlighted a dialog will appear instructing you to select one.
-
- once a rule set has been copied to the clipboard, this option will paste a copy of the rule set to the rule group.
-
 - opens a dialog verifying you intend to remove the selected rule set. Click Yes to remove, and No to keep it in the list. If a rule set is not highlighted a dialog will appear instructing you to select one.
Rule Sets
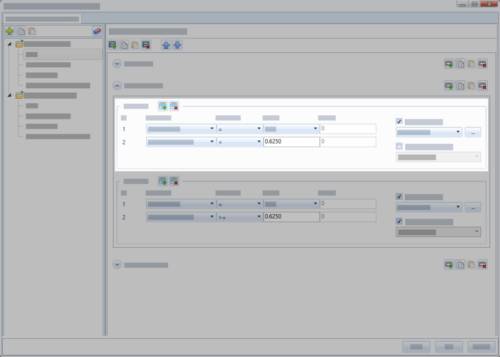
Rule Sets contain at least one rule, and sometimes many rules. These rules decide what operations are added to the feature when one of those rules are met.
Tip: If you think of the Rule Group as one of the considerations of how to cut a hole, (perhaps you cut a large hole differently than a small hole) the best way to think about a Rule Set is equate them to the desired results for each one of those possibilities. (Create one Rule Set for the large hole, and one for the small hole.)
Context menu
Right-clicking along the top of a Rule Set gives you access to the following items in a context menu:
- Copy - copies the entire Rule Set, and can then be pasted by using the Paste rule set option as seen in the section above.
- Delete - opens a dialog verifying you intend to remove the selected rule set. Click Yes to remove, and No to keep it in the list.
- Create New Rule - will add a new rule to the rule set.
- Delete Rule - opens a dialog verifying you intend to remove the selected rule. Click Yes to remove, and No to keep it in the list. If a rule is not highlighted a dialog will appear instructing you to select one.
Quick access menu
The quick access menu gives you access to the following options:
-
 - will add a new rule to the rule set.
 -
 - opens a dialog verifying you intend to remove the selected rule. Click Yes to remove, and No to keep it in the list. If a rule is not highlighted a dialog will appear instructing you to select one.
Rules
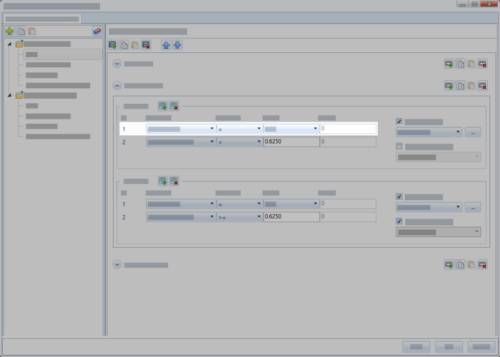
Rules are the base level items for making decisions based on the data found from the model geometry for the various holes that have been identified.
Tip: If you think of the Rule Group as one of the considerations of how to cut a hole, (perhaps you cut a large hole differently than a small hole) and the Rule Sets as the desired results for each one of those possibilities, then the Rules themselves will determine what sizes are considered small, and what sizes are considered large. The Knowledge Base will then see if the identified geometry is considered large, or small and create the feature accordingly.
Important: Currently, the values entered for the rules must be numeric with the exception of the variable "Dia". This is the variable for the Diameter found for the hole which can then work in tandem with math characters like + - * /. As an example, these allow you to specify a value like "3*Dia", or three times the found diameter.
Context menu
Right-clicking along a Rule gives you access to the following item in a context menu:
- Delete - opens a dialog verifying you intend to remove the selected rule. Click Yes to remove, and No to keep it in the list.
Quick Steps
Part 1) Creating a new template
- In the Quick Access Menu of the Rule Templates section, click (Create new template) to create a new template.
- Right-click the new template and select Rename to rename the template.
- Enter a name for the new template.
Part 2) Creating Rule Groups for Feature Types
- In the new template, select a Feature Type to create a Rule Group for and click (Create new rule group) to create a new rule group.
- Right-click the new rule group and select Rename to rename the rule group.
Part 3) Creating Rule Sets
- In the new rule group, click (Create new rule set) to create a new rule set.
A new rule set, Rule Set 1, is added to the list.
Step 1) Creating a rule
- In the rule set, click (Create a new rule) to create a new rule.
Determine the "if"
- Set the Parameter.
- Set the Condition.
- Set Value1, and Value2 when necessary.
Determine the desired "then"
- Select the Operation Lists check box.
The drop down list, and ellipses button, become available to allow you to:- Use a previously defined Machining Strategy by selecting from the drop down list.
Or:
- Create a new strategy by clicking the ellipses button.
- Use a previously defined Machining Strategy by selecting from the drop down list.
- Select the Parameter Template check box.
- Select a Parameter Template from the drop down list.
Step 2) Repeat as necessary
- Repeat Part 3 for all necessary if/then situations.
Repeat Parts 2 and 3
- For every situation you want to handle in a particular feature type, repeat parts 2 and 3 to create additional rule groups and set the necessary rule sets, and rules.
- When a single feature type has all of the desired situations handled, select another feature type and repeat the process for it.
Repeat as necessary
- With all the features types handled for a particular template, you can create additional templates as needed and repeat the entire process for them.
Next Topic
For a walk through of how to create Knowledge Base Templates from scratch, see the Creating Knowledge Base Templates topic.