 Leads
Leads
Introduction
This topic explains the Leads page found in the Equidistant operation of the Mill 3 Axis Wizard.
 Leads
Leads
Entry
-
 Plunge - the tool plunges directly to the start
point of the toolpath. The Lead-in and Lead-out settings become available.
Plunge - the tool plunges directly to the start
point of the toolpath. The Lead-in and Lead-out settings become available.
Type
-
Single Depth - From the Feed Plane, Single
Depth will move at the Plunge Feedrate to the full Depth of Cut.
-
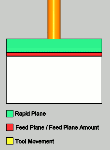
 Peck - From the Feed Plane, Peck will move
at the Plunge Feedrate to the Peck Depth, return to the Feed Plane
with a rapid move, rapid down to a point above the last depth
equal to the amount of the Feed Plane being used, before continuing
to the next Peck Depth amount at the Plunge Feedrate. This method
will be repeated until the full Depth of Cut is reached.
Peck - From the Feed Plane, Peck will move
at the Plunge Feedrate to the Peck Depth, return to the Feed Plane
with a rapid move, rapid down to a point above the last depth
equal to the amount of the Feed Plane being used, before continuing
to the next Peck Depth amount at the Plunge Feedrate. This method
will be repeated until the full Depth of Cut is reached.
- Peck
Depth - sets the increment to use for each peck.
-
Fast Peck - From the Feed Plane, Peck will
move at the Plunge Feedrate to the Peck Depth, Rapid up to an
amount equal the Feed Plane being used, before continuing to the
next Peck Depth amount at the Plunge Feedrate. This method will
be repeated until the full Depth of Cut is reached.
-
Peck Depth - sets the increment to use for each peck.

- Ramp
- creates a linear ramp move into the stock. The ramps are automatically
adjusted, based on values entered, so that collision into the model
is avoided. When this option is selected the following boxes become
available.
-
Reverse Direction
![]() Select the check box to reverse the direction of the entry move. This
creates the entry move in the opposite direction of the toolpath starting
direction.
Select the check box to reverse the direction of the entry move. This
creates the entry move in the opposite direction of the toolpath starting
direction.
![]() Clear the check box to leave the entry method in the default direction.
Clear the check box to leave the entry method in the default direction.


-
Angle of Approach - sets the angle between the ramp motion and the top of the stock.
- Spiral
- creates a helical entry into the toolpath. When this option is selected
the following boxes become available.
-
Reverse Direction
![]() Select the check box to reverse the direction of the entry move. This
creates the entry move in the opposite direction of the toolpath starting
direction.
Select the check box to reverse the direction of the entry move. This
creates the entry move in the opposite direction of the toolpath starting
direction.
![]() Clear the check box to leave the entry method in the default direction.
Clear the check box to leave the entry method in the default direction.


-
Spiral Radius - sets the distance from the center of the spiral to the edge of the spiral, when viewing the ramp from the top.
-
Angle of Approach - sets the angle between the ramp motion and the top of the stock.
Lead-in
-
Plunge -
generates a plunge feed move into the feature.
-
Parallel -
generates a linear feed move into the feature using the Length value.
-
Circular -
generates a radial move into the feature using the Radius and Angle
value.
- Length
- for the Parallel and Right Angle lead options, this sets the
distance of travel before the cutter reaches the defined edge.
- Radius
- for the Circular and Vertical Tangent lead option, this sets
the radius of the arc approach into the feature.
- Angle - for the Circular and Vertical Tangent lead options, this sets the total sweep of the arc for the lead.
Lead-out
- Same As Lead-in
 - Select this check
box to use the Lead-in settings to automatically set the Lead-out settings.
- Select this check
box to use the Lead-in settings to automatically set the Lead-out settings.  - Clear the check box to set the Lead-out independently from the Lead-in
.
- Clear the check box to set the Lead-out independently from the Lead-in
.
-
Plunge -
generates a plunge feed move out of the feature.
-
Parallel -
generates a linear feed move out of the feature using the Length value.
-
Circular -
generates a radial move out of the feature using the Radius and Angle
value.
- Length
- for the Parallel and Right Angle lead options, this sets the
distance of travel away from the feature.
- Radius
- for the Circular and Vertical Tangent lead option, this sets
the radius of the arc move away from the feature.
- Angle - for the Circular and Vertical Tangent lead options, this sets the total sweep of the arc for the lead.