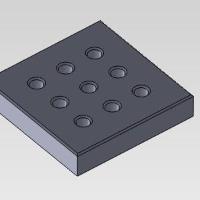
|
Hole
Group - This group contains a drop down of all the hole
groups for the selected feature. If the feature contains multiple
groups, move all of the Holes from the Remaining Hole List, into
the Sorted Hole List, then select the next group from the Hole
Group list and repeat the process.
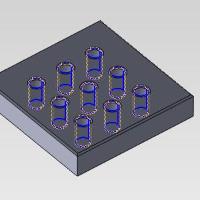
Sorted
Hole List - This group can be thought of as the machine
sequence list and shows all holes that have been assigned a position
in that sequence. All holes in this list will be have their highlight
set to red in the graphics area. Highlighting holes in this list
will change their color in the graphics area from red, to pink.
There will always be one highlighted hole in this list.
 - moves the selected
hole up one position in the Sorted Hole List. - moves the selected
hole up one position in the Sorted Hole List.
 - moves the selected hole down one position
in the Sorted Hole List. - moves the selected hole down one position
in the Sorted Hole List.
 - deletes the selected hole from the Sorted Hole List.
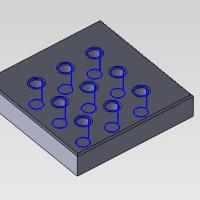
Remaining
Hole List - This group contains all holes that have
not been assigned a position in the machine sequence. All holes
in this list will be highlighted blue in the graphics area. Highlighted
holes in this list will have their highlight color changed from
blue, to green.
 - resets the lists to default.
Steps
1) Getting Familiar
-
Left-click in the
graphics area, away from your holes.
In moving the mouse slightly, you will notice that the mouse
location is being traced.
While the mouse location is being traced, Hole Selection Mode
is active. The mouse location continues to be traced until
you left-click again.
-
Left-click
the mouse in the graphics area again.
In moving the mouse, you will notice the mouse location is
no longer being traced.
Hole Selection Mode is deactivated.
-
Left-click
to activate Hole Selection Mode and move the mouse slightly
to verify the mouse location is being traced.
-
Click
and hold the scroll wheel on the mouse, or use a 3D mouse
to rotate the model slightly.
If you do not rotate the model too much, you will notice Hole
Selection Mode remains active.
If the model is rotated over a particular angle threshold,
Hole Selection Mode terminates and the mouse location is no
longer traced.
This is to help keep you from selecting holes accidentally
while rotating a model.
-
Practice
entering and exiting Hole Selection Mode and get a feel for
the amount of rotation allowed without exiting Hole Selection
Mode.
2) Sorting Holes
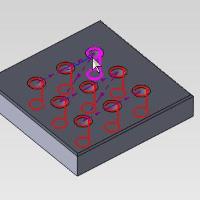
-
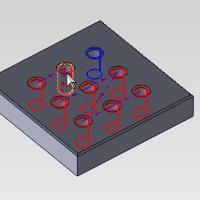
While
in Hole Selection Mode, move your mouse over the first hole
to be machined.
Tip: When
the model is rotated, notice hole geometry is highlighted with
an arc at the top, an arc at the bottom, and a line connecting
them. To select the hole, it is not necessary to touch the highlighted
color exactly, as a fully cylindrical bounding area is created
within those highlights
|
Model
|
Remaining
Holes
|
Bounding
Area
|
|
|
|
|
The highlight color
of the hole changes to pink and it is added to the Sorted Hole
List.
-
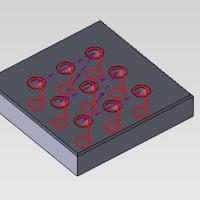
Continue
dragging the mouse through the holes in the order to be machined,
until all are selected.
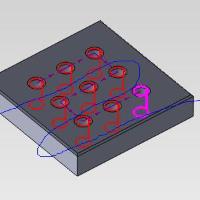
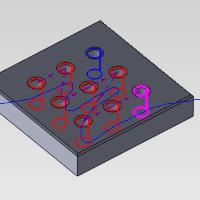
Notice there is the path traced out by the mouse in blue, and
another purple path with dotted lines and arrows. This path
shows the sequence in which the holes will be machined.
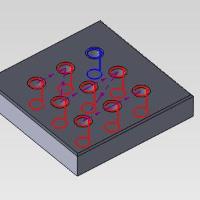
3) Clearing Sequence
-
Click
the icon
under the Remaining Hole List to reset the sequence.
All holes are removed from the Sorted Hole List and moved back
to the Remaining Hole List.
4) Skipping Holes
-
Enter
into Hole Selection Mode to select the holes again.
-
Take
a moment to skip a hole during the selection process.
-
Exit
Hole Selection Mode and notice the sequence path skips the
hole we purposely missed.
4) Inserting Holes
-
Before
entering into Hole Selection Mode, move your mouse into the
bounding area of the hole to machined immediately prior to
the skipped hole.
-
Click
inside of the bounding area of the Sorted Hole to be machined
prior to the hole we intend to insert.
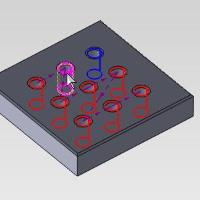
The Sorted Hole highlights pink.
The Remaining Holes we select next, are insert into the Sorted
Hole List directly after the hole whose bounding box we were
in while activating Hole Selection Mode.
-
Drag
the mouse through the bounding area of the Remaining Holes.
All holes are now sorted.
Take a moment to notice the sequence path laid out in purple.
4) Adjusting Sorted
Hole List
-
When
a Sorted Hole is selected in the list, the arrow icons can
be used to adjust its position in the list.
Take a moment to highlight a Sorted Hole and adjust its position
in the list and observe the resulting changed in the sequence
path.
|