The System Tab
Introduction
This topic will explain the System tab of the Settings dialog, will explain where to access it, will explain the options found in it, and will provide links to related topics.
The System Tab
The System Tab of the Settings dialog handles system settings like directories, CAM Tree flyouts,
Navigation
To access the Settings dialog , do one of the following:
- Select Tools > BobCAM >
 Settings.
 - In the BobCAM ribbon, click Settings.
- In the BobCAM Command
Manager Tab, select Settings.
By default the Settings dialog opens on the System tab.
The System Tab
General
Directories
Each item listed shows the file path in
which the files for each item are stored. Click in the text field to input
the file location manually, or click the ![]() button next
to each item to open the Browse for Folder dialog box. You can select
a new folder in which to store the files for the selected item. Generally
these should not be changed from the default directories.
button next
to each item to open the Browse for Folder dialog box. You can select
a new folder in which to store the files for the selected item. Generally
these should not be changed from the default directories.
- Data Folder - is the location for all of the BobCAD-CAM Data folders.
- CAM Features - is the location for storing the features that are saved in the CAM Tree.
Warning: Incorrect modification of these file paths can cause the system to malfunction. Do not alter these paths unless you fully understand how they work.
Data Collection
- Help improve BobCAD-CAM by sending usage statistics - BobCAD-CAM collects usage statistics from the users to help understand what features of the software are being utilized the most and aid in deciding what improvements to focus on for future releases. See https://bobcad.com/privacy/software-usage/ for more information.
 Leave the check box selected so we can improve the features of the software you use the most.
 Clear the check box to not share your feature usage and hope that you like what we create based on what others use most.
User Interface Options
Tree Behavior
-
Double-click - determines what double clicking an item in the CAD Tree, CAM Tree, or BobART Tree does. Choose between:
- Edit - launches the applicable dialog to allow you to adjust parameters in the wizard, edit geometry, set up tools, etc.
-
Expand/Collapse - allows you to expand and collapse items in the CAM Tree.
CAM
CAM Tree
- Enable CAM Tree Flyouts - The CAM Tree Flyouts appear as the '>>' symbols next to items in the CAM Tree. These allow you to double check some, and even edit other values by simply clicking on them in the CAM Tree. Select the check box to show, and be able to utilize, the CAM Tree Flyouts. Clear the check box to hide the CAM Tree Flyouts.
- Auto Blank New Items - Determines the Blank/Unblank state of newly created features and their operations. By default toolpath is shown until it is hidden by the user. Using this option will reverse that and the toolpath will be hidden until the user clicks an operation in the CAM Tree, or unblanks the toolpath. Select the check box to have the toolpath of newly created features hidden. Clear the check box to have the toolpath of newly created features shown.
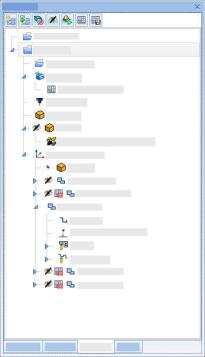
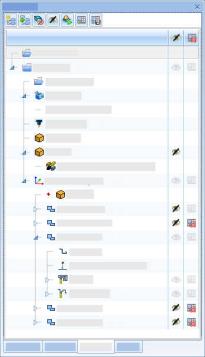
Look and Feel
- Style - allows you to adjust whether the Blank/Unblank and Post Yes/No states are accessed through the context menu only (Classic), or whether they are shown in columns in the CAM Tree and used as toggles (Extended).
| Classic | Extended |
|
|
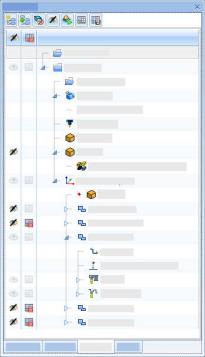
- Status Location - allows you to adjust whether the Blank/Unblank and Post Yes/No toggles are located on the left or right side of the CAM Tree.
| Left | Right |
|
|
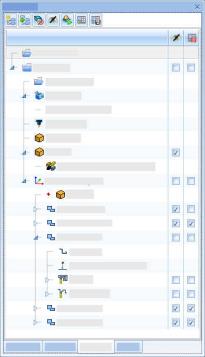
- Status Style - allows you to adjust whether the Blank/Unblank and Post Yes/No toggles are shown as icons or check boxes.
| Icons | Check boxes |
|
|
|
Posting
- Font - allows you to set the font used for the posted code in the Posting Manager.
- Apply to Default / Document - Applies the currently visible settings to the other document type. When in the Document Default tab, this will apply the same settings to the Current Document. When in the Current Document tab, this will apply the same settings to the Document Default.
Note: Only one page at a time can be applied to the other document type with the "Apply to ..." button. This ensures that the user can see the settings that are being copied to the other document type.
- OK - Closes the dialog.
- Apply - Applies the current settings.
- Cancel - Cancels any changes that have not been applied and exits the dialog.