Emboss Texture From Image Example 1
Introduction
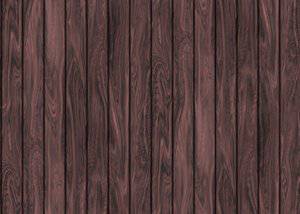
This topic explains how to create an Emboss Texture from Image feature with BobART. This is a great way to add a machinable texture to an embossed model. In this example you create an emboss feature using a seamless/repeatable wood texture image file. You explore the available feature parameters as you apply the texture to an existing model.
Example File
The part file for this tutorial is available for download at: http://www.bobcad.com/helpfiles. If you are connected to the Internet, you can click the link provided to download and save the Emboss Texture from Image Example 1.SLDPRT zip file. After downloading the zip file, extract the files on your system in a place that is easy to remember. You can then open the file to use with this tutorial.
In this example you open an existing file with a sign that was made using Emboss from Component. The sign and the image file that is used to create a texture are shown next.

Part 1) Open the Example File
-
Click the File, and Open.
-
In the Open dialog box, select the folder in which you saved the example files.
-
Select Emboss Texture from Image Example 1.SLDPRT, and click Open.
The file opens and the model displays in the graphics area.

Part 2) Add the Feature and Select the Image File
-
In the Manager Pane, click the
 BobART tab.
 -
In the BobART tree, right-click
 Emboss Model, point to EmbossTexture, and click From
Image.
Emboss Model, point to EmbossTexture, and click From
Image.
The Texture From Image dialog box displays. -
In the Name box, select the text, and type Hardwood Texture.
Click Color. In the Color dialog box, select any color for the feature and click OK.
Click the Application Type arrow, and click Merge High.
To close the dialog box and add the feature to the BobART tree, click OK. -
In the BobART tree, right-click
 Image, and click Re/Load
Image.
Image, and click Re/Load
Image.
The Open dialog box displays. -
At the bottom of the dialog box, next to Files of Type, click the arrow and select All Files (or PNG) from the list.
Locate the folder in which you saved the example file, and select Dusty Wood.png.
Click Open.
Part 3 Add the Texture and Edit the Feature Parameters
-
To add the feature to the model, right-click
 Emboss
Model, and click Regenerate.
Emboss
Model, and click Regenerate.

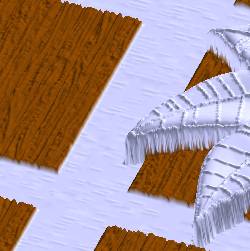
With the Merge High application type and the small Z Depth, the texture only appears in the lowest area of the model -
In the BobART tree, right-click
 Hardwood Texture, and click Edit.
The Texture From Image dialog box displays. -
Notice the Current Attributes group on the right side of the dialog box. The size of the selected image and the model display for reference. The image size is used to set the spacing of the texture/pattern.
Click Scale to Stock Size. This is useful when you are using an image file that is not a seamless/repeatable texture or you do not want the texture/image to repeat.
In the Z Depth box, change the value to 0.350.
To close the dialog box, click OK. -
To add the changes to the model, right-click
Emboss
Model, and click Regenerate.


Part 4) Edit the Pattern Size
-
Right-click
Hardwood Texture, and click Edit. -
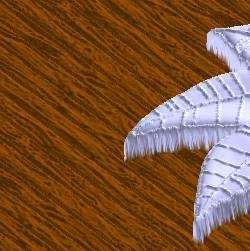
To create the texture using the actual size of the image, set Scale X (%) to 100.00 and Scale Y(%) to 100.00.
Because the image is smaller than the model, the texture is now repeated to fill the entire area defined by feature (currently the entire model).
Click OK to close the dialog box. -
Right-click
Emboss
Model, and click Regenerate.


Part 5) Edit the Pattern Spacing
-
Right-click
Hardwood Texture, and click Edit.
Set the Spacing X value to 125.00 and Spacing Y value to 125.00.
The texture now uses 125 percent of the size of the image for each repetition of the pattern.
Click OK. -
Right-click
Emboss
Model, and click Regenerate.
-
Edit the feature, and in the Progressive Shift box, type 40.00.
-
Click OK, and Regenerate the feature.


Notice that the start point of each row of the texture is progressively shifted (by 40 percent).
Part 6) Rotate the Texture
-
Right-click Hardwood Texture, and click Edit.
-
In the Spacing X box, double-click to select the text, and type 100.00.
-
Press Tab, and type 100.00 in the Spacing Y box.
-
Press Tab, and type 65.00 in the Rotation Angle box.
-
Press Tab, and In the Progressive Shift box, type 0.00.
-
Click OK, and Regenerate the model.

Part 7) Add a Second Feature and Assign a Boundary
The settings used thus far have allowed us to avoid assigning a boundary to contain the texture. When you do not assign a boundary, you are applying the texture to the entire model. Because the first texture is lower (in Z) than the rest of the model, it only shows where we want it. In this part, you add another feature and apply the texture to the border of the sign. The boundary is needed because this second texture is higher than the rest of the model.
-
In the BobART tree, right-click
Emboss Model,
point to EmbossTexture,
and click From Image. -
In the Name box, select the text, and type Border Texture.
Confirm the Application Type is set to Add.
In the Z Depth box, select the text, and type 0.750.
Click OK. -
In the BobART tree under
 Border
Texture, right-click Image,
and click Re/Load Image.
Border
Texture, right-click Image,
and click Re/Load Image.
At the bottom of the Open dialog box, next to Files of Type, click the arrow and select All Files (or PNG) from the list.
Select Dusty Wood.png.
Click Open. -
In the BobART tree, right-click
 BoundaryGeometry,
and click Re/Select.
BoundaryGeometry,
and click Re/Select.
In the Feature Manager design tree, select the Border feature.

To confirm the selection, click ![]() .
.

Note: For the remaining images in this example, sketches are hidden from view to make it easier to see the texture on the border of the sign. (In the View menu, click Sketches.)
-
Right-click
Emboss
Model, and click Regenerate.


-
Right-click Border Texture, and click Edit.
Click Scale to Stock Size.
Click OK, and Regenerate the model.


-
Right-click Border Texture, and click Edit.
Set the Z Depth to 2.00.
Click the Application Type arrow, and click Merge High.
Click OK, and Regenerate the model.


Even though the Z Depth of the feature is currently 2.00, the total height of the model is actually less than 1.00. This is done to show you that the Z Depth for Emboss Texture from Image does not necessarily create the feature at exactly the specified depth. The Z Depth is based on the information in the image file used. Sometimes you need to experiment to create the desired result. The final result is an interesting texture that blends with the surface beneath it. You can change the Application Type to Add to compare the differences in the border texture and see the creative differences.
This concludes the tutorial.