Emboss Texture from Art Surface (.bbas) File Example 1
Introduction
This help topic explains how to create an Emboss Texture from a BobART Surface File (.bbas). For this example, you add a feature to a new file to learn how the parameters affect the result of the texture. At the end of the tutorial, an example of using the texture with an existing model is shown.
Example File
The BobART Surface file for this tutorial is available for download at: http://www.bobcad.com/helpfiles. If you are connected to the Internet, you can click the link provided to download and save the Emboss Texture from Art Surface Example 1.SLDPRT zip file. After downloading the zip file, extract the files on your system in a place that is easy to remember. The .bbas file is used to create the texture for this example.
For this example, a new file is created and the Scroll.bbas surface file is used to explore the feature parameters. In the last part of the example, you open the Emboss Texture from Art Surface File Example 1.SLDPRT file and apply the final texture to an existing model.
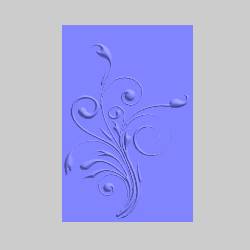
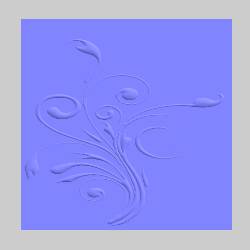
The BobART surface file (Scroll.bbas) used in this example is shown next.
Part 1) Create a New File and Create BobART Stock
-
In the Quick Access Toolbar, click
 New.
New. -
In the Manager Pane, click the
 BobART
Manager tab.
BobART
Manager tab. -
In the
BobART tree, right-click  Emboss Model,
and click Create/Modify Stock.
Emboss Model,
and click Create/Modify Stock.
The Selection Manager displays for you to assign a coordinate system used to place the stock. For this example, we use the SolidWorks world coordinate system so no selection is needed.
Click .
.
The Stock Parameters dialog box displays. -
In the Model Size group, set the X value to 8.00, and set the Y value to 8.00.
-
To create the stock, click OK.

Part 2) Add the Feature and Select the .BBAS File
-
In the
BobART
tree, right-click Emboss Model, point to EmbossTexture,
and click From Art Surface (.bbas)
File. -
In the Texture From Art Surface dialog box, in the Name box, change the description to My Art Texture.
-
To close the dialog box, click OK.
The My Art Texture feature is added to the BobART
tree.
My Art Texture feature is added to the BobART
tree. -
Under
My Art Texture, right-click
 Art Surface,
and click Re/Load Art Surface.
Art Surface,
and click Re/Load Art Surface. -
In the Open dialog box, select the folder in which you extracted the example file.
-
Select Scroll.bbas and clickOpen.
Part 3) Edit the Feature
-
In the BobART tree, right-click
My Art Texture, and click
Edit. -
In the Texture From Art Surface dialog box, notice the Current Attributes group. This is an informational display that shows the current Emboss Model Size and the Art Surface Size.
To make the surface file the same size as the stock, click Scale to Stock Size.
The Scale X and Scale Y parameters are automatically set. The Scale Z parameter remains at 100.000. -
To close the dialog box, click OK.
Part 4) Regenerate the Model
- In the BobART tree, right-click
 Emboss Model,
and click Regenerate.
Emboss Model,
and click Regenerate.
Part 5) Edit the Image Size Control and Regenerate
-
Right-click My Art Texture, and click Edit.
-
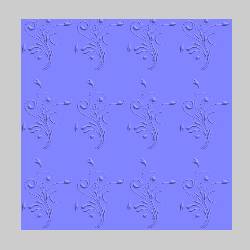
In the Image Size Control group, set the Scale X value to 100.000, and set the Scale Y value to 100.00.
This sets the surface file size back to the original size. The texture is now tiled to fit the stock size. (The 3x2 surface file is repeated across the 8x8 stock.)
Click OK. -
To view the results, right-click
Emboss
Model, and click Regenerate.
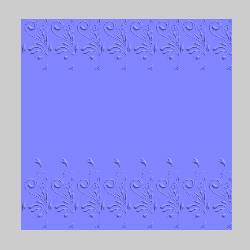
The Scale parameters change the size of the selected BobART surface file (.bbas) that is used to create the texture/pattern.
Note: When the Scale X parameter is changed to 135.00,
the regenerated model result is as follows.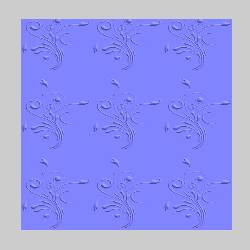
Part 6) Edit the Pattern Location Control and Regenerate
-
Right-click My Art Texture, and click Edit.
-
In the Image Size Control group, confirm that Scale X, Scale Y, and Scale Z are set to 100.00.
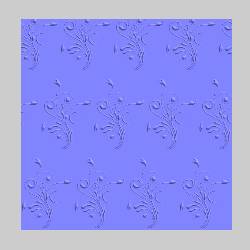
In the Pattern Location Control group, set Spacing X to 50.00, and set Spacing Y to 200.00.
Click OK. -
Right-click
Emboss
Model, and click Regenerate.
The result shows that only the spacing of the texture/pattern (not the surface file) is scaled. You can see that the scroll is repeated every inch along the X-axis. (The art surface size in X is 2.00 and the spacing is set to 50.00 percent.) This also means that half of the art surface is removed for each repetition. The spacing along the Y-axis now uses 6.00 inches for the texture instead of the previous 3.00 inches. (The art surface size in Y is 3.00, and the spacing is set to 200.00 percent.)
Part 7) Edit the Progressive Shift
-
Edit the feature.
-
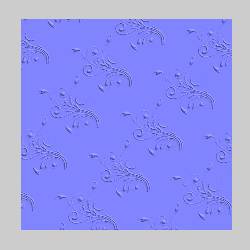
In the Pattern Location Control group, set Spacing X and Spacing Y to 100.00.
In the Progressive Shift box, set the value to 37.00.
Click OK. -
Regenerate the model.
The Progressive Shift parameter creates an offset of each row of the texture/pattern so that the starting position is different for each row.
Part 8) Add a Rotation Angle
-
Edit the feature.
-
In the Pattern Location Control group, set the Rotation Angle to 52.00.
(The rotation angle is measured from the X-axis.)
Click OK. -
Regenerate the model.
-
Now that you have learned about the feature parameters, you can close the file. (It is up to you if you want to save the file or not.) For the next part of this example, you learn how to assign a boundary and apply the feature to an existing model.
Part 9) Assign a Boundary to the Feature
To show how to assign a boundary, the texture is applied to the body of a guitar. For this part, you can open the provided example file to follow along with the steps.
-
Click the File tab to enter the backstage, and click Open.
In the Open dialog box, select the folder in which you saved the example file.
Select EmbossTexture from Art Surface Example 1.SLDPRT, and click Open.
Click the BobART
tab, and click  to expand
Emboss Model.
to expand
Emboss Model.
Notice the third feature in the BobART tree, My Art Texture. The same feature that you created in this example is already added to the tree.
Click to expand the My Art Texture feature. -
Under
 My Art Texture, right-click
 Boundary Geometry,
and click Re/Select.
Boundary Geometry,
and click Re/Select. -
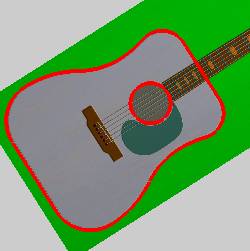
In the Feature Manager design tree, select the Body feature, and select the Sound Hole feature.
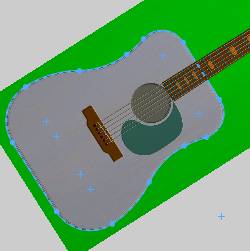

When selecting a boundary, multiple closed chains can be selected.
To confirm the selections, click .
.
-
Right-click
Emboss
Model, and click Regenerate.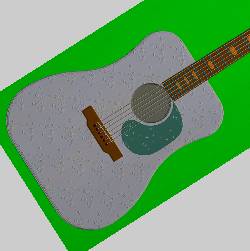
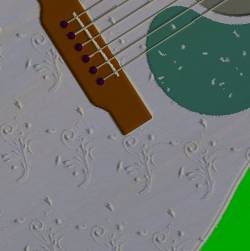
The texture is being added to the model and it is starting to appear through the pick guard. For this application, the texture should be cut into the body and not raised from it. -
Edit the feature, and change the Application Type to Subtract.
-
Regenerate the model.


The texture is no longer added to the model, but is now subtracted or cut into the body of the guitar.
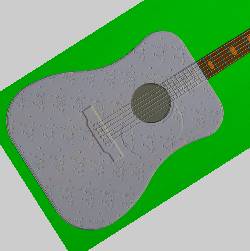
The only other pertinent information about this example is the Emboss Texture from Art Surface (.bbas) File feature location in the BobART tree. The texture feature is added after the features that created the body of the guitar, which is before all of the remaining features (the bridge, neck, and strings).
If you drag the My Art Texture feature to the bottom of the tree and Regenerate, the texture is then subtracted from all features in the tree as shown next.
This concludes the tutorial.