What's New in BobCAM for Rhino V2
Introduction
This release of BobCAM for Rhino V2 offers more functionality than ever before. For this release we chose to focus on two major topics: usability and more toolpath power! We have been working very closely with our customers to listen to their everyday programming needs and the minor nuances that would help them get their programs to the machines even faster. From focusing on reducing the number of times you need to right-click, to added tools to manage your work offset numbers, to new toolpaths for deburring your parts, and even hole recognition! Every customer is going to find enhancements in the product that make programming feel more natural.
The BobCAM for Rhino V2 release is available in the following languages:
- English
- Spanish
- French
- German
- Japanese
- Czech
- Portuguese
- Italian
CAM
General
Settings Dialog Updates
General Page: Browser
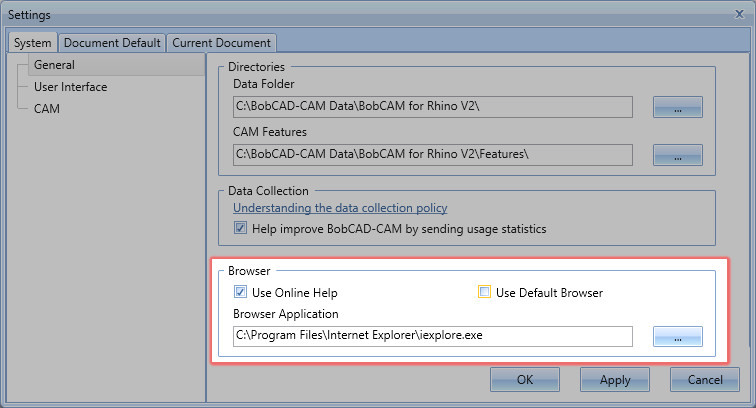
The Help group in the General page of the System tab has now become the Browser group. The new Use Default Browser option allows you to decide which browser is used to launch the Online Help, and the Setup Sheets. By default, the system uses your default browser. By clearing the check box seen in the image below you can now set these to be launched with the browser of your choice!
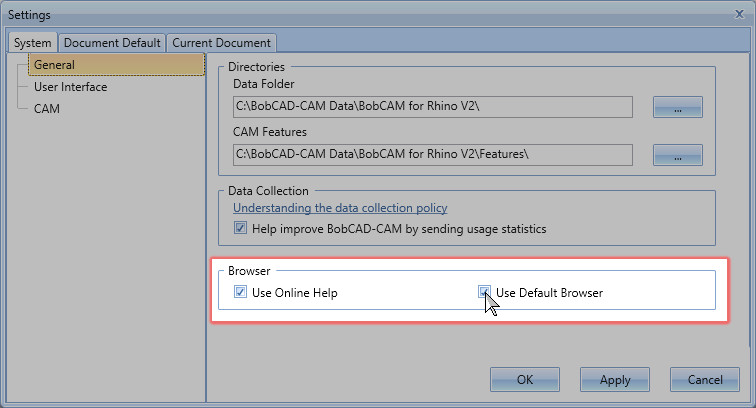
Simply select the .exe of the desired browser and that will what is used to launch the online help and setup sheets!
User Interface Page: Tree Behavior
The new User Interface page of Settings dialog has a couple things you would already be familiar with, like the Theme and Selection mask options from the User Profile page of the Backstage, but also has the new Tree Behavior options! We wanted to reduce the need to right-click even more by making it so you could simply edit your features, operations and more just by double clicking on the item! We also made this an option, so for any users that preferred the previous method of expanding and collapsing the items can simply set that as the option.
-
Edit - launches the applicable dialog to allow you to adjust parameters in the wizard, edit geometry, set up tools, etc.
-
Expand/Collapse - allows you to expand and collapse items in the CAM Tree.
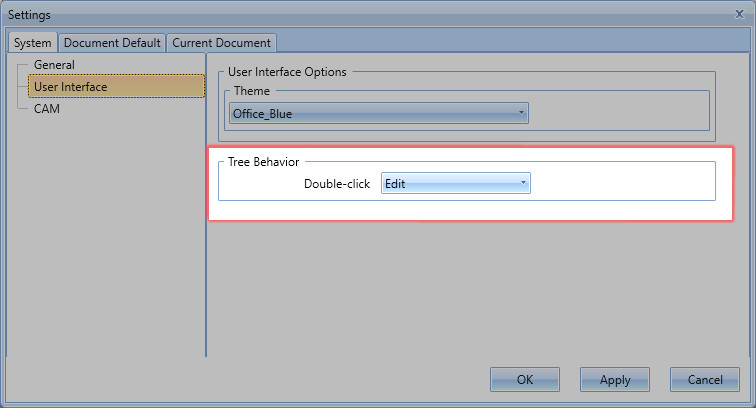
Note: Tree Behavior applies to items in your CAD Tree, CAM Tree, and BobART Tree.
CAM Page: Auto Blank New Items
The new Auto Blank New Items option allows you to have the toolpath of your new CAM features hidden upon creation! By default, as soon as a feature is created, the toolpath of all operations in the feature is immediately visible. This makes sense, since you're going to want to see if the toolpath appears to be what you had in mind before simulation. However, checking the toolpath of your feature when there are many overlapping operations is nearly impossible. It's easy enough to blank the feature so you can click operations in the CAM Tree to view their toolpath, but with this version we're saving you those extra couple mouse clicks by allowing you to blank newly created features by default!
![]()
CAM Page: Look and Feel
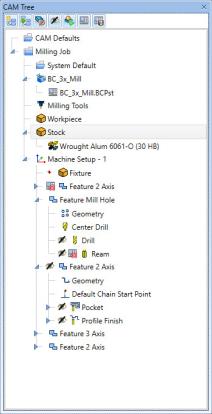
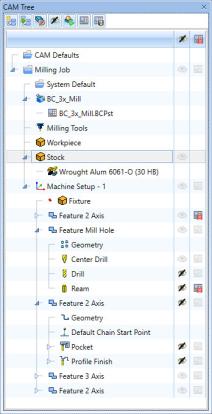
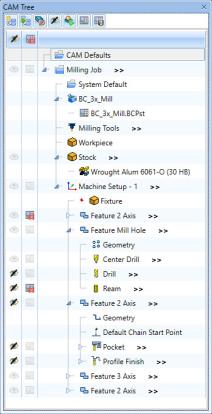
This version of BobCAM gives you the option to save yourself a lot of right-clicking in the CAM Tree, while making it much easier to see the state of each item at a glance! By default, changing the status of CAM Tree items requires right-clicking the item to update the status through the context menu. Once you do, an icon is placed in front of the items name showing that state. This is all pretty standard, but with the new Look and Feel options for the CAM Tree in the Settings menu, you can switch to the new Extended style CAM Tree to save a ton of right-clicks and provide a little visual organization! Now use Blank/Unblank and Post Yes/No with a simple click.
| Classic | Extended |
|
|
Look and Feel options
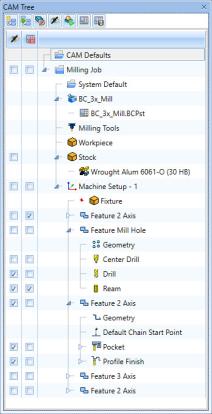
We went even further with the new Extended CAM Tree style by allowing you to control the look and feel of it! When we consulted our customer base, it was clear there was a divide where the users would prefer these new options to be, so we just provided you the option to choose yourself. These options let you decide which side of the CAM Tree the states appear, and whether the states are shown as icons or check boxes.
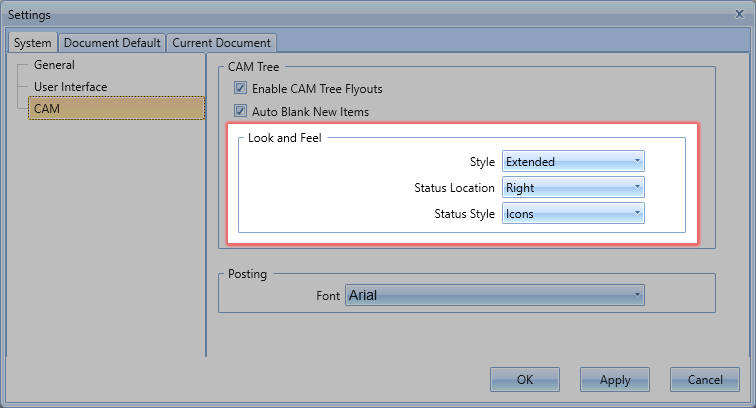
| Status Location | Status Style | |||
| Left | Right | Icons | Check boxes | |
|
|
|
|
|
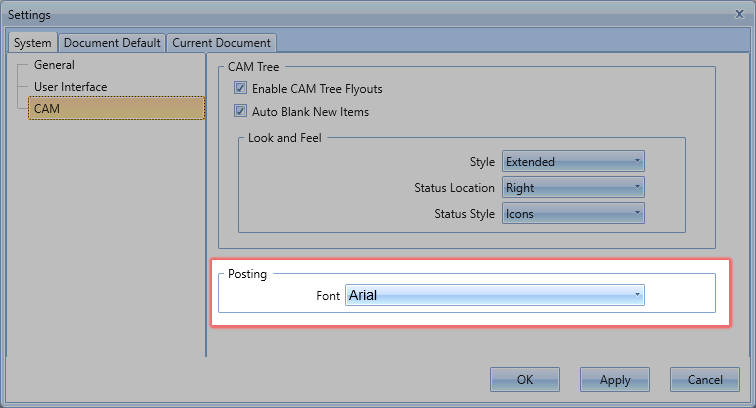
CAM Page: Posting Font
You can now control the font used for your code posted in the Posting Manager. We've been updating the Posting Manager to make several things easier for you, and one thing customers have asked for is the ability to update the font used for the code. While it is strictly a cosmetic enhancement, we heard you, and it has now been implemented.
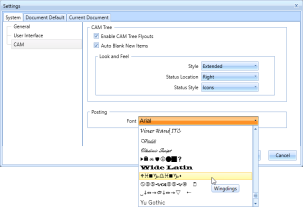
|
* Please Font responsibly. If we get a tech support call from your boss because you thought posting in Wingdings would be funny, we're going to take it away. |
Coolant Options
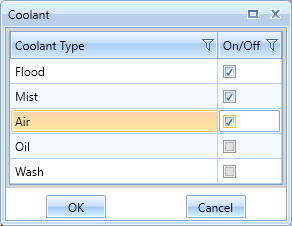
Previous versions of BobCAM would only allow you to enable a single coolant option per operation which was fine for most of our customers. However, many machines these days have multiple coolant options that can be enabled at once and every manufacturer likes to handle their own and of codes a little differently! Now instead of having to work with the posting department to build you custom posting dialogs in the operations, BobCAM now natively supports up to 10 coolant on and off codes to be optionally used.
Please note that modifications to your existing post processor will be needed to add this new functionality.
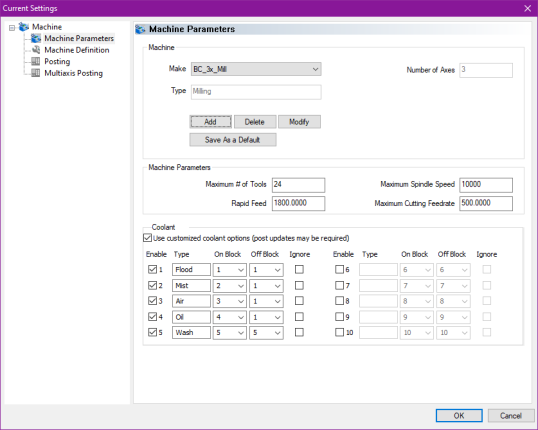
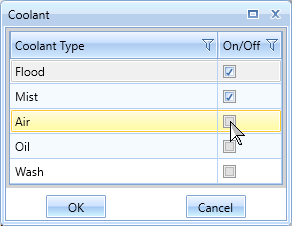
Once set, a single coolant option, or a combination of these coolant options, can be turned on by launching the Coolant dialog from operations tool page.
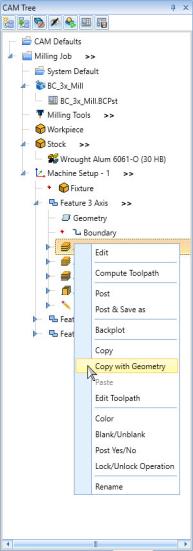
Copy with Geometry
With the new Copy with Geometry option, you can copy all the settings of the feature along with all the geometry associated with the feature and paste it in the same document!
|
Copying and pasting features can be a huge time saver when programming a part. Making sure all the settings that you’ve taken the time to dial in can help to ease your mind as well, but in the past geometry always had to be selected again. This could be a pain when you have several boundaries, various surfaces selected for gouge checking, other surfaces with advanced allowances applied, and on and on. Now with the new Copy with Geometry option, these troubles are a thing of the past. It’s never been easier! |
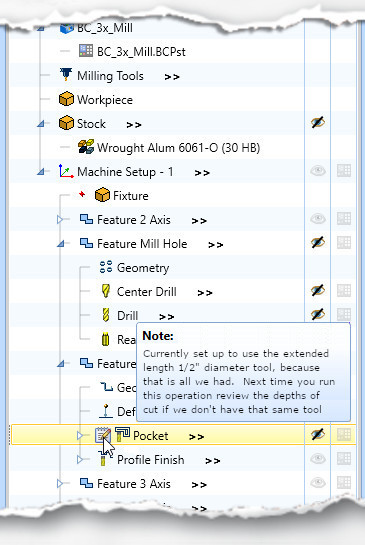
Add Note
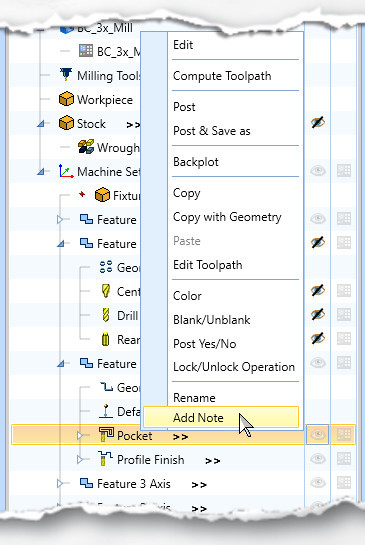
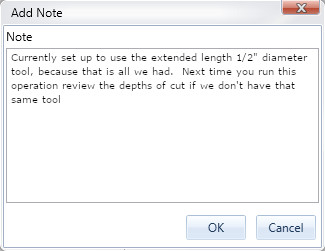
The new Add Note option allows you to create your own custom tool tips for items in your CAM Tree! Tool tips can be found everywhere in software and are a great way to get a quick explanation of a functions purpose. Simply hover your mouse over the function and a note pops up. In the new BobCAM for Rhino V2 we found a way to help you organize your job even more by giving you a way to create your very own tool tips. Simply right-click the item and choose Add Note. The Add Note dialog appears allowing you to type a message out. Click OK, and a Note icon is added to the item in your CAM Tree. The next time you, or another programmer hovers over that icon, the tool tip appears! Notes can be added to:
-
Job
-
Machine Setup
-
Feature
-
Operation
-
Index Systems
-
Groups
|
|
|
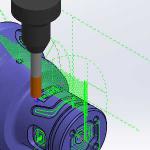
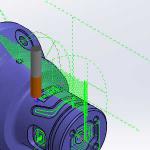
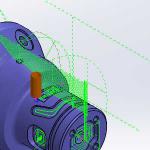
Backplot Visibility
The new visibility options in Backplot allow you to hide the individual components of the tool! In the past you could control the transparency of the entire tool assembly, but not the individual components. In this release, you can decide which aspects of the tool are visible.
|
|
|
|
|
|

|
|
|
|
|
This same functionality is available when backplotting for lathe operations as well!
|
|
|
|
|
|
|
CAM Wizard Tree state retained
In this version the expanded/collapsed state of the tree inside all your CAM Wizards is retained when the file is saved. When creating a feature with many operations, the items in the tree can easily run off the page and it can be handy to collapse and expand the individual operations. In the past when the wizard was closed and reopened, all operations would once again be expanded. Now, not only is the state of each operation retained when you reopen the wizard, but it's even retained when you save, close, and reopen the entire file!
CAM Tree focus retained
In this version the highlighted item in the CAM Tree retains focus when entering and exiting the CAM Wizard. While we have many ways to organize your CAM Tree, it can be easy to lose your place in large CAM Trees. In the past when you right-click an item in the CAM Tree to edit it, it only remained highlighted until you exited the wizard. This meant that you could lose track of the item you were just editing. Many customers in our online forum were requesting the item being edited should retain focus when editing the CAM Wizard. Well, we heard you! In this version, that is exactly what happens.
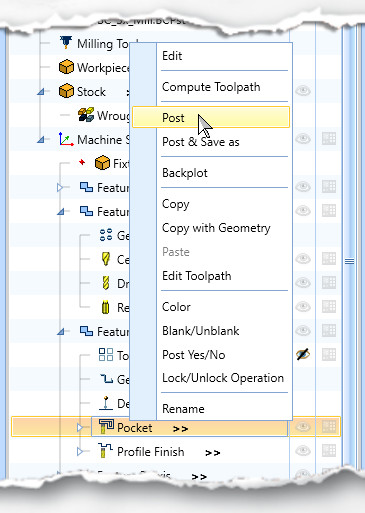
Post NC Programs for individual items
In this latest version of BobCAM we're giving you the ability to post particular portions of the program easier than ever before. While you have always been able to control what is posted out by setting everything else to Post No, doing this every time may need to post a different portion of the program can get a little tiring. Now BobCAM allows you to simply right-click the item and choose Post or Post & Save as to output that portion only! This can be done to output single features or operations, single Machine Setups, a single group, a single Index System, or Wrapping Group. Isolating the portion of the program you want to post has never been easier!
Mill
Mill Express
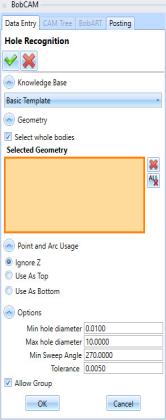
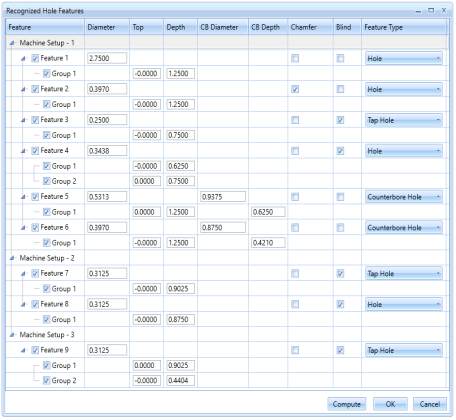
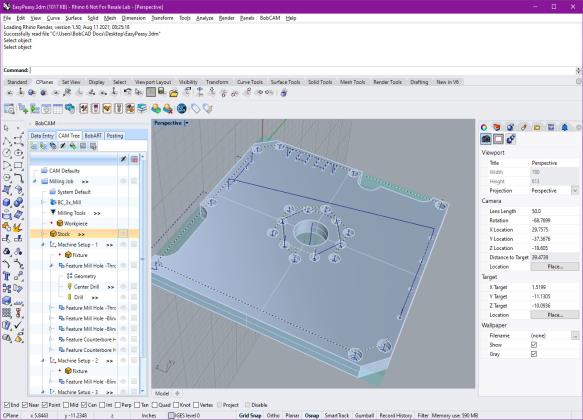
Hole Feature Recognition
We have taken Hole Feature Recognition to a whole new level in this release. Now, with a single click we recognize all four hole types, and their variations!
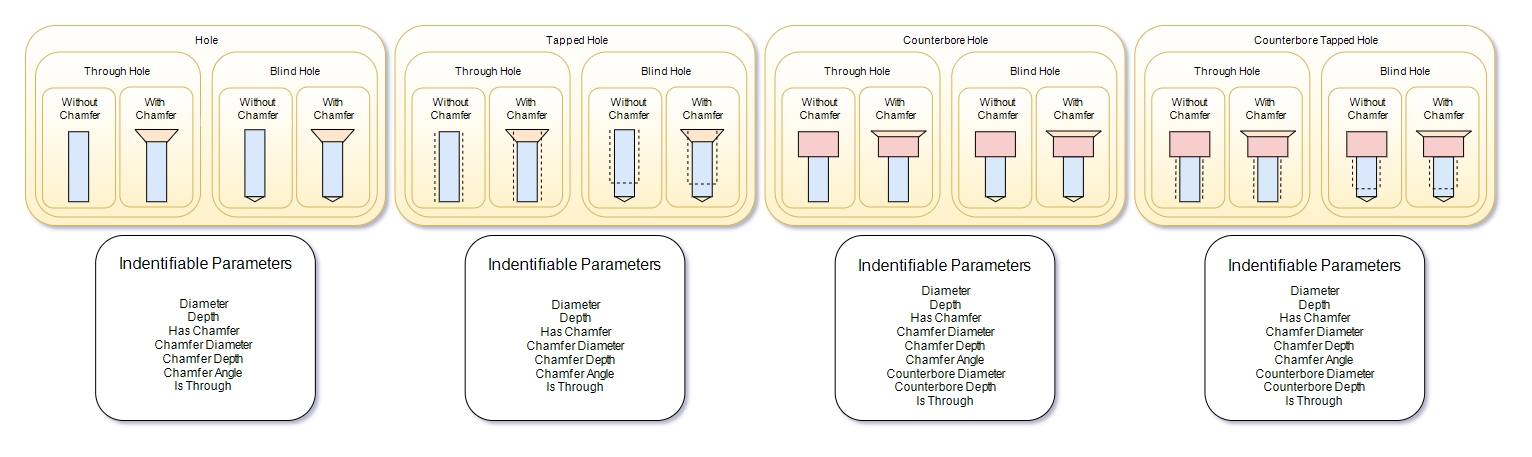
The machining features are automatically created based on a customizable set of rules in our new knowledge base, and all can be computed at once! In this release, feature recognition has been broken into several parts to give you the most control possible, while keeping things simple:
- Step 1 – Launch Hole Recognition
- Step 2 – Review found hole features
- Step 3 – Done! All holes machined
| Step 1 | Step 2 | Step 3 |
|
|
|
Add Property
The New Add Property function allows you to assign geometry thread information to be read by the Hole Recognition feature. While the Advanced Hole feature can automatically attach this information when creating complex 3D holes, existing part files may not have this information on the attached to the entities being machined. Whether your existing part file is a 3D model, or even just points and arcs indicating areas to be tapped, the new Add Property feature will allow you to tag each entity so the job can be done as quickly as possible with the Hole Recognition feature.

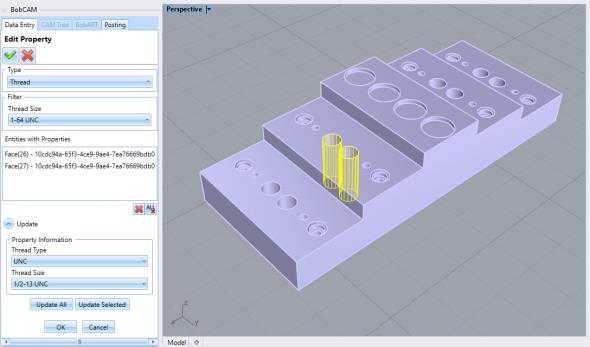
Edit Property
Once properties have been assigned to geometry with the Add Property function, the new Edit Property function will allow you to adjust the previously assigned values with ease! The filter drop down shows all thread sizes available for editing. With a particular thread size selected, all geometry with that thread size will be listed. Simply select the desired geometry and update it with the new thread information.
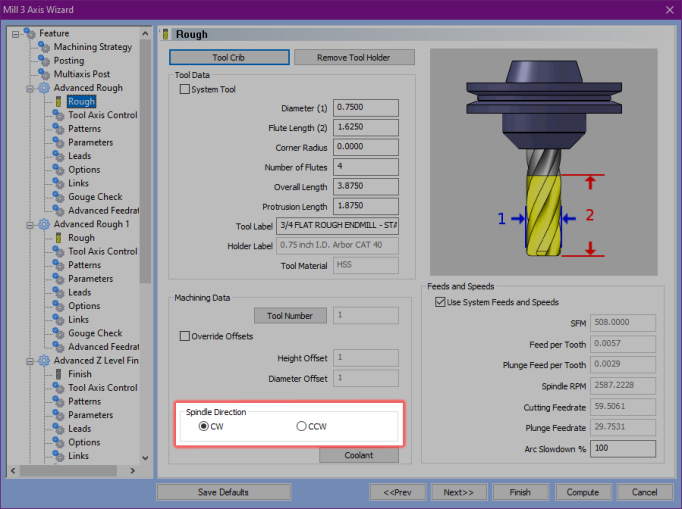
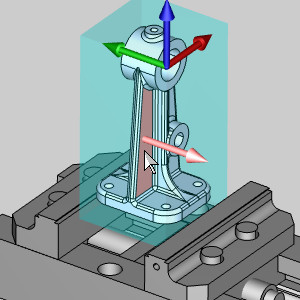
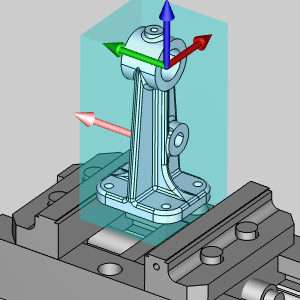
Spindle Direction
This new version has updated the user interface to allow the spindle direction to be updated with radio buttons in the tool page. While changing the spindle direction has always been possible be setting a negative Spindle RPM value, we have updated this version to make it intuitive and obvious for new users. With the new Spindle Direction radio buttons, a simple click is all you need to switch between clockwise and counterclockwise spindle directions.
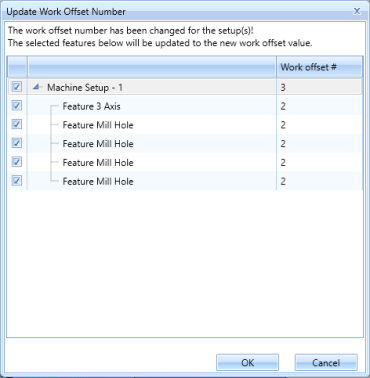
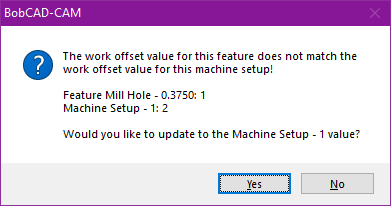
Work Offset Update
Keeping your work offsets straight has never been easier with the new pop-up dialogs! Whether you're updating the work offset of your machine setup, or pasting features between setups, you always want to make sure you'll be posting out the proper work offsets for all your features. When you’re updating the machine setup, this meant having to go through each feature to update it as needed. When pasting a feature into another setup, it meant being sure to remember to update that feature as needed. With the dialogs, this is done for you automatically! When updating the machine setup, the Update Work Offset Number dialog appears allowing you to clear any features you do not want to update. Simply click OK and you're done. When pasting a feature into a machine setup with a different work offset, a dialog appears offering to update the feature automatically!
| Updating the Machine Setup Work Offset | Pasting a Feature |
|
|
Mill 3 Axis Premium
Deburring
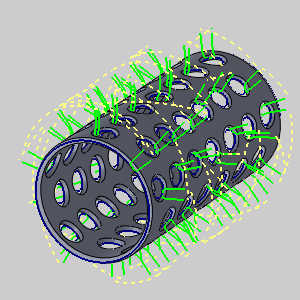
The new Deburring operation allows you to automatically create toolpath to trim complex edges or apply chamfers/fillets to the edges of your parts. For all machined parts, sharp edges must be dealt with. The burrs on sharp edges are a safety issue for the machinists working on them and can even affect the functionality of the part. While taking care of these edges on basic 2-3 axis parts is fairly simple, selecting each individual edge can be time consuming! The new Deburring operation makes this vital step of the machining process a breeze with automatic feature detection, automatic linking, automatic lead in and even automatic collision detection! Simply select your tool, select your geometry, and let us do the rest!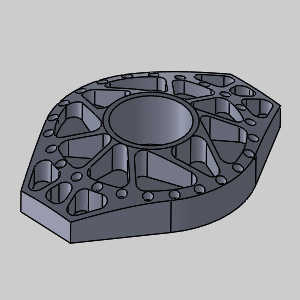
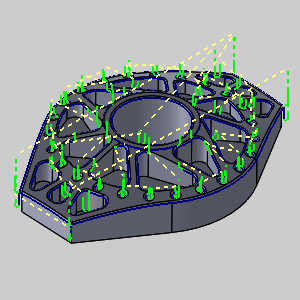
A part with this many edges would normally be a nightmare to deburr, but by just selecting the entire model, BobCAM for Rhino V2 gives you all the toolpath you need! The Deburr operation will even do undercuts automatically when a capable tool is selected for the operation!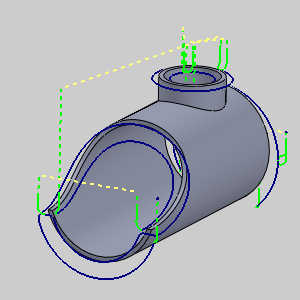
Mill 4 Axis Pro
Turn Milling
The new Turn Milling operation combines turning with milling tools to power through materials in record time! In many cases turning operations are applied to the stock to remove material as quickly as possible. The only issue with turning material down quickly is when the chips don't break properly and form large piles against the part called bird nests. These can be dangerous to the part finish, tool, and the machinist. The Turn Milling toolpath can be a super-efficient way to remove a lot of material on your 4 or 5 axis milling machines or your Mill Turn machines! By combining the efficiency of turning with the chip slinging power of an endmill, you can have the best of both worlds and power through material quicker than ever without having to worry.
Deburring
The new Deburring operation allows you to automatically create toolpath to trim complex edges or apply chamfers/fillets to the edges of your parts. For all machined parts, sharp edges must be dealt with. The burrs on sharp edges are a safety issue for the machinists working on them and can even affect the functionality of the part. While taking care of these edges on basic 2-3 axis parts is simple, creating a trimming path on complex multiaxis geometries can often take just as long as programming the entire part! The new Deburring operation makes this vital step of the machining process a breeze with automatic feature detection, automatic linking, automatic lead in and even automatic collision detection! Simply select your tool, select your geometry, and let us do the rest!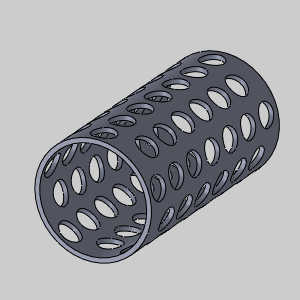
A part with this many edges would normally be a nightmare to deburr, but by just selecting the entire model, BobCAM for Rhino V2 gives you all the toolpath you need! The Deburr operation will even do undercuts automatically when a capable tool is selected for the operation!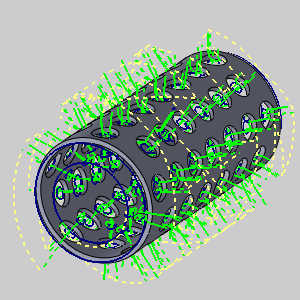
Mill 5 Axis Standard
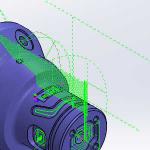
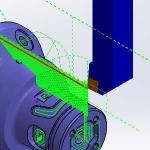
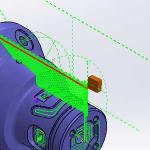
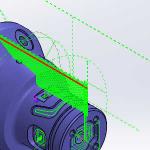
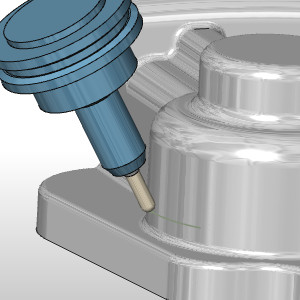
3 to 5 Axis Conversion
BobCAM
|
In the image to the left, you can see the arbor is colliding with the model and would not be able to cut that area if a 3 Axis gouge check were used. |
|
By switching to 5 Axis, we can use a gouge check and have it tilt the tool to avoid collisions! |
Note: While the 3 to 5 Axis Conversion in Mill 5 Axis Premium allow you to utilize Barrel Tools, these are not available with Mill 5 Axis Standard.
Mill 5 Axis Pro
Multiaxis Finishing
The new multiaxis machining patterns bring the power and speed of the Multiaxis Roughing to finishing! The multiaxis roughing was a revolution in roughing multiaxis parts quickly and easily, but until now a similar solution for finishing did not exist. Generalized toolpath operations have all the settings you could possibly need, so they can be utilized in a wide range of situations. These generalized toolpaths could be applied to the floors and walls of multiaxis parts, but with all those settings they were not designed for ease and simplicity. This meant it could take a bit of toying with all the various options to get the desired result. Now BobCAM
Multiaxis floor finishing
This path was designed to finish the floors of multiaxis parts. Pick your geometry and let us do the heavy lifting.
Multiaxis wall finishing
This path was designed to finish the walls of multiaxis parts. Pick your geometry and let us do the heavy lifting.

Note: While the Multiaxis finishing operations in Mill 5 Axis Premium allow you to utilize Barrel Tools, these are not available with Mill 5 Axis Pro.
Deburring
The new Deburring operation allows you to automatically create toolpath to trim complex edges or apply chamfers/fillets to the edges of your parts. For all machined parts, sharp edges must be dealt with. The burrs on sharp edges are a safety issue for the machinists working on them and can even affect the functionality of the part. While taking care of these edges on basic 2-3 axis parts is simple, creating a trimming path on complex multiaxis geometries can often take just as long as programming the entire part! The new Deburring operation makes this vital step of the machining process a breeze with automatic feature detection, automatic linking, automatic lead in and even automatic collision detection! Simply select your tool, select your geometry, and let us do the rest!
Mill 5 Axis Premium
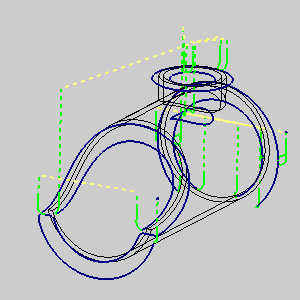
Port Machining
The new Port Machining operation from BobCAM
Multiblade
The new Multiblade operation allows you to create toolpath on multibladed parts faster than ever before. There's a reason impellers and blisks are used to showcase the multiaxis ability of CAM systems: Multiblade parts can be found everywhere from vacuums to aircraft and have always been the most challenging 5 axis parts to cut. Having to control everything aspect of tool movement on such complex parts requires intimate knowledge of the possible settings and hours of programming. The Multiblade operation has four patterns which are specifically designed to handle a particular aspect of the part. Roughing, Blade finishing, Hub finishing, and Fillet finishing are each designed to create optimum toolpath with very little input from the user. Use the Multiblade operation to flatten the learning curve and turn your hours of programming into minutes!
Auto 3+2 Roughing
BobCAM
-
Automatic - allows you to set a search angle increment, a maximum amount of stock to leave, and a maximum tilt range. We'll do the rest.
-
Semi-automatic - allows you to do the same thing, but also allows you to specify a preferred direction of approach.
-
Manual - allows you to take complete control and specify each allowable direction of machining.
Whether you want to pick each of the axis manually as seen below, pick a preferred direction, or just let BobCAM do the work for you, 3+2 Roughing can revolutionize your part programming.
|
|
|
Multiaxis Finishing with Barrel Tools
The new multiaxis machining patterns bring the power and speed of the Multiaxis Roughing to finishing! The multiaxis roughing was a revolution in roughing multiaxis parts quickly and easily, but until now a similar solution for finishing did not exist. Generalized toolpath operations have all the settings you could possibly need so they can be utilized in a wide range of situations. These generalized toolpaths could be applied to the floors and walls of multiaxis parts, but with all those settings they were not designed for ease and simplicity. This meant it could take a bit of toying with all the various options to get the desired result. Now BobCAM
Multiaxis floor finishing
This path was designed to finish the floors of multiaxis parts. Pick your geometry and let us do the heavy lifting.
Multiaxis wall finishing
This path was designed to finish the walls of multiaxis parts. Pick your geometry and let us do the heavy lifting.
Posting
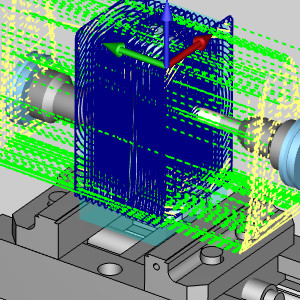
Search from the Posting Manager
In the new BobCAM for Rhino V2, searching your posted code can be done directly in the Posting Manager without the need to launch in an editor! In the past the Posting Manager only allowed you to view the code. In most cases though, if you want to look at the code you want to look for something in the code. This meant that you had to post the code, launch the code into an editor, and then search. If the code isn't the way you want, you would need to close the editor, update the program, repost, relaunch the editor and search again. Now you can simply post, click in the Post Manager, and press Ctrl+F. The search bar appears and you're ready to go.
APT Output
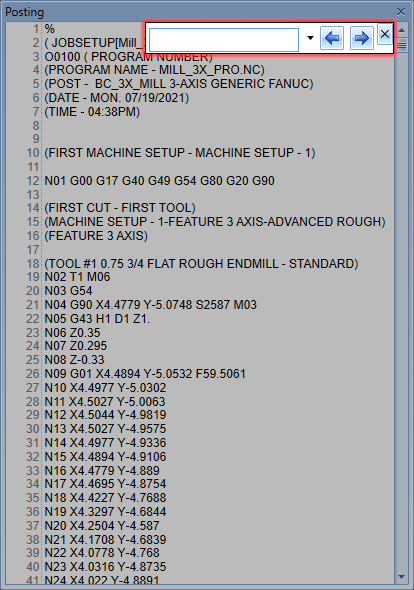
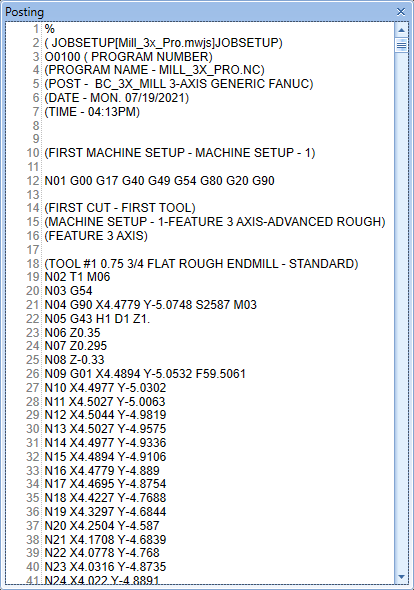
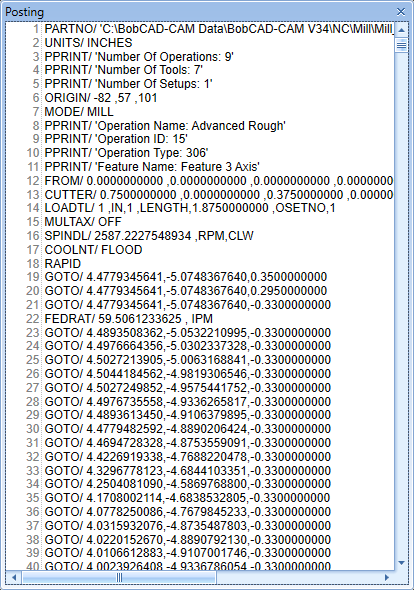
BobCAM can now output tool position in APT format for Milling jobs. In the past, once your toolpath was ready to send to the machine you would post the code using the default, or custom, post processors in BobCAM to generate the NC code. In some cases, customer work with a third-party post processing software that handles the creation of the final NC code by imputing the tool position information as a .apt file. Now, you can easily set your NC File Extension to ‘.apt’ in the Current Settings dialog to output in this format.
| .NC | .APT |
|
|
New Post Questions
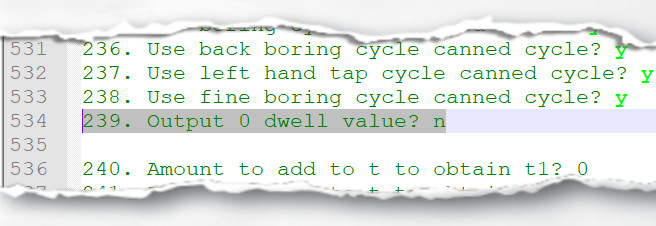
239
A new post question has been added to allow you to remove dwell values of zero when outputting your drilling canned cycles. In the past when the dwell value was left at the default of zero the posted code would output a dwell call with a zero value rather than just leave it out. In this version we've added post question 239 "Output 0 dwell value?". Now, by setting the value of this post question to "n", operations which do not use a dwell will not include that call.
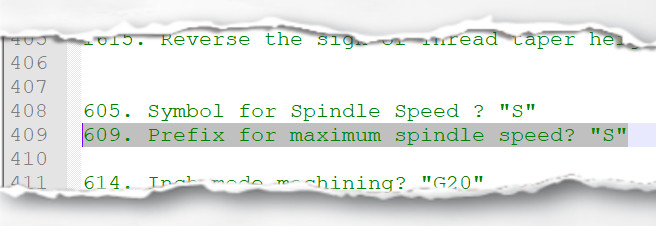
609
A new post question: 609. Prefix for maximum spindle speed? has been added to specify the prefix for the maximum spindle speed which is output using the smax post variable in the post processor.
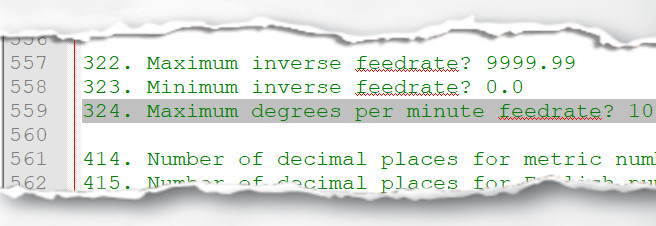
324
A new post question: 324. Maximum degrees per minute feedrate? has been added to specify the maximum speed when the multiaxis feed type is set to DPM by post question 441.
General
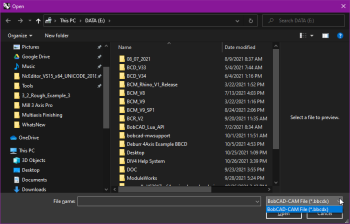
.bbcdx import/export
We have created a brand-new file format to share CAM, BobART and more information between our three separate product lines. The new BBCDX file format allows our users who work with our BobCAD-CAM stand-alone, BobCAM for SOLIDWORKS or BobCAM for Rhino product to share information between the systems. While the geometry information will still be different for each system, you will be able to merge in entire CAM Trees, BobART Trees, and BobART models into the other systems to share as much information as can be between these products. For full functionality, the minimum versions of each product required are as follows:
-
BobCAD-CAM V34 SP0
-
BobCAM for SOLIDWORKS V9 SP1
| Save As .bbcdx | Open .bbcdx |

|
|
Installer
The installation has been updated with a new option to launch the What’s New as a .htm file by default. In the past you had to open the help, and then access the What’s New topic to find out about the latest and greatest features. In this new release, the What’s New is launched automatically so you can quickly learn about all the nifty new options to make your programming job easier than ever before!