


 Leads: Advanced Rough
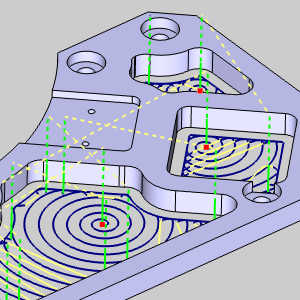
Introduction
This topic explains the Leads page of the Advanced Rough operation found in the 3 Axis Wizard, the options found in it, and will provide links to related topics.
Operation Stock
The Advanced Rough operation always uses a stock recognition for the toolpath calculation. By default, the stock definition from the Stock Wizard is used. You can also specify the stock to use by assigning geometry to the Operation Stock item in the CAM Tree. Operation stock allows you to remove unnecessary air cutting from the operation by passing stock for only the area that you want to cut. There are no settings needed in the wizard to use stock recognition for the Advanced Rough operation. The stock definition from the Stock Wizard is always used unless you assign Operation Stock.(View Selecting Operation Stock for more help.)
Tip: You can use simulation to save the stock model as an .stl file, which can then be used as Operation Stock. To learn more, view How to Save Simulation Stock as STL.
 Leads
Leads
Entry
-
 Plunge - the tool plunges directly to the start
point of the toolpath.
Plunge - the tool plunges directly to the start
point of the toolpath.

Type
-
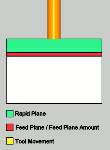
Single Depth - From the Feed Plane, Single
Depth will move at the Plunge Feedrate to the full Depth of Cut.
-
 Peck - From the Feed Plane, Peck will move
at the Plunge Feedrate to the Peck Depth, return to the Feed Plane
with a rapid move, rapid down to a point above the last depth
equal to the amount of the Feed Plane being used, before continuing
to the next Peck Depth amount at the Plunge Feedrate. This method
will be repeated until the full Depth of Cut is reached.
Peck - From the Feed Plane, Peck will move
at the Plunge Feedrate to the Peck Depth, return to the Feed Plane
with a rapid move, rapid down to a point above the last depth
equal to the amount of the Feed Plane being used, before continuing
to the next Peck Depth amount at the Plunge Feedrate. This method
will be repeated until the full Depth of Cut is reached.
- Peck
Depth - sets the increment to use for each peck.
-
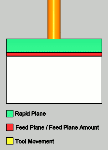
Fast Peck - From the Feed Plane, Peck will
move at the Plunge Feedrate to the Peck Depth, Rapid up to an
amount equal the Feed Plane being used, before continuing to the
next Peck Depth amount at the Plunge Feedrate. This method will
be repeated until the full Depth of Cut is reached.
-
Peck Depth - sets the increment to use for each peck.
- Center Cutting Tool
 - With this check box selected, you have access to the Ramp Entry options.
 - With this check box cleared, you do not have access to the Ramp Entry options.
- Ramp - sets the lead-in
motion for the rough toolpath segments (for center cutting tool only).
Several ramping strategies are available:
- Ramp at Drill Positions - determines if the ramp/spiral entry is applied to each of the selected Drill Tip Positions for the operation. Leaving this option cleared will cause a plunge entry to be applied at the selected positions, while selecting this option will apply the ramp/spiral entry at each position. This option is only available when using the Adaptive Roughing pattern.
|
|
|
|

|
-
Automatic - automatically selects from the
following ramp options:Line,Spiral,Zig
Zag, and Profile are attempted in this order
until a successful ramp entry is accomplished (without gouging).
-
Line - the
lead-in move is along an angular line, using theAngle of Approachvalue.
-
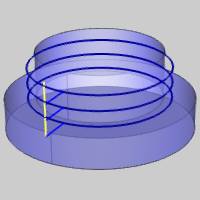
Spiral - creates a helical entry into
the stock material, the tool engages the stock with helical
interpolation. TheRamp
LengthandAngle of Approach valuesdefine the helix.
-
Zig Zag* - similar to line ramp, the length
of the ramp is limited so you get zig and zag angular moves.
The zag move is in opposite direction to the zig move and
at the same angle to the horizontal. This uses theAngle of Approach and Ramp
Length values.
-
Profile* -
the tool engages the stock following the contour of the part
or the toolpath profile.
- Ramp Length
- sets the single segment
length for the selected ramp type. This is only available when using the Automatic, Spiral, and Zig Zag options.
- Angle of
Approach - sets the angle
which the ramp move forms with the toolpath segment to which
it is connected. This defines the angle of the ramp move to
the horizontal.
- Ramp Length
- sets the single segment
length for the selected ramp type. This is only available when using the Automatic, Spiral, and Zig Zag options.
- *
These options are not available when the Adaptive Roughing pattern
is being used.
Warning: The Ramp approach type does not support collision detection or island avoidance. This should be used with caution.
Note: All of the options work similar to the automatic ramp option, that is if that particular option fails, the other ramp options are attempted. If no ramp strategy is possible in that given area, then a plunge move is applied.
Leads
Note: This Leads section is only available when the Adaptive Roughing Pattern is used. The leads that are available are as follows.
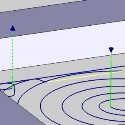
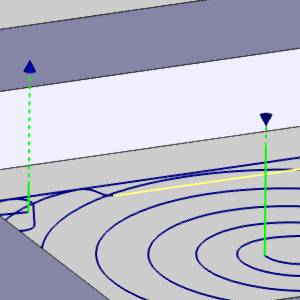
-
Vertical - plunges
directly into the material at the start point of the toolpath and lifts
out at the end.
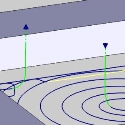
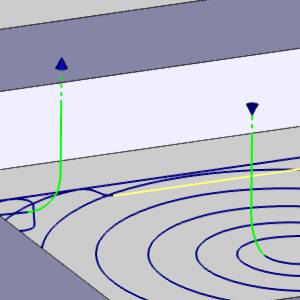
-
Vertical
Arc - attempts to enter and exit the material tangent
to the surface being machined using an vertical arc move.
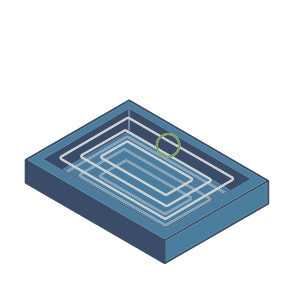
Use Lead-Out
![]() - With this check box selected, a lead out will be whose radius will be based on a percentage of the stepover.
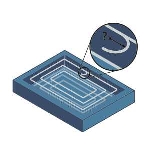
- With this check box selected, a lead out will be whose radius will be based on a percentage of the stepover. ![]() - With this check box cleared, no lead out will be used.
- With this check box cleared, no lead out will be used.

|
|
- Radius in % of stepover - defines the size of the lead-out in relation to the stepover used for the operation.
Note: The option to adjust the size of the lead-out based on stepover percentage is only available when you are not using the Adaptive Roughing pattern.