This is part four of a ongoing series on improving cnc programming worflow with CAD-CAM software. For the previous section, click here and to start with part one, please click here.
The next stage in the process of using CAD/CAM software involves the creation of Toolpath (cutter-path) which is the actual path that the cutting tool takes to machine the part. A CAM Tree-Job Manager will help you keep each machining operation organized and properly sequenced so that the g-code program produces the best possible cycle time for the job. 2, 3, 4 & 5 axis toolpaths are all developed to produce efficient roughing and finishing cycles. The Machine Setup should already be created in the Job Tree because you setup your stock. A Machining Wizard is a series of dialog boxes that step you through a process with a “Next” button until done where a “Finish” button would close the wizard and save everything you set for a toolpath machining strategy. When Wizards are used in the creation of toolpath two things happen.
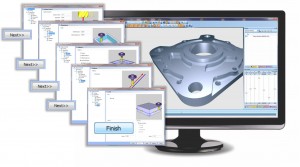 New users create programs in a fraction of time over toolpath creation without using wizards and secondly, nothing is forgotten or left behind in making toolpath that is accurate and properly calculated based off of the tools you setup for the job. Toolpath Wizards start by allowing you to choose the areas of the part to apply a specified toolpath (planar, spiral, z-level etc) within a boundary or an entire part, set clearances and height of rapid moves for the tool.
Then you can choose the type of cutting pattern (zig-zag or single direction cutting), cutting direction (climb or conventional), roughing parameters, custom tolerance and cut-depth options, lead-in and out options, toolpath linking options (how you want to connect one path to another) and other custom machine options. When finished you will automatically generate the toolpath so you can visually inspect it. This takes place for each separate operation. If a change is needed you can simply go back into the operation and edit it. Then re-generate the toolpath. Once you have created toolpath for each operation you are ready to move into the next phase of the process.
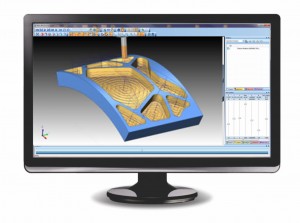 Improvements in workflow efficiency can also be accomplished by using High Speed toolpaths. High Speed machining is a revolutionary method of cutting where the traditional hard right and left turns in the cutting path are changed to produce more rounded or circular style cutting movements. In some cases the high speed cut paths are seen to be longer in overall length with this type of cutting path. However the benefits can be seen in that there is a constant tool engagement (less tool-material collision) which is proven to extend the life of cutting tools. In addition, cutting speeds are typically increased (High-Speed) which proves to reduce overall cycle times. High Speed toolpath was initially developed for 2 Axis machining (pocketing type operations).
As CAD/CAM providers continue to develop their technology you can now see high speed toolpaths available for more complex 3 Axis machining such as the advanced 2 & 3 Axis high speed Adaptive Roughing strategy that BobCAD-CAM software uses. This provider has recently released their Multiaxis CAD/CAM software that uses a High Speed Adaptive Roughing toolpath strategy that is the first in the world for Multiaxis CNC milling. Other toolpath strategies can include the Advanced Roughing option in BobCAD-CAM that allows the user to enter an Intermediate Step variable which tells the software to rough down to the bottom of a cavity and then come back up the outer walls stopping at each specified intermediate level and remove the material that tends to look like a large stair step on the walls of the part. This improves roughing quality and cuts down the amount of material that the finishing tool has to remove, all in one operation. This is another popular toolpath operation that will help increase efficiency. Lastly, workflow efficiency can be achieved in what is called, “Toolpath Associativity.” Associativity is the ability to make a design change to a part and automatically update toolpath operations without having to re-create an entire job. This is highly advantageous when there are many operations within a single job.
In part five, we will discuss simulation and the G-Code program.


Leave a Reply