Hello World Example
The purpose of this topic is to provide a baseline example that can be used to show proper methods for defining a Lua plug-in inside of the BobCAD-CAM application.
Getting BobCAD Ready for Plug-ins
First we must set up a few things on the PC prior to running BobCAD-CAM V32 to get you started utilizing Lua plug-ins made for BobCAD-CAM.
Step 1 - Setting Up the Registry:
First you must make sure the registry keys are present to provide access to the Lua plug-in capability. Please review the Registry Key to Enable topic and add the value to registry.
Step 2 - Build the Lua Plug-in Folder Structure:
Next we will manually set up your plug-in folder for this example.
- Navigate to your BobCAD-CAM Data folder for the version you are working in (must be V32 or newer). This is commonly found at the following file path:
C:\BobCAD-CAM Data\BobCAD-CAM V##\ - Inside this directory, create a folder named LuaPlugins if one does not already exist.
- Inside the LuaPlugins folder create a directory named My First Plug-in which will be the name of the plug-in displayed in the Installed Lua Plug-Ins dialog.
- Enter the My First Plugin folder and create a folder named Image which will house our icons for the ribbon bar command.
- Enter the Image folder and create 2 folders, one named 32x32 and one named 16x16 for our icons in large and small format.
NOTE: The Image folder is not actually required, as the images can be referenced utilizing a full path inside of the Lua script. However it is best practice for the full functionality of the software and ease of programming to include this directory and it's sub-directories. - Save the image below as light.png to your C:\BobCAD-CAM Data\BobCAD-CAM V32\LuaPlugins\My First Plug-in\Image\32x32\ folder. This is a 32x32 pixel png file.

- Save the image below as light.png to your C:\BobCAD-CAM Data\BobCAD-CAM V32\LuaPlugins\My First Plug-in\Image\16x16\ folder. This is a 16x16 pixel png file.

NOTE: This will be the icons displayed in the button we create on the ribbon bar to execute our command. - Lastly navigate back to your My First Plug-in directory and create a new Lua document by the name of Main.Lua which will house your primary scripts for this plug-in.
NOTE: The name Main is not required, but it must be a *.Lua file which is simply a text file with the Lua extension.
Creating The Script
Next we must add a little code to the script to do the following:
- Connect to BobCAD
- Add the command to the ribbon
- Display the message box showing Hello World!
So let's open our Main.Lua file in our favorite text editor, and begin coding!
Step 1 - Connect to BobCAD
First we must add the ConnectToBCC function to our script.
function ConnectToBCC()
end
Step 2 - Add the button to the ribbon
With the Bcc.AddCommand function, we will create a ribbon tab, add a group to the tab, and add our button to fire our script. All of this will be done inside the ConnectToBCC()function.
function ConnectToBCC()
-- Add a button the ribbon to fire the Hello World function when pressed
Bcc.AddCommand({ TabName="My Lua Plug-ins", GroupName="Basic Examples", ButtonName="Hello World", CallbackFuncName="sayHelloWorld", ImageNameLarge="light.png", ImageNameSmall="light.png", ToolTip="Say hello to the world!" })
end
The result of this line of code, creates the following in the BobCAD software: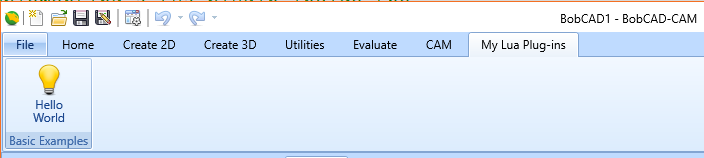
Step 3 - Create our function to display the message box
Now since we have set up our button to fire the sayHelloWorld function, we need to add this function to our script so something happens when the button is pressed in the ribbon.
function sayHelloWorld()
-- Display a message box stating Hello World!
Bcc.ShowMessageBox("Hello World")
end
Step 4 - Add some comments and Save the file
Now we have completed our first example. The contents of your Main.Lua script should look as follows:
---------------------------------------------------------------------------
-- The ConnectToBCC is run by BobCAD-CAM when the plug-in is connected --
-- Ribbon bar commands will be created here to fire your plug-in --
-- functions --
---------------------------------------------------------------------------
function ConnectToBCC()
-- Add a button the ribbon to fire the Hello World function when pressed
Bcc.AddCommand({ TabName="My Lua Plug-ins", GroupName="Basic Examples", ButtonName="Hello World", CallbackFuncName="sayHelloWorld", ImageNameLarge="light.png", ImageNameSmall="light.png", ToolTip="Say hello to the world!" })
end
---------------------------------------------------------------------------
-- This function displays the hello world message box --
-- Fired: Using the Hello World button in the ribbon --
---------------------------------------------------------------------------
function sayHelloWorld()
-- Display a message box stating Hello World!
Bcc.ShowMessageBox("Hello World!")
end
Save your Lua script as you have just finished your first BobCAD-CAM Lua plug-in!
Review and Update The Script
Now that we have created our first script we will give it a try! Then we will continue to edit the script with BobCAD-CAM running, and walk through the steps of reloading the plug-in to get an understanding of that workflow.
Step 1 - Start BobCAD-CAM
Go ahead and start the BobCAD-CAM software!
You should now see your My Lua Plug-ins tab in the ribbon bar of the BobCAD-CAM software, because the plug-ins are loaded automatically.
- Click on the My Lua Plug-ins tab
- Click the Hello World button to display the message box!
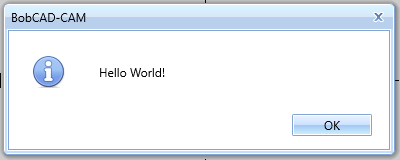
- Click OK on the message box to close.
Step 2 - Editing the Script
Next we are going to make some edits to the script to further enhance our example.
- Now go back to your text editor that has your Main.Lua file open. If you have closed this, please open your Main.Lua file again in your text editor.
- Update your sayHelloWorld() function to include the following code:
------------------------------------------------------------------------
-- This function displays the hello world message box --
-- Fired: Using the Hello World button in the ribbon --
------------------------------------------------------------------------
function sayHelloWorld()
-- Display a message box stating Hello World!
-- Store the user response in the answer variable
answer = Bcc.ShowMessageBox("Hello World!\n\nWould you like to say hello back?", {ButtonType="YesNo", ImageType="Question"})
-- If user answers yes respond Nice to meet you!
-- If user answers no respond Good bye!
if answer == 6 then
Bcc.ShowMessageBox("Nice to meet you!")
else
Bcc.ShowMessageBox("Good bye!")
end
end
- Now save your Main.Lua file.
Step 3 - Reload the plug-in
Now that we have updated our script code, we must reload the plug-in inside the BobCAD-CAM application to get the updated information.
- From within the BobCAD-CAM software, click the File tab to access the backstage of the software.
- On the side bar, click the Lua Plug-ins item to launch the Installed Lua Plug-ins dialog.
- In this dialog, click the Reload button to the right of the My First Plug-in to reload your updates from the script.
- Click OK to close the Installed Lua Plug-ins dialog.
TIP: You can assign a keyboard shortcut to launch the Installed Lua Plug-ins dialog, which is highly recommended because you will reload frequently when writing a script!
Step 4 - Try the updated code
Now that we have reloaded the updated script into BobCAD-CAM, the new changes will be available! So let's try it out!
- From the My Lua Plug-ins tab in the BobCAD-CAM ribbon bar, choose the Hello World button again.
The following updated dialog will appear: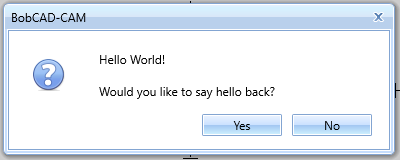
- Choose Yes or No to see the appropriate response dialog from our script!
Congratulations! You have completed the getting started hello world example, and now should have a basic understanding of setting up a plug-in as well as how to continue working with your code!