BobART
Managertab, right-click
BobART
Managertab, right-click  Emboss
Model, and click Create/Modify
Stock.
Emboss
Model, and click Create/Modify
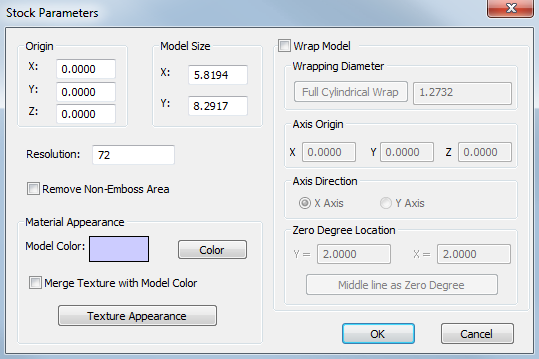
Stock.The Create/Modify Stock command opens the Stock Parameters dialog box for you to set the length, width, origin location, resolution, texture, and color of the BobART stock. The BobART stock defines the area in which emboss features can be created. Geometry that is created for emboss features generally must be within the bounds of the stock. There are however some creative situations in which only part of the geometry is contained within the stock area.
If the stock has not been defined and you add an emboss feature to the BobART tree, Stock Parameters dialog box displays prior to the Feature dialog box for you to specify the stock before continuing.
To create or modify BobART stock:
BobART
Managertab, right-click Emboss
Model, and click Create/Modify
Stock.
The Stock Parameters dialog box displays.
View the Stock Parameters dialog box
Origin
The Origin group sets the stock location using the XYZ coordinate. The origin is the bottom-left corner of the stock.
Model Size
Resolution - the DPI or dots per inch used to create the model. Higher values provide a more detailed appearance, and may increase calculation times. Lower values reserve system resources, create a less detailed appearance, and may be helpful to use during creation for slower systems.
Remove Non-Emboss Area
 Select the check box to remove any area of the model/stock that is not
part of an emboss.
Select the check box to remove any area of the model/stock that is not
part of an emboss.

 Clear the check box to include the non-emboss area (stock) with the model.

Material Appearance
TIP: The default color for the stock and all emboss features use the Solids color that is defined in the Settings Part or Settings Default dialog boxes.
Select the check box to add the Model
Color to any selected Texture Appearance.
Clear the check box to allow the selected
Texture Appearance to define the color.
You can wrap the embossed model to create a cylindrical style model. Generally, you should first create the model that you want to wrap. After you have created the model, you can then modify the following stock parameters to create the wrapped model.
Wrap Model
Select the check box to wrap an existing model.

Clear the check box when creating flat models or while creating the model
that you want to wrap.
Wrapping Diameter
The Wrapping Diameter defines the diameter around which the stock is wrapped. This is measured to the stock surface (and not the top of the model). You can type the value to set the Wrapping Diameter or use the following option.
Full Cylindrical Wrap - after you have created the stock/model, you can click Full Cylindrical Wrap to automatically set the Wrapping Diameter. This option does not work until after the stock/model is created. This uses the size of the model perpendicular to the rotation axis and divides the value by pi.
Axis Origin
The Axis Origin defines the center of the wrapped model along each axis using the XYZ values. This works together with the Axis Direction. For example, with rotation around the X-axis (Axis Direction), the Y and Z values define the center of rotation. The X-value can then be used to move the model along the X-axis.
Axis Direction
The Axis Direction defines around what axis the model is wrapped. You can wrap the model around the X-axis or the Y-axis. When the Axis Origin values are X0Y0Z0, the model is moved to the WCS origin and wrapped around the selected axis. The location can then be moved using the Axis Origin values.
Zero Degree Location
The Zero Degree Location is a distance from the model origin (not the WCS) along the axis that is perpendicular to the rotation axis (Axis Direction). This location on the flat model is placed at the zero degree location of the wrapped model (this is the Z-axis or top of the cylindrical model).
Middle Line as Zero Degree - sets the Zero Degree location to the center of the embossed model. This uses the size of the model perpendicular to the rotation axis and divides the length by two.
OK - accepts any changes and closes the dialog box. The stock is created (or updated) in the graphics area.
Cancel - cancels the creation of the stock the first time that the dialog box displays. When editing the stock parameters, this cancels any changes and closes the dialog box.
Material/Texture Selection Dialog Box