In this Topic Show
The Shape Library contains many predetermined wireframe geometry shapes that are provided to help you create standard shapes faster and easier than using a combination of wireframe CAD functions. These wireframe shapes can then be used with other CAD functions to create solid and surface geometry.
To open the Shape Library, do one of the following:
The Shape Library dialog box displays icons of all available shapes as shown next.
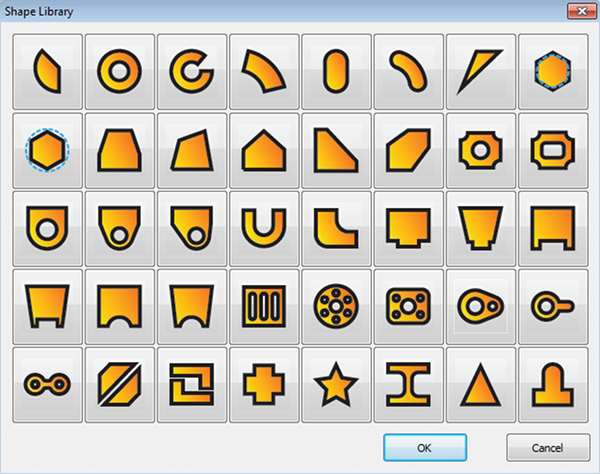
Click the shape that you want to create and click OK to display the parameters in the Data Entry Manager.
To learn about all shapes and their parameters, view Shape Library Parameters.
All of the Shape Library functions contain the Position and Orientation parameters as explained next. When creating shapes, it is often easiest to first define the parameters to get the proper shape before trying to move, mirror, or rotate the shape as explained in this section.
IMPORTANT: The origin (or reference location) of the Shape Library entities, generally, is the lower-left corner of the shape in its default orientation. For example, this is usually the lower-left corner of a bounding box drawn around the shape, but a few shapes have the origin at the arc center. The X and Y values determine the location of the shape origin in reference to the WCS or CAD origin.
View a Position and Orientation Example.
1 After opening the Shape Library, click the icon of the shape that you want to create, and click OK.
The parameters for the shape display in the
![]() Data Entry tab.
Data Entry tab.
2 Type all parameter values to define the dimensions of the shape.
The CAD preview of the shape updates in the graphics area.
IMPORTANT: When defining the parameters for any shape, the CAD preview is removed when invalid values are entered. If you have entered all values for the shape and the CAD preview isn't visible, confirm you have properly defined all the parameters as shown in the Data Entry Manager diagram.
3 Modify the Position and Orientation values to determine the location and orientation of the shape in the graphics area.
Notice the order of the two previous steps, it is often easiest to define the shape dimensions first and then modify the position and orientation.
4 In
the ![]() Data
Entry tab, click OK to
create the shape as shown in the CAD preview.
Data
Entry tab, click OK to
create the shape as shown in the CAD preview.
(You can click Cancel to exit the function and not create the shape.)
TIP: Shape Library entities are added to the CAD Tree which allows you to modify the parameters of the shapes after creating them.