 Parts Parameters
Introduction
The Parts Parameters page of the Nesting Wizard allows you to view and edit the parts assigned to the Nesting job. You can edit the Part Name, Quantity, Filler Quantity, Priority, Status (Active Yes/No), remove parts, adjust Rotation and edit advanced parameters to maximize nesting efficiency. These options are applied to the currently selected part or parts. You can select multiple parts using the Ctrl/Shift modifiers on your keyboard. It's important to note that each part can be assigned different settings.
The Parts Parameters Page
The Part List
Each part that you added in the Part Geometry page of the Nesting Wizard is listed inside of the Parts Parameters Part List box. This list box is an informational display that contains the part ID, Part Name, Length, Width, Quantity, Filler Quantity, Priority, and Active status for each part. Select a part from the list in order to edit the information in the Part Parameters group. A preview of the selected part is shown in the preview window next to Part Parameters.
ID -is an automatically assigned integer and cannot be edited.
Part Name - by default the part name will be "Part-"+ the integer value from the ID. This can be changed by double-clicking on the part name to enable editing.
Length (X) - is the length of the bounding box we place around the part to give you an idea of the size of each part. This value is not editable.
Width (Y) - is the width of the bounding box we place around the part to give you an idea of the size of each part. This value is not editable.
Quantity - determines how many of the selected part to attempt to nest on the given sheets.
Filler Quantity - This is the amount that can be used for filling empty space in the sheet after the sheet is nested.
Priority - This allows parts to be prioritized for the nesting job. The higher the value assigned to a part, the higher the priority in the nest.
Active - This shows the active status of the part. Active parts in the nest will list Yes in this column and inactive parts will list No.
-
Active
![]() When selected the highlighted parts
will be worked into the nesting calculation.
When selected the highlighted parts
will be worked into the nesting calculation.
![]() When this check box is cleared
the part or parts selected are no longer considered for nesting and the
Active status in the Part List will be set to No.
The part remains available and can be made active later.
When this check box is cleared
the part or parts selected are no longer considered for nesting and the
Active status in the Part List will be set to No.
The part remains available and can be made active later.
-
Remove - removes the selected part or parts from the Nesting job.
Part Parameters
-
Quantity - determines how many of the selected part to create in the nesting result.
-
Filler Quantity - This is the amount that can be used to fill any empty space in the sheet after the sheet is nested.
|
No Filler Part |
Filler Part |
|
|
|

-
Priority - This allows parts to be prioritized for the nesting job. The higher the value assigned to a part, the higher the priority in the nest.
-
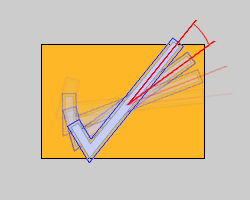
Rotation
![]() - This check box is selected
by default and will allow the selected parts to rotate based on what is
set for the Angle Increment or Angle List radio button.
- This check box is selected
by default and will allow the selected parts to rotate based on what is
set for the Angle Increment or Angle List radio button.
![]() - When
this check box is cleared the part or parts selected are no longer able
to be rotated in the nest and will remain as they are currently oriented
in the workspace.
- When
this check box is cleared the part or parts selected are no longer able
to be rotated in the nest and will remain as they are currently oriented
in the workspace.
-
 Angle Increment - This will allow you to define
the angle increment the nesting engine will test to see which angle
creates a more efficient orientation of the part.
Angle Increment - This will allow you to define
the angle increment the nesting engine will test to see which angle
creates a more efficient orientation of the part.
-
 Angle List - If the radio button is set
to Angle List you will be allowed to set several specific rotation
angles for the selected part, in order to test those angles for more
efficient orientations of the part. Each listed rotation angle should
be separated by a comma.
Angle List - If the radio button is set
to Angle List you will be allowed to set several specific rotation
angles for the selected part, in order to test those angles for more
efficient orientations of the part. Each listed rotation angle should
be separated by a comma.
Advanced
-
Grain Direction - In order to force a part to adhere to the grain direction you must choose how the grain direction on the selected parts should be aligned and also specify the grain direction on the sheet.
-
Ignore - The part will have no defined grain direction.
-
Vertical (Y) - Sets the grain direction to run vertically through the current orientation of the part. The part will be aligned to match the grain direction settings for the appropriate sheet.
-
Horizontal (X) - Sets the grain direction to run horizontally through the current orientation of the part. The part will be aligned to match the grain direction settings for the appropriate sheet.
Important: Important : Grain direction must be set on the part and sheet. If a part is set to adhere to a particular grain direction, it will not nest on a sheet that does not have a grain direction specified. Also, parts adhering to grain direction should have their rotation settings left at default. If parts are set not to rotate they will not nest on sheets with opposing grain direction.
-
Advanced - launches the Advanced Part Parameters dialog.
Next Topic
When you finish with the Part Parameters page click Next>> , to go to the Tabs page.