 Sheets Parameters
Introduction
The Sheet Parameters page of the Nesting Wizard defines the size, quantity, and shape of sheets to be used within the Nesting job. The sheets represent the nesting stock and the system nests the parts inside of the defined sheets.
The Sheet Parameters Page
The Sheet List
The Sheets list displays all the parameters for all sheets assigned
to the Nesting job. By default, a single sheet is already created and
ready for editing. Select a sheet in this list to modify with the following
parameters.
Sheet List
ID -is an automatically assigned integer and cannot be edited.
Sheet Name - by default the part name will be Sheet-"+ the integer value from the ID. This can be changed by double-clicking on the sheet name to enable editing.
Length (X) - sets the length of the sheet along the X-axis.
Width (Y) - sets the width of the sheet along the Y-axis.
Height (Z) -sets the height or thickness of the sheet in the Z-axis.
Quantity - determines how many of the selected sheets to use for the nesting result.
Shape - Notes whether the sheet is rectangular or a customer shape. This can be set by selecting either the Rectangular or Custom Shape radio button in Sheet Shape below.
Active - Notes whether the sheet will be used to nest parts. This can be set by selecting or clearing the Active check box below.
-
Active
![]() Select the check box to include the
sheet in the nesting calculation.
Select the check box to include the
sheet in the nesting calculation.
![]() Clear the check box to ignore the sheet in the nesting
calculation.
Clear the check box to ignore the sheet in the nesting
calculation.
-
Add Sheet - Adds a copy of the highlighted sheet to the sheet list.
-
Remove Sheet - Removes the highlighted sheet from the sheet list.
Important: Important: In the naming of sheets, be sure not to use special characters. Any sheet named with special characters will not be able to be saved out as a remnant sheet. Characters to avoid \ / : * ? " < > |
Sheet Shape
![]() Rectangular - allows
you to define a rectangular sheet by just typing in dimensions. Drawing
the geometry is not needed.
Rectangular - allows
you to define a rectangular sheet by just typing in dimensions. Drawing
the geometry is not needed.
Origin - Select a radio button to set the origin location to any corner of the stock. Type values in the X, and Y boxes to define the location of the stock reference point in the Workspace.
-
X - determines the X-axis location of the sheet reference point.
-
Y - determines the Y-axis location of the sheet reference point.
![]() Custom Shape - Selecting this
radio button will allow you to select a custom shape to your stock. You
will be able to set the shape with:
Custom Shape - Selecting this
radio button will allow you to select a custom shape to your stock. You
will be able to set the shape with:
-
Pick Geometry - enables selection mode and hides the Nesting Wizard for you to select the nesting geometry from the Workspace. Once the geometry has been selected, click
 OK to confirm
the selection and return to the Nesting Wizard.
OK to confirm
the selection and return to the Nesting Wizard.
-
Load Files - opens the File Open dialog for you to select the file you want to use. Once the file is selected, click Open and the file will be set as your sheet shape and the preview will be visible in the lower right corner.
Sheet Thickness - allows you to define the thickness of the sheet.
Height(Z) - is the thickness of the stock.
Additional Sheet Parameters
Quantity - determines how many of the selected sheets to use for the nesting result.
Nesting Corner - determines the corner on the sheet from which the nesting should begin fitting parts. Choose between:
|
Upper Left |
Upper Right |
|
|
|
|
Lower Left |
Lower Right |
|
|
|


Fill Sheet - determines the direction in which the sheet gets filled. Choose between:
|
Vertical (Y) |
Horizontal (X) |
|
|
|
Grain Direction - By default the Grain Direction, both here and on the Parts Parameters page, are set to Ignore. In order to force a part to adhere to the grain direction you must choose how the grain direction on the selected sheet is aligned and also specify the grain direction on the parts.
-
Ignore - does nothing with grain direction.
-
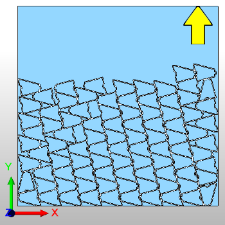
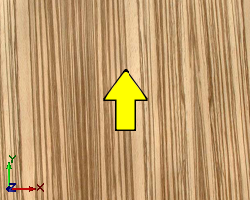
Vertical (Y) - Sets the grain direction to run vertically through the sheet. The part will be aligned to match the grain direction settings for this sheet.
-
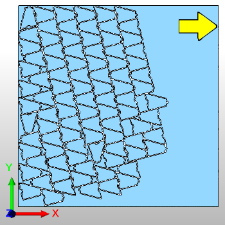
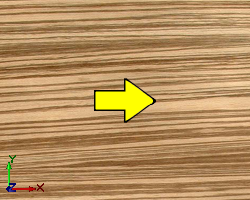
Horizontal (X) - Sets the grain direction to run horizontally through the sheet. The part will be aligned to match the grain direction settings for this sheet.
Important: Grain direction must be set on both the part and sheet. If a part is set to adhere to a particular grain direction, it will not nest on a sheet that does not have a grain direction specified. Also, parts adhering to grain direction should have their rotation settings left at default. If parts are set not to rotate they will not nest on sheets with opposing grain direction.
-
Set Stock Margin -sets a distance or margin of space around the perimeter of the sheet in which no cuts are made. This value sets the parts in such a way that, when being cut, the center of the defined tool shall not breach this defined margin.
Important: Since the stock margin is set by the center of the tool, it is up to the user to add the radius of the tool when needed.
- Advanced - Launches Advanced Sheet Settings.
Adding and Removing Sheets
-
Add Sheet - adds another sheet of material to the list. When the new sheet is created, the values of the new sheet will be set to the default values.
- Remove Sheet -removes the selected sheet from the sheet list.
Important: The software does not create any extra stock sheets in order to nest leftover parts. You must create another sheet or add to the quantity of an existing sheet if there are leftover parts to nest. The sheets are used in the order they are created, meaning if you have multiple sheets, parts are nested to the first sheet defined in the list before moving on to the next.
Next Topic
After defining the parameters for all stock sheets, click Next>> to go to the Nesting Parameters tab.