The Mill Hole Wizard Machine Sequence Page
Introduction
The fourth step of the Mill Hole Wizard is to define the Machine Sequence. These parameters define the order in which the holes in the feature will be completed.
The Machine Sequence page
Sort Order
These options will vary based on the Drilling Type you selected when choosing geometry.
Standard Drill:
![]() Closest - This method will always try
to move to the closest geometry from its current location.
Closest - This method will always try
to move to the closest geometry from its current location.

![]() Pick Order - opens the Hole Sequence dialog in the
Pick Order - opens the Hole Sequence dialog in the

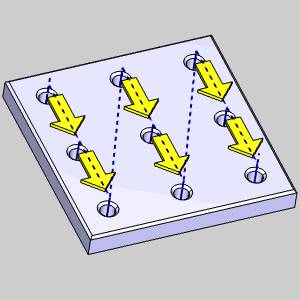
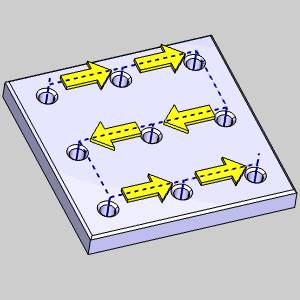
![]() X Direction - uses the points
from the selected geometry to create rows aligned with the X Axis of the
machine setup. The machine sequence will then move across these rows.
X Direction - uses the points
from the selected geometry to create rows aligned with the X Axis of the
machine setup. The machine sequence will then move across these rows.

![]() Y Direction - uses the points
from the selected geometry to create rows aligned with the Y Axis of the
machine setup. The machine sequence will then move across these rows.
Y Direction - uses the points
from the selected geometry to create rows aligned with the Y Axis of the
machine setup. The machine sequence will then move across these rows.
![]() Custom Direction - uses the points
from the selected geometry to create parallel rows based on the angle
entered. The machine sequence will then move across these rows.
Custom Direction - uses the points
from the selected geometry to create parallel rows based on the angle
entered. The machine sequence will then move across these rows.

![]() Optimized
- uses an algorithm to attempt to create the shortest possible distance
between all points. It then compares that distance to the distances that
would result from the Closest, X Direction, and Y Direction option. The
path with the shortest distance is provided as the result.
Optimized
- uses an algorithm to attempt to create the shortest possible distance
between all points. It then compares that distance to the distances that
would result from the Closest, X Direction, and Y Direction option. The
path with the shortest distance is provided as the result.
Multiaxis Drill:
![]() Closest - This method will always try
to move to the closest geometry from its current location.
Closest - This method will always try
to move to the closest geometry from its current location.
![]() Pick Order - opens the Hole Sequence dialog in the
Pick Order - opens the Hole Sequence dialog in the

Cross Drill:
![]() Closest - This method will always try
to move to the closest geometry from its current location.
Closest - This method will always try
to move to the closest geometry from its current location.

![]() Pick Order - opens the Hole Sequence dialog in the
Pick Order - opens the Hole Sequence dialog in the
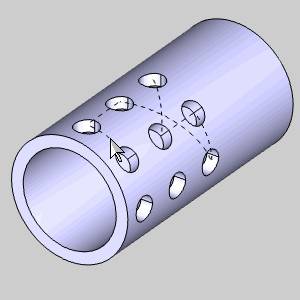
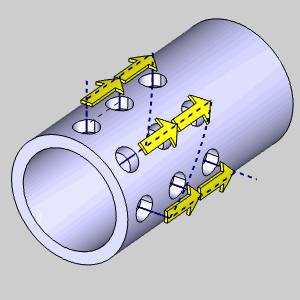
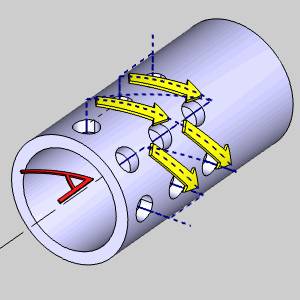
![]() Along Rotation Axis - uses the
points from the selected geometry to create rows aligned with the Rotation
Axis direction as defined for the feature in the Geometry Selection dialog.
The machine sequence will then move across these rows.
Along Rotation Axis - uses the
points from the selected geometry to create rows aligned with the Rotation
Axis direction as defined for the feature in the Geometry Selection dialog.
The machine sequence will then move across these rows.
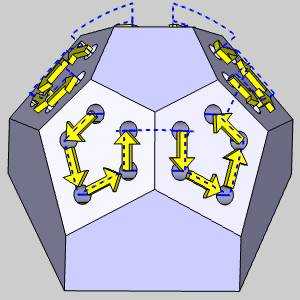
![]() Around Rotation Axis - uses the
points from the selected geometry to create a rows perpendicular to the
Rotation Axis direction as defined for the feature in the Geometry Selection
dialog. The machine sequence will then move across these rows.
Around Rotation Axis - uses the
points from the selected geometry to create a rows perpendicular to the
Rotation Axis direction as defined for the feature in the Geometry Selection
dialog. The machine sequence will then move across these rows.

![]() Custom Direction - uses the points
from the selected geometry to create parallel rows based on the angle
entered relative to the rotation axis. The machine sequence will then
move across these rows.
Custom Direction - uses the points
from the selected geometry to create parallel rows based on the angle
entered relative to the rotation axis. The machine sequence will then
move across these rows.
The following options remain the same for Standard, Multiaxis, and Cross Drill.
Reverse Each Operation
![]() - With this option selected, it forces each operation to move backwards along the
path of the previous operation.
- With this option selected, it forces each operation to move backwards along the
path of the previous operation.![]() - With this option cleared, each operation will move along the same path, in the same order.
- With this option cleared, each operation will move along the same path, in the same order.
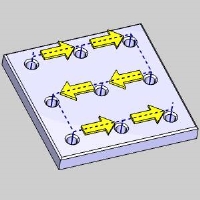
Note: When multiple operations used in a feature, the subsequent operations in the feature will have this option available. This saves moves, since each operation does not have to move back to the start position for each operation, but can pick up where the last left off. The example below uses a 3 operation feature using an X Direction with the Zig Zag option, and starting in the Upper Left position. This will work similarly with other directions, options and start locations.
|
Feature with 3 Operations |
||
|
Center Drill |
Drill |
Tap |
|
|
|
|
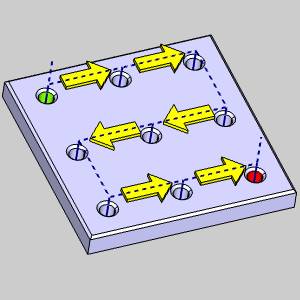
Start Location
-
Start Position - select a corner of the option box to set the starting position of the Machining Sequence.
Select one of the following options to set the machining pattern.
Note: The example below uses X Direction with the Zig Zag option. This will work the same way with other directions, and options.
|
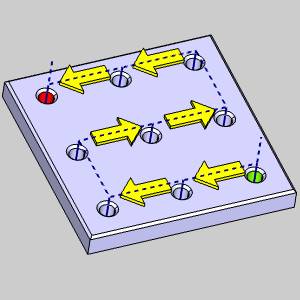
Upper Left |
Upper Right |
Lower Right |
Lower Left |
|
|
|
|
|


Note: The following options are not active when using the Closest or Pick Order Sort Order options.
Pattern
-
Zig -creates a machining sequence with one-way pattern, for example, from left to right.
|
Zig with X Direction |
|
|
-
Zig Zag - creates a machining sequence with an alternating back-and-forth pattern.
Zig Zag with X Direction
Next Topic
Clicking Next> > will take you to The Mill Hole Wizard Posting Page.