Creating Rectangular Stock with 2D Geometry
Introduction
In this example you learn how to create rectangular stock using sketch entities. This example will also provide links to related topics.
Creating the Stock
You select the stock type, size, and add offsets to the stock as needed. The sketch used for this example is shown first.

Part 1) Select the Stock Type
-
When the Stock Wizard is entered for the first time,

This is because the

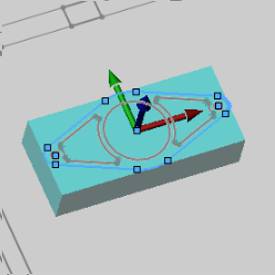
Notice also that the stock ![]() coordinate system is placed at the top and center of the stock. This can
be adjusted In the Stock Orientation
group, and is only a coordinate system used in setting the stock
origin and orientation, and it is not related to the machining origin.
coordinate system is placed at the top and center of the stock. This can
be adjusted In the Stock Orientation
group, and is only a coordinate system used in setting the stock
origin and orientation, and it is not related to the machining origin.
Part 2) Pick Geometry
Because you are only creating stock for the part and not the entire print, you must manually select the desired geometry.
-
In the Size group, under Geometry Options, select Pick

The geometry is added to the list.
-
To create stock based on the selection, click Calculate Stock.
The result is shown next.

Part 3) Set the Stock Size
Now that the stock shape is defined, and because you are using 2D geometry, you need to change the default stock height.
Note: The
stock uses a default one inch height
when there is no difference between the extents of the geometry in the
Z-axis
-
In the Size group
 (Height Z)
box, type 2.000,
and press Tab
.
(Height Z)
box, type 2.000,
and press Tab
.
The height of the Stock is creased.
Part 4) Add an Offset to the Stock
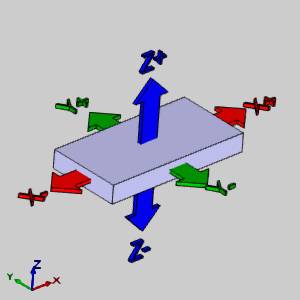
Because the part is being cut from stock that is larger than the bounding stock, an offset is added to increase the size. A diagram of the Offset directions follows.
|
Offset Diagram
|
|
|
|
- In the Offset group, enter the values as follows.
| X | Y | Z | |
| Offset + | 0.0000 | ||
| Offset - | 0.0000 |
The stock is now 0.2500 larger on all four sides.
- To finish the Stock