Post Processor Lessons - Lesson 1
Post Modification Lesson 1: Enabling Debug and Deleting Output
In this lesson we will cover making some common modifications to the header block that may be required for your machine tool. We are going to use the following files for this lesson:
|
Machine File: BC_3x_Mill
Post Processor: BC_3x_Mill.BCPst
Part File: Post Guide – Lesson 1.bbcd |
|
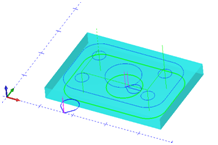
This test file includes multiple machining features. Each feature contains multiple operations to complete the part. It is important when creating, customizing, or modifying post processors that you test all machining scenarios to ensure the post processor is working fully on the machine tool.
This includes but is not limited to:
-
Profile Milling with and without machine cutter compensation
-
All drilling canned cycles supported by the software and the machine
-
Tool Change blocks
-
Subprogram output
-
File ending
The start of the NC program is referred to as the “Header” and below you can see an example of the default header output.
%
O0100 (PROGRAM NUMBER)
(PROGRAM NAME - POST GUIDE - LESSON 1.NC)
(POST - BC_3X_MILL 3-AXIS GENERIC FANUC)
(DATE - FRI. 04/21/2017)
(TIME - 04:36PM)
(BEGIN PREDATOR NC HEADER)
(COORD_SYS 1=X0 Y0 Z0)
(MTOOL T1 S1 D0.25 C0. A0. H2.5)
(MTOOL T2 S1 D0.25 C0. A0. H2.5)
(MTOOL T3 S4 D0.4375 C0. A60. H2.75)
(MTOOL T4 S4 D0.375 C0. A118. H5.)
(MTOOL T5 S1 D0.375 C0. A0. H2.25)
(MTOOL T6 S1 D0.5 C0. A0. H3.)
(MTOOL T7 S1 D0.5 C0. A0. H3.)
(SBOX X0. Y-2.5 Z-0.375 L3.5 W2.5 H0.375)
(END PREDATOR NC HEADER)
For the 1st modification we will alter the header to remove the following items and then we will add some new information.
Items to remove:
-
% sign
-
Post Processor Name line
-
Time
Lesson 1 - Step 1:
Open the post processor file in your text editor. (We recommend using Notepad ++ for this as it is a no cost text editor that works well).
Lesson 1 - Step 2:
Search or scroll down to Post Block 26. This is the Debugging Post Block. Change the “debug_off” variable to “debug_on” and save the file.
This turns on the post debugging. It will help us locate what Post Block is outputting the lines of code we wish to modify.
Lesson 1 - Step 3:
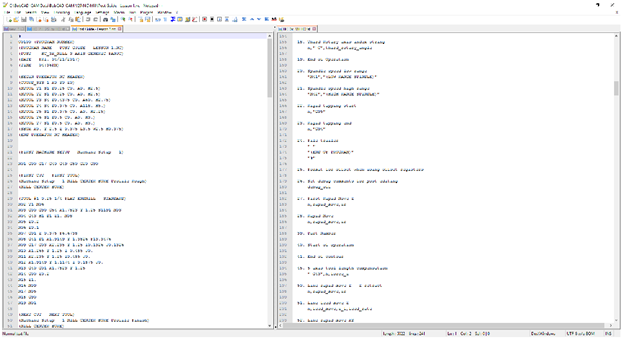
Run the post processor to generate the gcode. Open the Gcode in your text editor and I recommend you tile the two windows so you can see the post processor output (Gcode) and the post processor file itself at the same time as shown in the image below.

Lesson 1 - Step 4:
Notice now the extra entries for the Debugging comments. These comments tell us which Post Blocks are responsible for the output we are seeing in the NC code. (See Below)
*************0. File header*************
%
O0100 (PROGRAM NUMBER)
(PROGRAM NAME - POST GUIDE - LESSON 1.NC)
(POST - BC_3X_MILL 3-AXIS GENERIC FANUC)
(DATE - FRI. 04/21/2017)
(TIME - 04:54PM)
(BEGIN PREDATOR NC HEADER)
(COORD_SYS 1=X0 Y0 Z0)
*************0 - 110. Tool list format ( output using output_tool_list variable )*************
(MTOOL T1 S1 D0.25 C0. A0. H2.5)
*************0 - 110. Tool list format ( output using output_tool_list variable )*************
(MTOOL T2 S1 D0.25 C0. A0. H2.5)
*************0 - 110. Tool list format ( output using output_tool_list variable )*************
(MTOOL T3 S4 D0.4375 C0. A60. H2.75)
*************0 - 110. Tool list format ( output using output_tool_list variable )*************
(MTOOL T4 S4 D0.375 C0. A118. H5.)
*************0 - 110. Tool list format ( output using output_tool_list variable )*************
(MTOOL T5 S1 D0.375 C0. A0. H2.25)
*************0 - 110. Tool list format ( output using output_tool_list variable )*************
(MTOOL T6 S1 D0.5 C0. A0. H3.)
*************0 - 110. Tool list format ( output using output_tool_list variable )*************
(MTOOL T7 S1 D0.5 C0. A0. H3.)
*************0 - 108. Rectangular stock format*************
(SBOX X0. Y-2.5 Z-0.375 L3.5 W2.5 H0.375)
(END PREDATOR NC HEADER)
The “*************0. File header*************” line is showing us that Post Block “0.” is what we need to look in to find the variables and strings that are outputting the lines below it in the NC program.
Lesson 1 - Step 5:
In the post processor find the Post Block labeled with the number “0.”
0. File header
default_add_spaces
"%"
"O",prog_n,"(PROGRAM NUMBER)"
"(PROGRAM NAME - ",prog_name,")"
"(POST - ",machine_make,machine_model,")"
"(DATE - ",output_date,")"
"(TIME - ",output_time,")"
user_comment_1
user_comment_2
user_comment_3
user_comment_4
user_comment_5
user_comment_6
user_comment_7
user_comment_8
user_comment_9
user_comment_10
user_comment_11
user_comment_12
user_comment_13
user_comment_14
user_comment_15
" "
"(BEGIN PREDATOR NC HEADER)"
"(COORD_SYS 1=X0 Y0 Z0)"
output_tool_list
output_stock_definition
"(END PREDATOR NC HEADER)"
" "
Remove the lines marked in RED below.
default_add_spaces
"%"
"O",prog_n,"(PROGRAM NUMBER)"
"(PROGRAM NAME - ",prog_name,")"
"(POST - ",machine_make,machine_model,")"
"(DATE - ",output_date,")"
"(TIME - ",output_time,")"
Lesson 1 - Step 6
Save and then run the post processor to look at the output. Notice the lines have now been removed from the output.
*************0. File header*************
O0100 (PROGRAM NUMBER)
(PROGRAM NAME - POST GUIDE - LESSON 1.NC)
(DATE - MON. 04/24/2017)
(BEGIN PREDATOR NC HEADER)
END OF LESSON


