The Line Continuous function is used to create lines by clicking in the graphics area once to define the start point and clicking a second time to define the end point of the line. You can use the snap points of other wireframe entities to define these locations. After creating the first line, the end point of the previous line becomes the start point of the next line so that you can create a continuous chain of line entities.
Line Continuous supports Dynamic Drawing which allows you to use data entry and/or sketching to create line entities. After sketching the first line, it becomes the active entity. The active entity displays in the current Entity color, but displays with a greater line thickness to make it easier to identify. The active entity end point (Previous Point) can then be modified using data entry. The benefit of Dynamic Drawing is that while sketching a line you can use data entry to update the current and previous points to exact coordinate values as needed.
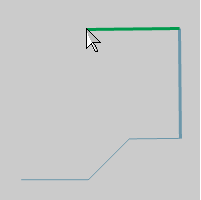
Active Entity
Line Continuous supports the use of the snap increment when selecting the start and end points of each line. The snap increment allows you to get precise results when using mouse selection and helps to reduce data entry modifications.
To learn more, view Snap Increment.
To open Line Continuous, do one of the following:
In the Lines menu, click Continuous.
On the CAD toolbar,
click the down arrow and click the ![]() icon.
icon.
Right-click anywhere in the graphics area, point to CAD, Lines, and click Continuous.
The parameters display in the ![]() Data Entry tab
of the Data-CAM Tree Manager.
Data Entry tab
of the Data-CAM Tree Manager.
![]() Select the check box to sketch only horizontal and/or vertical lines.
After selecting the line start, you can move the mouse pointer horizontally
or vertically in either direction and the line only follows the pointer
movement that is parallel to that direction.
Select the check box to sketch only horizontal and/or vertical lines.
After selecting the line start, you can move the mouse pointer horizontally
or vertically in either direction and the line only follows the pointer
movement that is parallel to that direction.
![]() Clear the check box to allow free sketching meaning the line always follows
the screen position of the mouse pointer.
Clear the check box to allow free sketching meaning the line always follows
the screen position of the mouse pointer.
The Data Entry parameters are used to create lines or modify the coordinate values of the active line and/or current line that is sketched in the graphics area. When the mouse pointer is in the graphics area, these values update to the current screen position.
TIP: When you move the mouse pointer into the graphics area, the data entry values are updated to the current screen position. You should keep the mouse pointer in the Data Entry Manager, until you click OK, to avoid changing the Current Point values you have entered.
You can type values to create the first or current point, or you can modify the end point of the preview entity. When creating or modifying the current point, you can either click OK or sketch the next point to finish the current point. This group provides two sets of coordinate values: Absolute and Incremental.
Absolute
The Absolute group allows you to define the current point as an absolute value in reference to the Active UCS.
X - sets the X-axis location of the current point.
Y - sets the Y-axis location of the current point.
Z - sets the Z-axis location of the current point.
Incremental
The Incremental group allows you to define the current point as an incremental value from the Previous Point.
X - sets the amount of change in the X-axis from the previous point.
Y - sets the amount of change in the Y-axis from the previous point.
Z - sets the amount of change in the Z-axis from the previous point.
The Previous Point displays the coordinate values for the last point that was created in the graphics area, whether by data entry or sketching, in reference to the Active UCS. These values can only be edited after clicking a location in the graphics area. If you use only data entry, these values are unavailable. The previous point is always the start point of the preview entity, which after sketching the first two points, is the same as the end point of the active entity.
X - sets the X-axis location of the previous point.
Y - sets the Y-axis location of the previous point.
Z - sets the Z-axis location of the previous point.
1 Open the function and click a snap point or anywhere in the graphics area to set the start point of the line.
You can modify the snap increment value or turn it off while selecting start and end points.
When you move the pointer, the CAD preview displays.
2 With Dynamic Drawing, you can now modify the Previous Point, and/or the Current Point using data entry.
The Previous Point is the one you sketched and the Current Point is not yet defined. It is shown by the CAD preview.
3 After changing the Data Entry parameters, click OK to set the Previous Point, and click OK again to set the Current Point.
TIP: When you move the mouse pointer into the graphics area, the data entry values are updated to the current screen position. You should keep the mouse pointer in the Data Entry Manager, until you click OK, to avoid changing the Current Point values you have entered.
You can update one or both values, or you can continue sketching in the graphics area.
4 Once the first line is defined, the end point of the active entity becomes the Previous Point, and the CAD preview displays the Current Point.
5 Continue this process using any combination of sketching and/or data entry to create a continuous chain of lines.
6 To finish the current line and start a new line, you can click OK or press Spacebar.
7 To close the function, click Cancel.
You can also create lines using only data entry. Keep in mind that you are creating points for each line: the start point and the end point. When using data entry, you click OK once for each point that you create.
1 Open the function and type values for the Current Point.
2 Click OK to set the start of the line which automatically populates the Previous Point values.
3 Update the Current Point values using an Incremental or Absolute value and click OK to create the first line.
TIP: If you move the mouse pointer into the graphics area, the data entry values are updated to the current screen position. When using the data entry method, you should keep the mouse pointer in the Data Entry Manager, until you click OK, to avoid changing the values you have entered.
4 Type values for the Current Point, and click OK to create the next line.
5 Repeat this process for as many lines as needed.
If you click OK without changing the previous values, the current continuous line is finished and you can start a new continuous line.
6 To close the function, click Cancel.
1 Open the function and click a snap point or anywhere in the graphics area to start the sketch.
You can modify the snap increment value or turn it off while selecting start and end points.
2 Click a snap point or anywhere to set the end of the first line entity.
3 Click a snap point or anywhere to set the end of the next continuous line entity.
4 Repeat Step 3 as many times as needed to create a continuous chain of lines.
5 To finish the current sketch, press Spacebar.
6 Click to start the next sketch, or click Cancel to close the function.