Multiaxis Finishing Example 2
Introduction
This tutorial explains how to create a Multiaxis Finishing feature and adjust the contact point to maintain smooth tool motion.
Example File
The part file for this tutorial is available for download at: http://www.bobcad.com/helpfiles. If you are connected to the Internet, you can click the link provided to download and save the Multiaxis Finishing Example 2.SLDPRT zip file. After extracting the zip file, you can then open the example file to use with this tutorial. In the example file provided, the Tool Crib is already equipped with the necessary tools, the stock and Machine Setup are already defined, and a roughing operation has prepped the part for the finishing operations. The part is simulated using the BC_Hermie_C20U machine.
In this example, you create toolpaths that can be used to finish the floor and the walls of the part.

Section 1) Floor Finishing
Part 1) Add the Feature
-
 CAM Tree tab.
-
Right-click
 Machine
Setup and click Mill Multiaxis.
Machine
Setup and click Mill Multiaxis. -
In the Multiaxis Wizard, click Mulitaxis Machining.
-
Click Next>> to go to the Posting dialog box.
Part 2) Define the Posting Parameters
-
The Work Offset # is automatically set to the value defined in the Machine Setup dialog box.
You can change the value here to update the Work Offset # for the feature. -
Click Next>> to go to the Multiaxis Posting dialog.
Part 3) Define the Multiaxis Posting Parameters
-
Notice, at the top of the dialog box, that the Use Machine Settings check box is selected.
This means that the Multiaxis Posting parameters for the feature use the same parameters as the machine that is selected in Current Settings.
You can clear the Use Machine Settings check box to define the Multiaxis Posting parameters of the feature separately from the current machine settings.
An example usage is explained later. -
Click Next>> to go to the Tool page.
Part 4) Select the Roughing Tool
-
Click the Tool Crib button.
The Tool Crib dialog appears. -
Select the ENDMILL FINISH tool type on the left of the dialog to show the tapered tools available in the Tool Crib.
-
Highlight the 0.2500 Diameter tool and click OK.
The Tool Crib dialog disappears. -
Click Next>> to go to the Parameters.
Part 5) Surface paths
-
In the Pattern group, set Machining to Floor finishing.
-
In the Sorting group, change the Cutting Method to Spiral.
-
In the Stepover group, change the Maximum stepover to 0.02.
Part 6) Part definition
-
Click the Part definition tab.
-
Click the ellipses button next to Part surfaces.
The Re/Select Geometry dialog appears. -
Select the check box for Select whole bodies and select the model.

-
Click OK.
The Mill Multiaxis Wizard returns. -
Click the ellipses button next to Floor surfaces.
The Re/Select Geometry dialog appears. -
Select the bottom of the part as seen in the image below.

-
Click OK.
The Mill Multiaxis Wizard returns. -
Click the ellipses button next to Wall surfaces.
The Re/Select Geometry dialog appears. -
Select the walls of the part as seen in the image below.

-
Click OK.
The Mill Multiaxis Wizard returns. -
Click Compute.

Part 7) Simulation
For more help using simulation, view Getting Started with Simulation.
-
To view the program, in the Quick access menu of the CAM Tree, click
 Simulation.
 -
Click Play to view the Roughing operation in simulation.
This will allow you to ensure this operation is free of collisions.

-
To close simulation, in the
 Exit Simulation.
Section 2) Wall Finishing
Part 1) Copy and Paste the feature
-
In the CAM Tree, right-click the Feature Multiaxis and select Copy with Geometry.
-
Right-click the feature again and select Paste.
-
Right-click the feature that was copied and select Rename.
-
Update the name to Floor Finish and press Enter.
Part 2) Adjust the Parameters and Compute
-
Right-click our pasted feature and select Rename.
-
Update the feature name to Wall Finish and press Enter.
-
Right-click Wall Finish and select Edit.
The Mill Multiaxis Wizard appears. -
Click Parameters in the tree on the left.
-
In the Pattern group, update Machining to Wall finishing.
-
In the Sorting group, change Cutting Method to One way.
-
Click Compute.

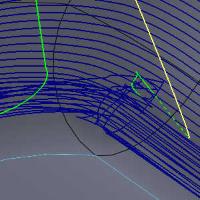
Zoom into the corner and notice the toolpath.
Part 3) Simulation
-
To view the program, in the Quick access menu of the CAM Tree, click
Simulation. -
Click Play to view the Roughing operation in simulation.
In this case we can see the wall is finished nicely without gouges.
But we can see wild swings in the corners while machining the fillet:


-
To close simulation, in the
Exit Simulation.
Part 4) Update the feature
-
Right-click Wall Finish and select Edit.
The Mill Multiaxis Wizard appears. -
Click Parameters in the tree on the left.
-
Click the Tool axis control tab.
Notice the values in the Relative contact point height on tool profile group.
|
Preferred: 0.5 Minimal: 0.4 Maximal: 0.6 |
Preferred: 0.5 Minimal: 0.2 Maximal: 0.8 |
Preferred: 0.5 Minimal: 0.1 Maximal: 0.9 |
Preferred: 0.5 Minimal: 0 Maximal: 1 |
|

|

|

|
Notice the differences in toolpath depending on the Minimal and Maximal values used above.
This is due to allowable contact point used on the surface. The contact point is represented as a value between zero and one as seen below. 
In this case, set the values as follows:
- Minimal - 0
- Maximal - 1
- Click Compute.
Part 5) Simulation
-
To view the program, in the Quick access menu of the CAM Tree, click
Simulation. -
Click Play to view the Roughing operation in simulation.

In this case we can see the wall is finished nicely without gouges. -
To close simulation, in the
Exit Simulation. -
In the File menu, click Save.
This concludes the example.