


Getting to Know the User Interface (UI)
Introduction
This topic will introduce you to the User Interface, provide a short explanation of each component, and provide links to the main topic of particular components where applicable.
The User Interface
There are
| Interface Key | |
|---|---|
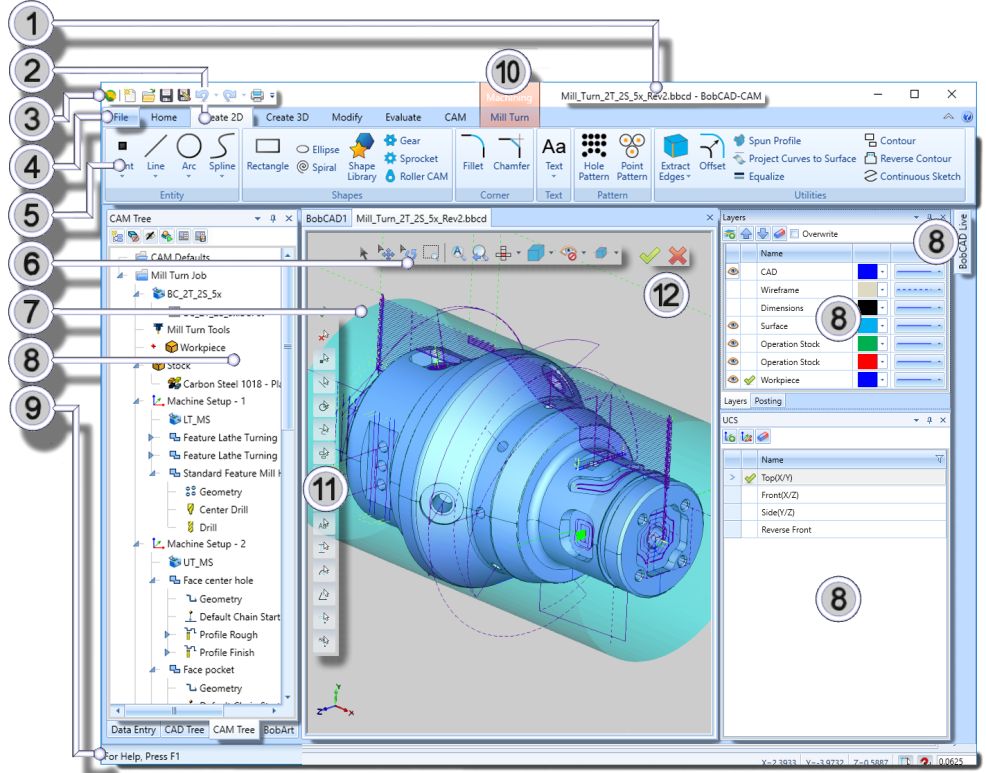
| 1. Title Bar | The title bar shows the name of the file currently open in the graphics area. |
| 2. Ribbon Tab | The Ribbon Tabs allow you to activate one ribbon at a time. Click Introduction to Ribbons for more details. |
| 3. Quick Access Toolbar | The Quick Access Toolbar gives you access to basic file options. Click The Quick Access Toolbar for more details. |
| 4. Backstage | The Backstage is where all the file options, Themes, Help options, Settings Part and Default, User Profiles, and keyboard shortcuts can be found. Click Introduction to the Backstage for more details. |
| 5. Ribbon | The Ribbons give you access to various functions. Click Introduction to Ribbons for more details. |
| 6. Document Toolbar | The Document Toolbar keeps all of your view options right inside the graphics area. |
| 7. Graphics Area | The Graphics Area is the visual interface between the user and the file. Will show all CAD, and Toolpath data. Click The Graphics Area for more details. |
| 8. Docking Pane | The Docking Panes include all managers: Data Entry, CAD Tree, CAM Tree, Operation Manager, BobART, BobCAD Live, Layers, UCS, Posting, and Measure. Click Introduction to Docking Panes for more details. |
| 9. Status Bar | The Status Bar displays the steps of the current operation, shows the mouse position, and allow you to set a Snap Increment, along with the active Color, Line Style, and Unit. Click The Status Bar for more details. |
| 10. Contextual Tab | The Contextual Tab will show Job related options when you click on the job in the CAM Tree. Click Introduction to Contextual Ribbons for more details. |
| 11. Selection Masks | A toolbar that remains in the graphics area to allow access to all selection masks. These commands are used to determine what entity types are able to be selected. See the Selection Mask section of The Home Ribbon topic for more information. |
| 12. OK and Cancel | The OK and Cancel button are also located directly in the graphics area to allow them to be accessed with ease. |
Tip: When entering values into the text fields, mathematics can be used. To find out more, see the Math Functions topic.