 Patterns
Introduction
This topic will explain the options found in the Patterns page of the Profile Rough, and also provides links to related topics.
The Patterns page
The patterns page allows you to choose a pattern for the cuts, and also gives you control of the compensation used.
Patterns
-
 Standard- creates a toolpath for cutting the perimeter of one or more
contours at a constant depth. (This is the only option available for
Finish operations.)
Standard- creates a toolpath for cutting the perimeter of one or more
contours at a constant depth. (This is the only option available for
Finish operations.)

- Apply Tabs - when tabs have been created on the Tabs page of the Mill 2 Axis Wizard, the Apply Tabs check box will appear when the Standard Pattern is selected.
 - Tabs will be applied to this operation.
  - Tabs will not be applied to this operation.
- Apply Tabs - when tabs have been created on the Tabs page of the Mill 2 Axis Wizard, the Apply Tabs check box will appear when the Standard Pattern is selected.
-
 Contour
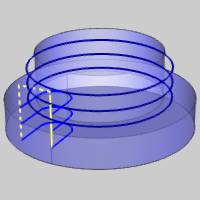
Ramping - creates an uninterrupted continuous step down, or
a spiral type toolpath. Set the cut Angle or Depth per Pass in the
Parameters section of the wizard.
Contour
Ramping - creates an uninterrupted continuous step down, or
a spiral type toolpath. Set the cut Angle or Depth per Pass in the
Parameters section of the wizard.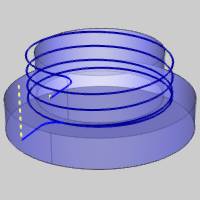
-
Side Roughing- is used when excessive stock remains on the part, and you
want to have the tool step into the feature in specified increments.
This option allows you to create multiple passes by offsetting the
target profile instead of creating a single pass from the profile.
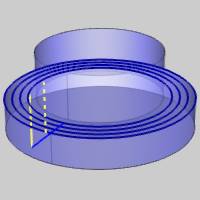

- Stock Remaining-
sets the total amount of material that exists for the side roughing
operation.
- Number of Passes - sets the number of passes applied to the operation. The Stock Remaining value is divided by this value to determine the stepover distance of each pass.
- Stock Remaining-
sets the total amount of material that exists for the side roughing
operation.
Compensation
System Compensation
With this option On, the system offsets the geometry by the tool radius. With this option Off, you should use Machine Compensation.
- Off - the toolpath is calculated from the center line.
- Left - the toolpath is calculated to the left of the selected contour.
- Right - the toolpath is calculated to the right of the selected contour.
Machine Compensation
These options only effect the output in the posted code.
- Off - the toolpath is calculated from the center line.
- Comp Left (G41) - the toolpath of the operation represents the center of the cutter. The post processed code includes the command for cutter compensation to the left of the contour.
- Comp Right (G42) - the toolpath of the operation represents the center of the cutter. The post processed code includes the command for cutter compensation to the right of the contour.
*For more information on how to use compensation, see the Compensation topic.
Related Topics
Clicking Next> > takes
you to the next page of the Mill 2 Axis Wizard. To move to the corresponding
topic, click the appropriate link below.
The Profile Rough Parameters page
The Profile Finish Parameters page
The Pocket Parameters page
The Facing Parameters page
The Engrave Parameters page
The Chamfer Mill Parameters page
The Plunge Rough Parameters page
The Corner Rounding Parameters page