Pocketing is one of the most common types of Toolpaths that any job shop manufacture will turn to in their daily projects. Whether you are new to using CAD-CAM software or a seasoned programmer, you’ll want to know where these options are and how to use them. The advantages of using offline programming software for job shop manufacturers can be found in the additional cutting options offline CAD-CAM systems like BobCAD have to offer.
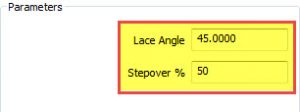
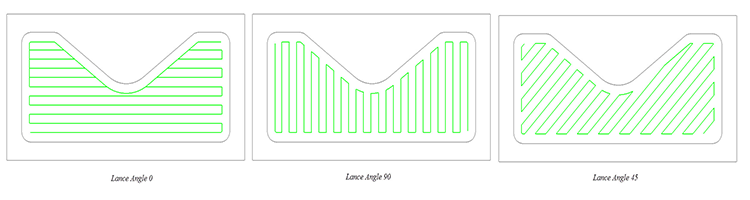
1- Zig Zag
This classic pocketing Toolpath has been around for years and is still very popular for its direct style pattern. Users define the lace angle and Stepover to control how aggressive the tool is engaged with material and the direction of cut.
Zig Zag Pocketing does offer a special feature that can help woodworking applications. Programmers can choose a final contour pass to run before or after the pocket pattern. This cleanup pass is helpful to run first while most of the material is left on the part, this way your smaller islands do not “chip” away.
Pro Tip: Another CAD-CAM advantage of Zig Zag pocketing is the ability to use up to 100% Stepover.
2/3- Offset-In/ out
Offset pocketing is also a classic pocketing pattern used by job shop manufactures all over the world. Programmers define a Stepover % (a different way to describe Stepover would be width-of-cut or WOC) to control how aggressive the tool will be engaged with the material. With offset pocketing, the users choose from offsetting-in or offsetting-out, controlling which direction the tool works its way in our out.

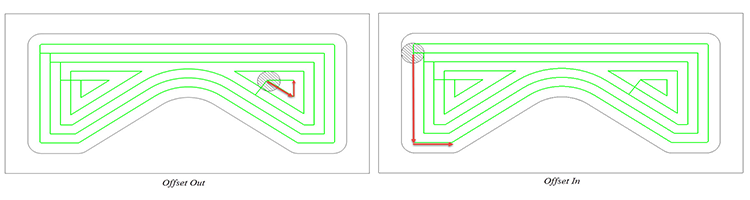
Pro Tip: Offset style pocketing is best used with a Stepover % less than ½ the cutter.
4- Spiral Pocket
This very popular conversational pocket pattern has made its way into modern CAM software because of how practical and useful a true spiral pocket can be. Spiral pocketing can only be used in circular geometry, that means arcs/diameters only! Users define a direction by choosing offset-in or offset-out. To control how aggress the tool engages the material, a Stepover % is used.
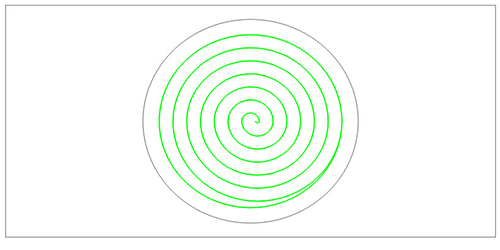
Pro Tip: Spiral pocketing uses arc segments in your G-code so you’ll have short, efficient, smooth running toolpath.
Subscribe to BobCAD-CAM's CNC Software Blog
Join your fellow manufacturers! Get BobCAD-CAM’s latest CAD-CAM articles straight to your inbox. Enter your email below:
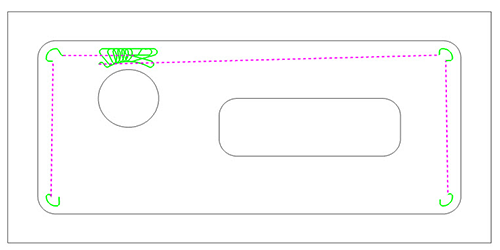
5- Advanced Pocket
Advanced pocketing is another offset-style pocket with a twist. All other pocketing Toolpath will remain inside the boundaries you select, whereas advanced pocketing can start outside of the pocket boundary, which is why it’s also known as an “Open Pocket”. Programmers define a stepover % just like the other pocket Toolpaths.
How do you define the “open” area of the pocket?
BobCAD uses a dotted line boundary to define the “open” areas of the pocket boundary.
Pro Tip: Advanced pocketing support outside in “open pocketing” and inside out “open pocketing”
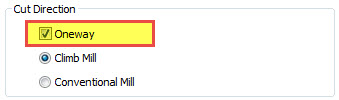
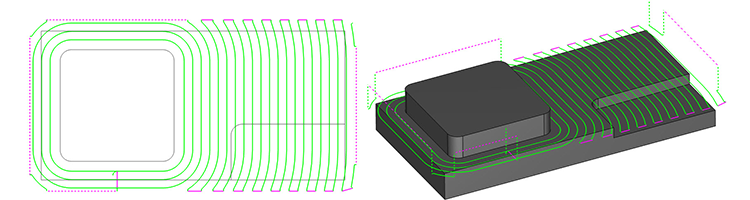
6- Adaptive Pocket
What pocketing pattern supports 2X diameter cutting, up to 100% Stepover, high-speed machining and power milling? Adaptive pocketing does, which is a form of trochoidal milling. This efficient cutting pattern uses smooth transitions in and out of the cut, allowing for some amazing material removal rates! Some users have cut cycle times but as much as 70% by using this pocketing pattern alone. Adaptive pocketing gives the users independent Stepover control for climb and conventional passes. They also can control how small areas are that they want to drive the tool into when controlling the Minimal Curvature Radius.
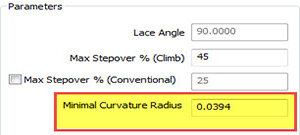
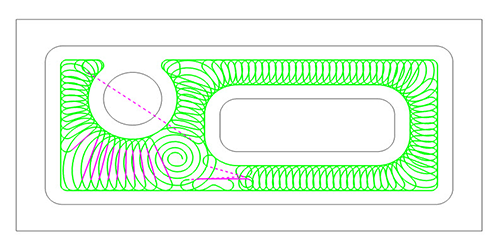
Pro Tip: When first using adaptive pocketing, use the same Stepover speeds and feeds you’d use with an offset pocket. This starting point will help you release how much more you can push your machine using this very modern pocketing Toolpath.
7- Rest Roughing
How do you clean up material left in the corners of your part where larger tools didn’t fit? Rest roughing! This pocketing pattern allows programmers to target material left behind by the previous cutter. Rest roughing can be created as either an offset pattern or an adaptive pattern.
How does the software know what the previous cutter was?
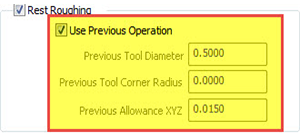
The previous tool information is loaded automatically, with the control to override settings as needed.
Pro Tip: By adjusting the previous tool diameter you’ll change where the software “thinks” there is material. You can use this to create more overlapping Toolpath.
You’re one click away from subscribing to BobCAD’s YouTube channel. Click the link below for tips, how-tos and much more!
Summary
Article Name
7 CAD-CAM Software Pocket Types and How They Work
Description
Pocketing is one of the most common types of Toolpaths that any job shop manufacture will turn to in their daily projects. Whether you are new to using CAD-CAM software or a seasoned programmer, you’ll want to know where these options are and how to use them.
Author
Michael A. Downss
BobCAD-CAM Software