Tech Tuesday is a weekly blog that addresses some of the most common questions and concerns that I hear throughout the previous week from users of BobCAD-CAM software. Both customers and future customers are more than welcome to leave a comment on what they would like to see covered for the following Tech Tuesday. Enjoy!
Machining off our 3D models is a faster and easier way to set up and program. Being able to select the whole model and let the software find where to cut for you is a huge time saver. This eliminates the need to select and define multiple boundaries. Let’s take a look at some of the tools you can use to get the most out of your toolpath, ensuring you’re getting the results you expect from your CAM software.
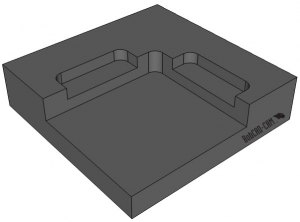
Here is the sample file we are working on today. As you can see, there are 3 open pockets that need to be machined.
You could machine this part using 2D toolpaths. BobCAD offers 7 types of pockets, one of which is Advanced Pocketing. This 2D toolpath supports open pocketing, which gives the user the control to define where they want the tool to start off of the part, eliminating tool plunges in the material.
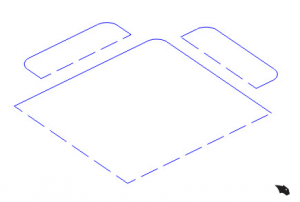
Open pockets require you to create wireframe geometry and dotted lines to define the open areas for the tool to lead in from. To set up this part for 2D Milling, you’ll prep your boundaries to look like this.
Because there are 2 different pocket depths, you’ll need to use 2 pocket features to program this job.
Subscribe to BobCAD-CAM's Tech Tuesday Blog
Join your fellow machinists. Get the latest Tech Tuesday CAD-CAM articles sent to your inbox. Enter your email below:
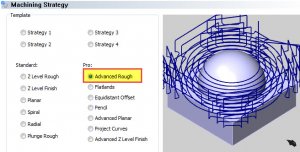
Is there a faster way? Yes. Using BobCAD’s Advanced Rough toolpath. This is an extremely popular 3D toolpath and is the workhorse for many job shop manufacturers. Customers repeatedly tell us how much they like this toolpath and how powerful it is.
Using the Advanced Rough toolpath has a slightly different workflow than using 2D toolpaths. To start, we can select the whole model and apply your roughing paths to it vs. having to create multiple boundaries to program the different depths of the pockets. This in itself is a huge time saver, but there’s more!
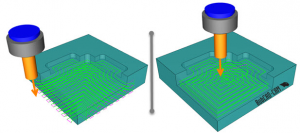
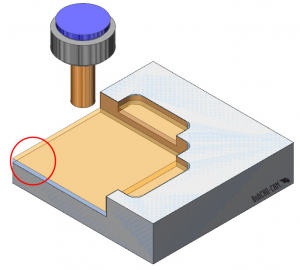
Advanced Rough is stock aware. Meaning it looks at the part model & the stock geometry and will start off the part, working its way in automatically.
Unlike BobCAD’s Standard Z level Rough, which will use the stock geometry as a center line boundary for the tool to follow.
Another powerful feature of Advanced Rough is the toolpath patterns you can choose from.
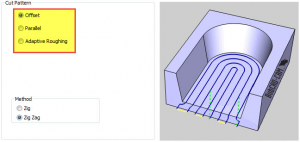
You can choose from an offset style pattern, parallel pattern or adaptive pattern. Users can control if the tool is cutting single direction or bi-direction with the Zig or Zig-Zag option.
So, at this point, we know when using Advanced Rough that we are using stock aware toolpath and the tool will start off the stock and work its way in. We also know we didn’t have to define the depth of our pocket in order to machine them.
Let’s take a look at simulation and see what our result looks like.
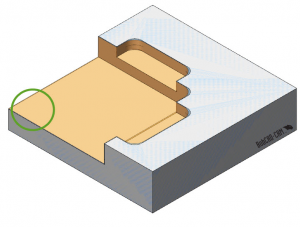
As you can see, it appears that we have more stock on the floor than we want; why is this?
The first thing we want to check is the allowance. This is the setting you use to leave stock for finishing. When using Advanced Rough users can choose from 2 allowance settings. The first choice is a global allowance which leaves a uniform amount of stock in X, Y, Z.

The second choice makes it so you can set a side & bottom allowance.
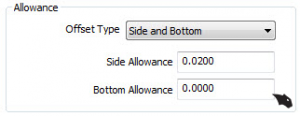
This allows you to leave different amounts of stock on the walls and floor. In our example, we used a global allowance of .02.
So, why do we have so much stock left on the floors of our part? The reason is simple; let’s look at our depth of cut (DOC) setting.
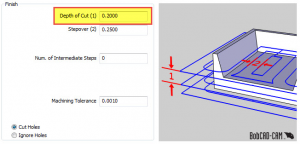
Our DOC is now set to .200. Now let’s take a look at our floor heights.
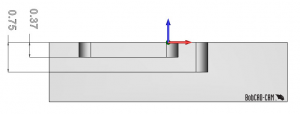
As you can see, our floor heights are not an increment of the DOC. This is the reason we have extra stock left of the floors.
If your floors are not an increment of the DOC, then there will be extra stock left.
Now, you can change the depth of cut setting to be an increment of floor geometry, which will work in some scenarios but not in all.
Are there any other options we can use to address this issue?
Yes, Advanced Rough has a special option to handle this scenario.
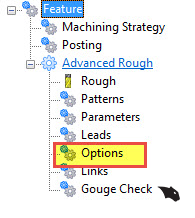
In this section of the toolpath wizard, you see a checkbox for Machine Flatlands. In order to ensure that our floors are being machined and left with the desired amount of stock for finish, we will use this option.
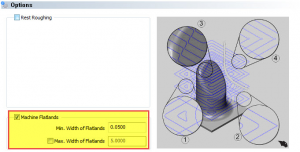
With Machine Flatlands checked, the software will find these floor heights and machine them, leaving the defined stock allowance.
If you would like to download this file for testing, use this link. Thanks again for reading another Tech Tuesday; see you next week!
Start your Test Drive.
Have questions? Call us at 877-838-1275.
You’re one click away from subscribing to BobCAD’s YouTube channel. Click the link below for tips, how-tos and much more!
To see if BobCAD’s Mill Turn software is right for your shop,
Summary
Article Name
Tech Tuesday: Save Time Using Your CAM Software’s Advanced Roughing with Flatland Detection
Description
Machining off our 3D models is a faster and easier way to setup and program. Being able to select the whole model and let the software find where to cut for you is a huge time saver. This eliminates the need to select and define multiple boundaries. Let’s take a look at some of the tools you can use to get the most out of your toolpath, ensuring you’re getting the results you expect.
Author
Michael A. Downss
BobCAD-CAM Software